How to create interactive checklists in Notes for iOS 9
 Marty Edwards
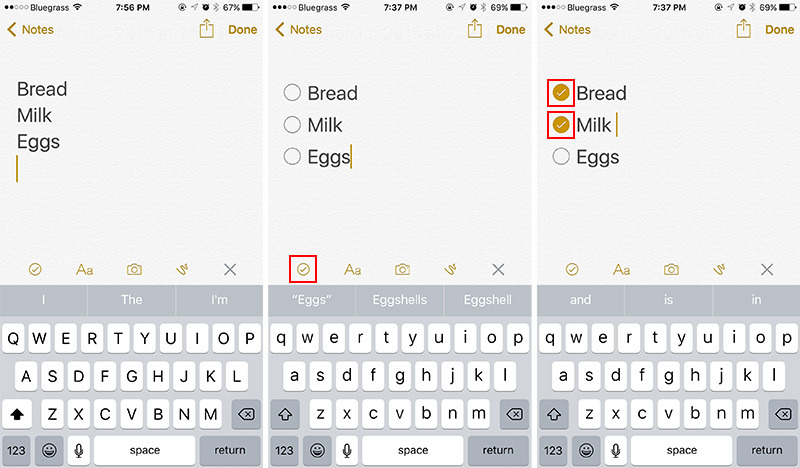
With Notes for iOS 9, Apple packs in a slew of powerful new features like deeper share sheet integration and drawing tools, but one of the most useful additions is the ability to create interactive checklists on the fly.
To create a new checklist from scratch, open Notes and click the pencil and pad icon at the lower right of the screen. On the new note screen, just above the soft keyboard (or at the bottom-right of the note boundary) is an action menu button represented as a gray circle with a plus sign. This small icon is the hub from which you can create checklists, format text, and insert pictures and drawings.
First, tap the action button, then select the checklist button represented by an encircled checkmark. An empty circle should appear in the note, after which your first item can be entered. This circle is interactive; tapping it will enter in a tick mark, offering visual confirmation that a task has been completed.
Alternatively, empty checklist buttons can be inserted after the fact by placing the cursor over a line of text and clicking on the checklist button in the action menu. Similarly, highlighting multiple lines of text and tapping the checklist button will create a multi-item list.
Checklists work perfectly for shopping. Lists can be imported by performing a copy and paste operation on text from emails, messages and other apps, then turned into an interactive checklist using the methods above. While shopping, simply tap the circle next to an item to tick it off the list.
Even though Notes is not yet a collaborative app, you can easily share formatted checklists with friends via email, Messages and more by tapping on the share button in the top-right corner of the screen. Further, activating iCloud syncing in Settings > iCloud > Notes automatically sends notes and real time changes to all your iOS and Mac devices.


 Wesley Hilliard
 Andrew Orr


 Amber Neely

 William Gallagher