
The Most Versatile VoIP Provider: FREE PORTING

 JUST RELEASED: Visit the Incredible PBX Wiki
One Minute Wonder: It’s Incredible PBX for Proxmox 7
What a difference a decade makes! We haven’t spent much time with Proxmox for well over a decade so we decided to experiment with a new server and the latest Proxmox 7.4 release to see how things have changed. And it was quite a surprise. Not only has the hardware footprint changed dramatically, but the Proxmox software itself is like a new animal. If you haven’t explored Proxmox lately, we would encourage you to give it a careful look before deciding on a virtual machine platform. In this tutorial we’ll cover everything you need to get started both with Proxmox and with Incredible PBX 2027.
Hardware Options for the Proxmox Server Platform
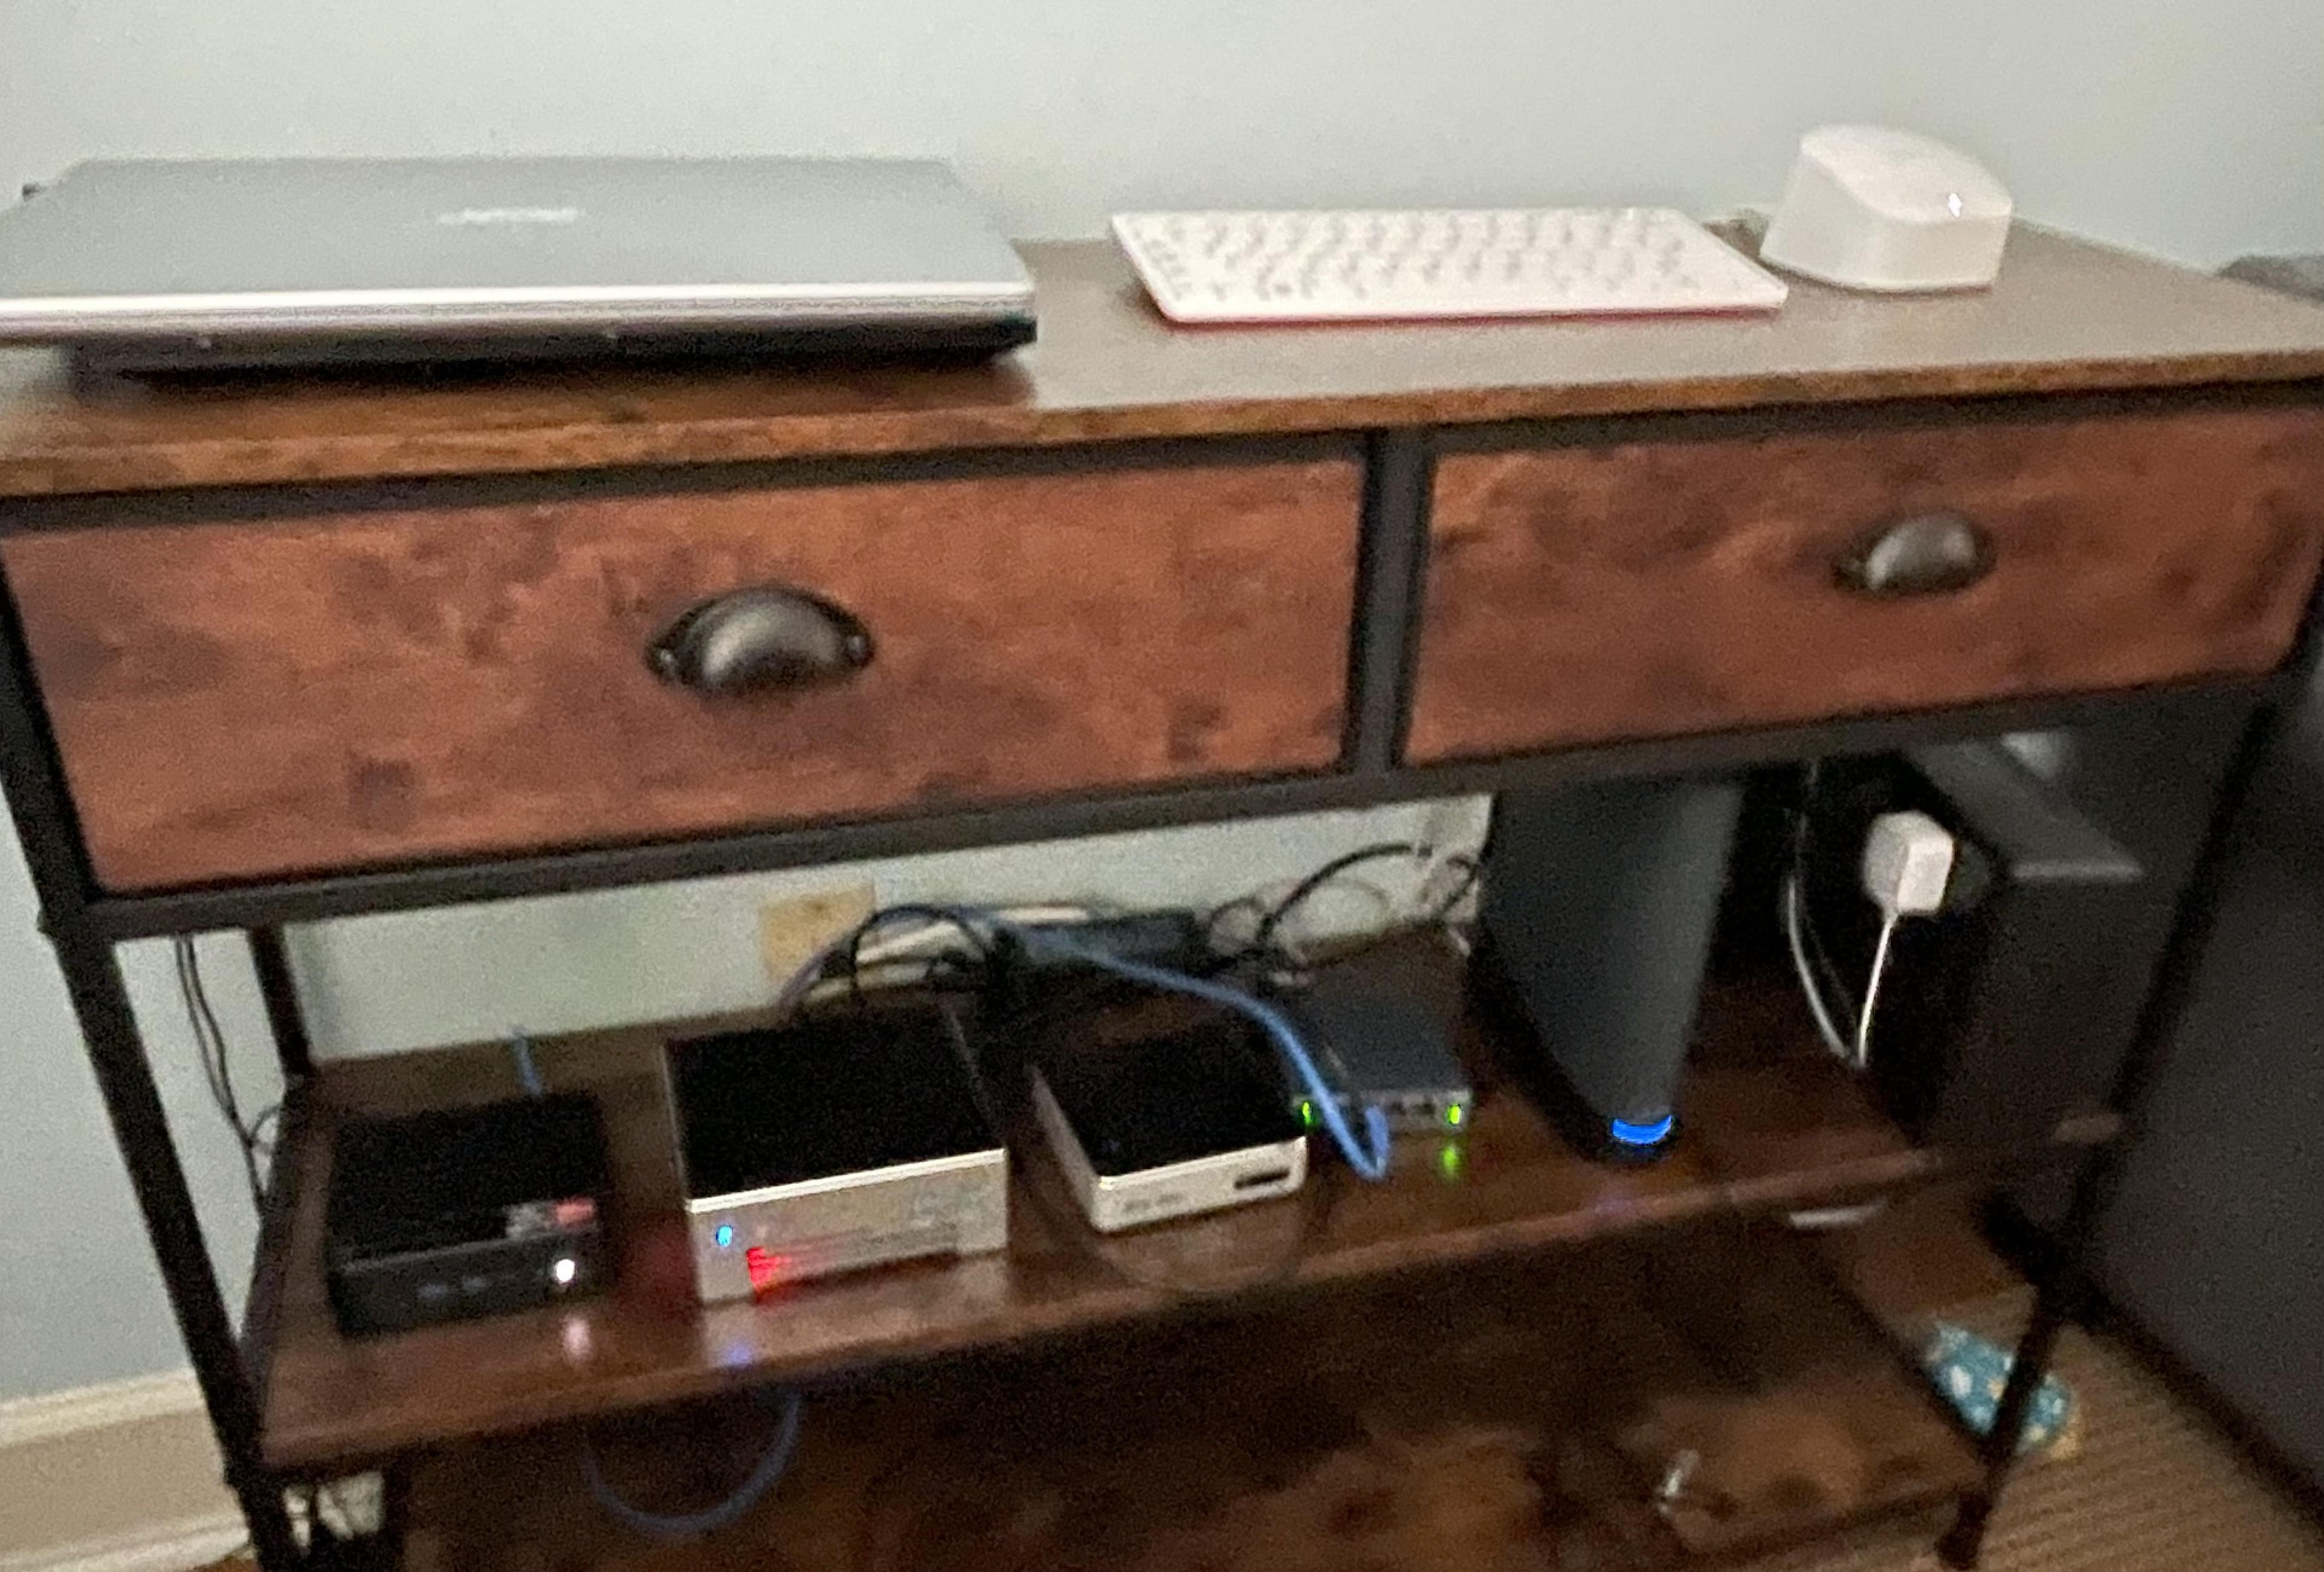
We do most of our shopping on Amazon not only because it’s cheap and easy but also because they financially support our projects through referral revenue. If those considerations bother you, feel free to do your own research. For this review, in terms of requirements, we were looking for a small-footprint, quiet machine with a robust processor, lots of RAM, and ample disk space. Our office has about a foot of remaining space in a bookshelf that already houses a UPS, two Internet routers, three notebook PCs (Windows 11, MacBook, and System76), a VMware ESXi server, a combination WEBDAV/SAMBA server, and a Raspberry Pi 400.
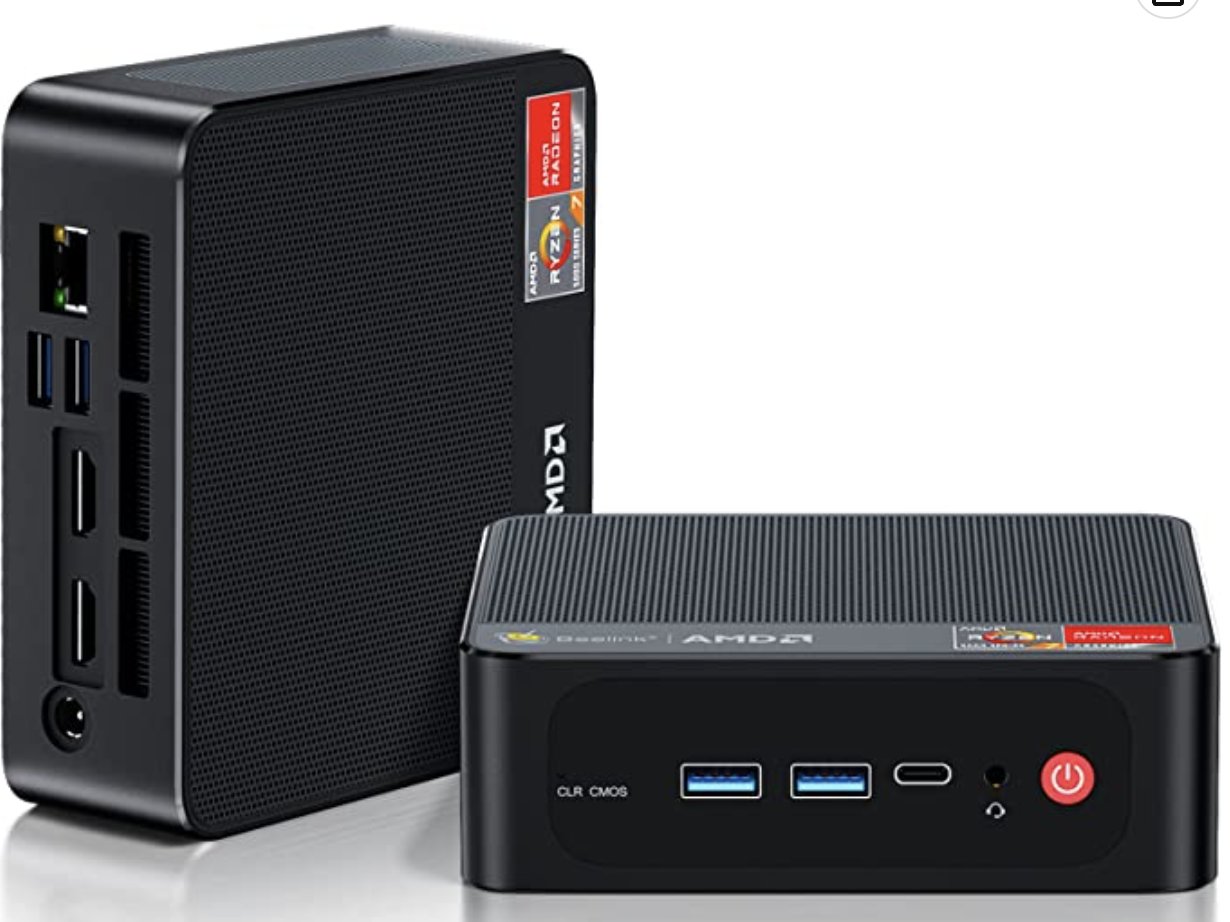
We narrowed the search down to Beelink’s SER5 Pro (shown above) with an AMD Ryzen 7 5800H 8 Core CPU(Up to 4.4GHz) with 32GB DDR4 RAM, and a 500GB NVME M.2 SSD for $429 and the ASUS PN52 Mini PC, AMD Ryzen 9 5900HX(8C/16T, Up to 4.6GHz) with 32GB DDR4 RAM, and a 512GB PCIe SSD for $699. Both are shipped with Windows 11 which was the major issue since we wanted to run Proxmox natively. From reading everything we could find on the web, it sounded as if the Beelink stumbled if you attempted to run any Linux flavor other than Ubuntu 20.04. So we gambled and ordered both machines knowing we could return either or both of them at no cost if Proxmox wouldn’t install. Gotta love Amazon!
Because the Beelink machine was $270 cheaper, we decided to start our testing there. To our surprise, pressing DEL on bootup to access the BIOS let us reconfigure the boot mode from UEFI to LEGACY with one click and reorder the boot order to first boot from a USB stick, neither of which we were able to do on our recently purchased Acer Aspire 5 notebook PC.
Installing the Proxmox 7 Server Platform
We began by downloading the Proxmox 7.4 ISO. Then we burned it to a USB flash drive using Balena Etcher. When we powered on the Beelink machine after inserting the USB stick and plugging in a network cable, keyboard, mouse, and monitor, presto! The Proxmox installer appeared, and Proxmox installed without a hitch. We quickly logged in as root via SSH and ran: apt update | apt dist-upgrade. We added Proxmox free repo to /etc/apt/sources.list: deb http://download.proxmox.com/debian/pve bullseye pve-no-subscription. Next, we deleted the commercial repo from /etc/apt/sources.list.d. And reissued: apt update. Finally, we removed the subscription nag by following this tutorial. That got everything squared away. And we were ready to log into the web portal at https://server-ip:8006 using the root password we set up as part of the install.
A Word to the Wise: Keep your Proxmox server behind a hardware firewall unless you’re a savvy network administrator.
Interacting with the Proxmox Server
There are two basic ways to administer your Proxmox server, either through the Linux command line interface (CLI) or using the Proxmox GUI. With the CLI, you will probably want to enable root logins using SSH. With the GUI, you will access it using a browser pointed to the IP address of your server at port 8006: https://server-ip:8006. With both CLI and GUI access, login as root with the password you set up when you installed Proxmox.
Installing Linux ISOs on Proxmox Server
We always like to begin our setup of virtual machine platforms by installing the ISOs for Debian 11, Ubuntu 22.04, and Rocky 8. CAUTION: Even though Ubuntu 22.04.2 is now available, the Ubuntu 22.04.1 ISO was necessary to install earlier releases of Incredible PBX 2027-U. To be on the safe side, install both flavors so they will be available for other tasks.
In the Proxmox portal, navigate to Folder View -> Storage -> local -> ISO Images. You can begin by either downloading the desired ISO images to your desktop and then clicking Upload. Or you can download the ISO images directly from the web by clicking Download from URL. Here are the direct ISO links for Debian 11.7.0, Ubuntu 22.04.1, Ubuntu 22.04.2, and Rocky 8.8. Please note that new ISO images are released regularly which means these links will fail at some point in the future. Please let us know if you discover it first by sending a kind note to support [at] incrediblepbx.com. If you’re in a hurry, try bumping up the value in the point release of the download link. Or download these versions from the new Incredible PBX Repo.
Installing Linux Containers on Proxmox Server
For slightly better performance by sharing the kernel instance with the physical server, you may wish to use Containers instead of Virtual Machines. If you’re familiar with OpenVZ templates, Proxmox Containers are nearly identical. The downside is you cannot migrate LXC Containers. Play with both and choose for yourself. To install Debian 10 and 11, Ubuntu 22.04, and Incredible PBX 2027-U Container templates, here’s how. Log into your Proxmox CLI as root and issue these commands:
pveam update
pveam available
pveam download local debian-10-standard_10.7-1_amd64.tar.gz
pveam download local debian-11-standard_11.6-1_amd64.tar.zst
pveam download local ubuntu-22.04-standard_22.04-1_amd64.tar.zst
cd /var/lib/vz/template/cache
wget -O incrediblepbx2027U.tar.zst https://bit.ly/3nxswhc
We’ll cover how to create an Incredible PBX 2027-U Container from a template below.
Installing Incredible PBX 2027-U on Proxmox Server
Now for the fun part. Once you deploy the latest Incredible PBX 2027-U image on your Proxmox server, your VMs will be up and running in less than a minute. Here are the steps. Begin by logging into the command line interface (CLI) as root. Then issue the following commands using a unique number for the virtual machine image you wish to create, e.g. 777:
cd /var/lib/vz/dump
wget -O vzdump-qemu-ipbx2027u.vma.zst https://bit.ly/42v7RcB
# verify MD5 checksum: 8f86465e88ce3dfcf7b510bdc3b60393
md5sum vzdump-qemu-ipbx2027u.vma.zst
# create virtual machine with unique VM number, e.g. 777
qmrestore vzdump-qemu-ipbx2027u.vma.zst 777
To create additional VMs, you can either issue the qmrestore command above with a different VM number while positioned in the CLI at /var/lib/vz/dump, or you can create them in the GUI by navigating to Server View -> proxmox -> local and choosing Backups. Then highlight the vzdump-qemu-ipbx2027u.vma.zst backup image and click Restore. Now give the new VM a unique number and then click Restore to build the virtual machine.
Installing Incredible PBX 2027-D on Proxmox Server
To deploy the latest Incredible PBX 2027-D image with Debian 11 on your Proxmox server, issue the following commands from the CLI:
cd /var/lib/vz/dump
wget -O vzdump-qemu-ipbx2027d.vma.zst https://tinyurl.com/y8uucckd
# create virtual machine with unique VM number, e.g. 777
qmrestore vzdump-qemu-ipbx2027d.vma.zst 777
Create additional VMs using the steps documented in the previous section.
Installing Incredible PBX 2027-R on Proxmox Server
To deploy the latest Incredible PBX 2027-R image with Rocky 8 on your Proxmox server, issue the following commands from the CLI:
cd /var/lib/vz/dump
wget -O vzdump-qemu-ipbx2027r.vma.zst https://tinyurl.com/5n6u2ecw
# create virtual machine with unique VM number, e.g. 777
qmrestore vzdump-qemu-ipbx2027r.vma.zst 777
Create additional VMs using the steps documented in the previous section.
Installing Incredible PBX 2021-D on Proxmox Server
Believe it or not, there still are folks that depend upon faxing in their daily lives. While a somewhat kludgy fax solution exists for Incredible PBX 2027, it’s not the same as the slick Incredible Fax application using HylaFax and Avantfax. If you really need faxing, the problem is easily solved by deploying Incredible PBX 2021-D with Debian 10, Asterisk 18, FreePBX 15, and Incredible Fax. We’ve even freshened up the 2021-D Proxmox image to current specs. Here’s how to deploy it. Once you deploy the latest Incredible PBX 2021-D image on your Proxmox server, your VMs will be up and running in less than a minute. Here are the steps. Begin by logging into the Proxmox CLI as root. Then issue the following commands using a unique number for the 2021-D virtual machine you wish to create, e.g. 555:
cd /var/lib/vz/dump
wget -O vzdump-qemu-ipbx2021d.vma.zst https://bit.ly/3M3Xo2v
# verify MD5 checksum: b37e6fba28fd03fbcf99760e0bdbf866
md5sum vzdump-qemu-ipbx2021d.vma.zst
# create virtual machine with unique VM number, e.g. 555
qmrestore vzdump-qemu-ipbx2021d.vma.zst 555
To create additional VMs, you can either issue the qmrestore command above with a different VM number while positioned in the CLI at /var/lib/vz/dump, or you can create them in the GUI by navigating to Server View -> proxmox -> local and choosing Backups. Then highlight the vzdump-qemu-ipbx2021d.vma.zst backup image and click Restore. Now give the new VM a unique number and then click Restore to build the virtual machine.
We would encourage you to try both the Incredible PBX 2027-U image and the Incredible PBX 2021-D image. Both are absolutely free so you have nothing to lose by experimenting a bit.
Incredible PBX Startup Steps with Proxmox
When the upload finishes, log into your Proxmox web portal: https://server-ip:8006
Then navigate to Folder View -> Virtual Machine -> 555 or 777 -> Start. Choose the Console option and wait for your virtual machine to boot up. Then log in as root with the default password: password. Press ENTER to kick off the brief setup procedure. Create a very secure root password as well as an admin password for the FreePBX GUI and Apache web apps. Press ENTER to keep your local version of sshd_config. Carefully read the configuration messages when the setup completes. Press ENTER to reboot.
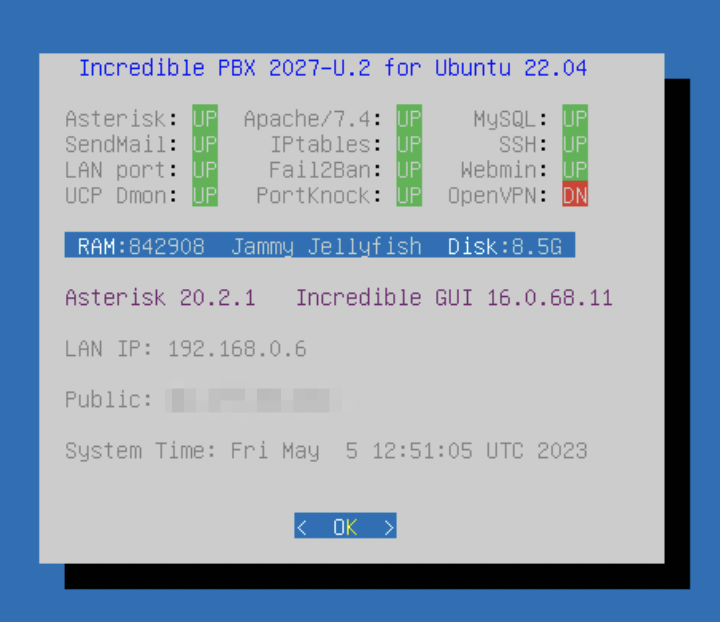
After the server reboots, log back in as root using the Console option and your new root password. The Automatic Update Utility will load any late-breaking security fixes and then the pbxstatus screen will display. Make note of your private IP address. All private IP addresses are whitelisted in the firewall; however, if you will be accessing your Proxmox VM from a public IP address, then there’s one additional step. Run /root/add-ip and whitelist the IP address of your desktop machine replacing mypc and 12.34.56.78 in this example with a label for the PC and its actual public IP address: /root/add-ip mypc 12.34.56.78.
You now can log into the VM’s Linux CLI as root at the IP address you deciphered above. And you can log into the FreePBX Web GUI as admin by pointing a browser to that same IP address and entering the FreePBX password you assigned during setup.
Creating Incredible PBX Containers on Proxmox
If you wish to compare performance with Containers, here’s how to set up an Incredible PBX 2027-U Container from the Incredible PBX 2027-U template you installed previously. We don’t recommend containers for production use.
Log into your Proxmox web portal: https://server-ip:8006. Navigate to Server View -> proxmox. Click Create CT. Assign a CT ID (the next available number is the default). Enter a root password twice for the Container. Click Next. Choose incrediblepbx2027U.tar.zst from the Template pulldown menu. Click Next. For disk size, we recommend 20GB but you can set any size above 15GB. Click Next. Assign the number of Cores desired for your Container. 1 is ample. Click Next. For Memory, we recommend 2048. For Swap, we recommend 1024. Click Next. For Network settings, we recommend DHCP for both IPv4 and IPv6. Click Next. Leave the default DNS settings. Click Next. Review your Settings and then click Finish. Once the Container is created, close the window and start the new Container. Then follow the Incredible PBX Startup Steps outlined above.
Continue your journey by hopping over to our tutorials for Incredible PBX 2027-U and Incredible PBX 2021-D. Enjoy!
Originally published: Monday, May 8, 2023

Need help with Asterisk? Visit the VoIP-info Forum.
Special Thanks to Our Generous Sponsors
FULL DISCLOSURE: ClearlyIP, Skyetel, Vitelity, DigitalOcean, Vultr, VoIP.ms, 3CX, Sangoma, TelecomsXchange and VitalPBX have provided financial support to Nerd Vittles and our open source projects through advertising, referral revenue, and/or merchandise. As an Amazon Associate and Best Buy Affiliate, we also earn from qualifying purchases. We’ve chosen these providers not the other way around. Our decisions are based upon their corporate reputation and the quality of their offerings and pricing. Our recommendations regarding technology are reached without regard to financial compensation except in situations in which comparable products at comparable pricing are available from multiple sources. In this limited case, we support our sponsors because our sponsors support us.
 BOGO Bonaza: Enjoy state-of-the-art VoIP service with a $10 credit and half-price SIP service on up to $500 of Skyetel trunking with free number porting when you fund your Skyetel account. No limits on number of simultaneous calls. Quadruple data center redundancy. $25 monthly minimum spend required. Tutorial and sign up details are here.
![]() The lynchpin of Incredible PBX 2020 and beyond is ClearlyIP components which bring management of FreePBX modules and SIP phone integration to a level never before available with any other Asterisk distribution. And now you can configure and reconfigure your new Incredible PBX phones from the convenience of the Incredible PBX GUI.
The lynchpin of Incredible PBX 2020 and beyond is ClearlyIP components which bring management of FreePBX modules and SIP phone integration to a level never before available with any other Asterisk distribution. And now you can configure and reconfigure your new Incredible PBX phones from the convenience of the Incredible PBX GUI.
 VitalPBX is perhaps the fastest-growing PBX offering based upon Asterisk with an installed presence in more than 100 countries worldwide. VitalPBX has generously provided a customized White Label version of Incredible PBX tailored for use with all Incredible PBX and VitalPBX custom applications. Follow this link for a free test drive!
 Special Thanks to Vitelity. Vitelity is now Voyant Communications and has halted new registrations for the time being. Our special thanks to Vitelity for their unwavering financial support over many years and to the many Nerd Vittles readers who continue to enjoy the benefits of their service offerings. We will keep everyone posted on further developments.

$1 a Month Buys a Cloud Powerhouse for Incredible PBX 2027

We lied. Sorry. This cloud-based solution for Incredible PBX 2027 will set you back $12.98 a year which works out to just under $1.10 a month. If you’ve never used a cloud platform, now’s your chance at a truly unbelievable price. You can barely cover the electric bill for on-premise hardware at this price, and that’s before you buy the hardware. We cover a number of cloud-based solutions over the course of a year, but you’ll be hard-pressed to find a comparable offering that’s as easy to install and maintain as this one.
RackNerd’s New Year’s Special1 provides KVM platform with a gig of RAM and 25 gigs of SSD storage and 4 terabytes of monthly bandwidth in your choice of locations: New York, New Jersey, Atlanta, Dallas, or Seattle. You can double your bandwidth allocation by posting a comment with your order number here. With over 700 pages of comments, you can rest assured this is not a fly-by-night operation. And it’s not as if you’re mortgaging your house to kick the tires.
Setup is a breeze. Choose your location, specify Debian 11 as the Operating System, plunk down your $12.98 and wait about 5-10 minutes for the VPS to spin up. Log in as the root user with SSH using the password specified in your email deployment message. Immediately change the password by issuing the command: passwd
Next, issue the following commands to download the Incredible PBX 2027 for Debian 11 installer and begin the install:
wget http://incrediblepbx.com/IncrediblePBX2027-D.sh
chmod +x IncrediblePBX2027-D.sh
./IncrediblePBX2027-D.sh
Hang around for a couple minutes and respond to the SSH config prompt by accepting the default. Then go have a nice, long cup of coffee. When you return, restart your virtual machine when prompted. Wait a couple minutes and log back in as root. Let the Automatic Update Utility bring your server up to current specs, and then issue the following commands to set your time zone, and create admin credentials for FreePBX® and our Apache Reminder and AsteriDex applications:
/root/timezone-setup
/root/admin-pw-change
/root/apache-pw-change
Now head over to the Incredible PBX 2027 tutorial and set up your phones and trunks. Enjoy!
Originally published: Monday, March 20, 2023
Need help with Asterisk? Visit the VoIP-info Forum.
Special Thanks to Our Generous Sponsors
FULL DISCLOSURE: ClearlyIP, Skyetel, Vitelity, DigitalOcean, Vultr, VoIP.ms, 3CX, Sangoma, TelecomsXchange and VitalPBX have provided financial support to Nerd Vittles and our open source projects through advertising, referral revenue, and/or merchandise. As an Amazon Associate and Best Buy Affiliate, we also earn from qualifying purchases. We’ve chosen these providers not the other way around. Our decisions are based upon their corporate reputation and the quality of their offerings and pricing. Our recommendations regarding technology are reached without regard to financial compensation except in situations in which comparable products at comparable pricing are available from multiple sources. In this limited case, we support our sponsors because our sponsors support us.
BOGO Bonaza: Enjoy state-of-the-art VoIP service with a $10 credit and half-price SIP service on up to $500 of Skyetel trunking with free number porting when you fund your Skyetel account. No limits on number of simultaneous calls. Quadruple data center redundancy. $25 monthly minimum spend required. Tutorial and sign up details are here.
![]() The lynchpin of Incredible PBX 2020 and beyond is ClearlyIP components which bring management of FreePBX modules and SIP phone integration to a level never before available with any other Asterisk distribution. And now you can configure and reconfigure your new Incredible PBX phones from the convenience of the Incredible PBX GUI.
The lynchpin of Incredible PBX 2020 and beyond is ClearlyIP components which bring management of FreePBX modules and SIP phone integration to a level never before available with any other Asterisk distribution. And now you can configure and reconfigure your new Incredible PBX phones from the convenience of the Incredible PBX GUI.
VitalPBX is perhaps the fastest-growing PBX offering based upon Asterisk with an installed presence in more than 100 countries worldwide. VitalPBX has generously provided a customized White Label version of Incredible PBX tailored for use with all Incredible PBX and VitalPBX custom applications. Follow this link for a free test drive!
Special Thanks to Vitelity. Vitelity is now Voyant Communications and has halted new registrations for the time being. Our special thanks to Vitelity for their unwavering financial support over many years and to the many Nerd Vittles readers who continue to enjoy the benefits of their service offerings. We will keep everyone posted on further developments.
- Follow this thread for the latest developments in the pending criminal case against the owner of RackNerd. [↩]
Happy New Year: It’s Incredible PBX 2027 for Ubuntu 22.04

Last week to celebrate New Year’s Day, we introduced Incredible PBX 2027 for Rocky 8 with AMD64-compatible hardware. Today we’re pleased to introduce Incredible PBX 2027 for Ubuntu 22.04 LTS with its ten-year life cycle to complement Asterisk® 20 featuring LTS support until the fall of 2027. Both new AMD64 releases come with full support for FreePBX® 16 as well as all the Incredible PBX goodies to which you’ve become accustomed.
We also want to offer our thanks to the many talented individuals on the VoIP-Info.org Forum who have assisted us in working through the growing pains of bringing you these new open source products at zero cost. And our special thanks to @kenn10 for his Herculean efforts refining the Incredible PBX 2027 install scripts. Come join the party!
If you’re using on-premise hardware, begin by downloading the Live Server ISO image of Ubuntu 22.04 for amd64. Follow our previous tutorials for tips on installation with VirtualBox or VMware ESXi. If you’d prefer to experiment in the cloud for about a penny an hour, open an account at Vultr or Digital Ocean using our referral links that support the Nerd Vittles project. You’ll also get some free credit to try out the service. Then create a new $5/month Ubuntu 22.04, 64-bit instance in your favorite city. Want some cheaper KVM cloud alternatives? Visit the Incredible PBX Wiki for tips.
If your PBX is sitting behind a NAT-based router, you’ll need to redirect incoming UDP 5060-5061 and UDP 10000-20000 traffic to the private IP address of your server. This is required for all of the SIP providers included in the Incredible PBX 2027 build. Otherwise, all inbound calls will fail.
Installing Incredible PBX 2027 on Ubuntu 22.04 Server
If you’re building the Ubuntu platform from the ISO, select the option to install a Minimal Server Platform. Then you’ll need to create a temporary user as part of the install. Enable installation of SSH and no additional components. After reboot, login as the new user and issue these commands:
# set root password
sudo passwd root
exit
# log back in as root
# delete temporary user
userdel -r temp-user-name
# decipher server IP address
ip a
# try logging in via SSH: ssh root@ip-address
On desktop machines, if you experience a 2-minute delay on boot up waiting for network to be configured, issue these two commands after logging in as root:
systemctl disable systemd-networkd-wait-online.service
systemctl mask systemd-networkd-wait-online.service
If you cannot login via SSH or Putty as root then, from the console while logged in as root, issue these commands:
apt install nano -y
cd /etc/ssh
nano -w sshd_config
# change the following entries as shown here:
  PermitRootLogin yes
  PasswordAuthentication yes
# save the file and restart SSH
# Ctrl-X, Y, and press ENTER key
systemctl restart ssh
ALERT: On some cloud platforms, e.g. RackNerds, they reportedly provide a non-interactive version of Ubuntu 22.04. So, after completing the steps above, you will need to run the following script: /usr/local/sbin/unminimize. Next, run: apt update && apt upgrade. Finally, reboot the server and log back in as root to continue.
Once your Ubuntu 22.04 platform is properly configured, login as root using SSH or Putty. Issue the commands below to kick off the install:
apt install wget tar nano -y
wget http://incrediblepbx.com/IncrediblePBX2027-U.sh
chmod +x IncrediblePBX2027-U.sh
./IncrediblePBX2027-U.sh
On homespun, ISO-built platforms, you will be prompted within a minute or so on whether to preserve your existing SSH configuration. Press ENTER to accept the default.
Setting a Hostname for Incredible PBX 2027
Once your server is up and running, you’ll need to set a hostname for the machine that is resolvable on the Internet. Failure to do so will make access to the FreePBX GUI a painfully delayed process. If you don’t have an FQDN that can be used, you can use the default: noreply.incrediblepbx.com. To change it, edit /etc/hosts and /etc/hostname. Also enter your new FQDN with the command: hostname myfqdn.com.
If you’re running your PBX in the Oracle Cloud, this message thread will show you how to set the hostname there.
Next Steps with Incredible PBX 2027
Before you can manage your PBX through a web browser, you first will need to set the root password for Ubuntu as well as the admin passwords for FreePBX and Apache web apps such as Reminders and AsteriDex. These all can be set by logging into your server as root and issuing the following commands: passwd, admin-pw-change, and apache-pw-change.
Outbound mail functionality needs to be working so that you can receive voicemail messages and faxes by email. To prevent SPAM, most ISPs and ITSPs block messages from downstream mail servers. That would be you. The easiest way to resolve this is to configure SendMail using Gmail as an SMTP Smarthost. You obviously need a Gmail account to implement this and you also will need to obtain an App password for your Gmail account, and use that in lieu of your regular Gmail password when configuring SendMail. With your Gmail username and App password in hand, log into your server as root and run: /root/enable-gmail-smarthost-for-sendmail.
If your Incredible PBX 2027 is hosted with a cloud provider, be advised that many providers do not include a swap file as part of their offering. FreePBX requires a swap file. To add one, issue this command after logging into your server as root: /root/create-swapfile-DO.
To correctly set the time on your PBX, run: /root/timezone-setup.
By default, the voicemail password for each of the configured extensions (701-705) is set to the extension number. This means the user will be prompted to set a voicemail password on the first login to voicemail for each extension. A phone must be registered to the actual extension to access its voicemail account. For example, once a phone is registered to extension 701, the voicemail setup can be accessed by dialing *98701.
Overview of the Initial Asterisk Setup Process
For those new to PBXs, here’s a two paragraph summary of how Voice over IP (VoIP) works. Phones connected to your PBX are registered with Extensions so that they can make and receive calls. When a PBX user picks up a phone and dials a number, an Outbound Route tells the PBX which Trunk to use to place the call based upon established dialing rules. Unless the dialed number is a local extension, a Trunk registered with some service provider accepts the call, and the PBX sends the call to that provider. The provider then routes the call to its destination where the recipient’s phone rings to announce the incoming call. When the recipient picks up the phone, the conversation begins.
Looking at things from the other end, when a caller somewhere in the world wishes to reach you, the caller picks up a telephone and dials a number known as a DID that is assigned to you by a provider with whom you have established service. When the provider receives the call to your DID, it routes the call to your PBX based upon destination information you established with the provider. Your PBX receives the call with information identifying the DID of the call as well as the CallerID name and number of the caller. An Inbound Route on your PBX then determines where to send the call based upon that DID and CallerID information. Typically, a call is routed to an Extension, a group of Extensions known as a Ring Group, or an IVR or AutoAttendant giving the caller choices on routing the call to the desired destination. Once the call is routed to an Extension, the PBX rings the phone registered to that Extension. When you pick up the phone, the conversation begins.
Configuring Trunks with Incredible PBX GUI
Perhaps the most difficult component to configure in the PBX is the Trunk. Almost every provider has a different way of doing things. We’ve taken some of the torture out of the exercise by providing a script which will configure settings for dozens of providers in seconds. Once installed, all you need to do is edit the desired Trunk (Connectivity:Trunks), change the Disable Trunk entry to No, and insert your credentials in both the PEER Details and Registration string of the SIP Settings Outgoing and Incoming tabs. Skyetel is enabled by default and needs no setup on the PBX side.
Configuring Skyetel for Incredible PBX 2027
If you’ve decided to go with Skyetel, here’s the drill. Sign up for Skyetel service and take advantage of the Nerd Vittles specials. First, complete the Prequalification Form here. You then will be provided a link to the Skyetel site to complete your registration. Once you have registered on the Skyetel site and your account has been activated, open a support ticket and request the $10 credit for your account by referencing the Nerd Vittles special offer. Once you are satisfied with the service, fund your account as desired, and Skyetel will match your deposit of up to $250 simply by opening another ticket. That gets you up to $500 of half-price calling. Credit is limited to one per person/company/address/location. Effective 10/1/2023, $25/month minimum spend required.
Skyetel does not use SIP registrations to make connections to your PBX. Instead, Skyetel utilizes Endpoint Groups to identify which servers can communicate with the Skyetel service. An Endpoint Group consists of a Name, an IP address, a UDP or TCP port for the connection, and a numerical Priority for the group. For incoming calls destined to your PBX, DIDs are associated with an Endpoint Group to route the calls to your PBX. For outgoing calls from your PBX, a matching Endpoint Group is required to authorize outbound calls through the Skyetel network. Thus, the first step in configuring the Skyetel side for use with your PBX is to set up an Endpoint Group. Here’s a typical setup for Incredible PBX 2027:
- Name: MyPBX
- Priority: 1
- IP Address: PBX-Public-IP-Address
- Port: 5060
- Protocol: UDP
- Description: my.incrediblepbx.com
To receive incoming PSTN calls, you’ll need at least one DID. On the Skyetel site, you acquire DIDs under the Phone Numbers tab. You have the option of Porting in Existing Numbers (free for the first 60 days after you sign up for service) or purchasing new ones under the Buy Phone Numbers menu option.
Once you have acquired one or more DIDs, navigate to the Local Numbers or Toll Free Numbers tab and specify the desired SIP Format and Endpoint Group for each DID. Add SMS/MMS and E911 support, if desired. Call Forwarding and Failover are also supported. That completes the VoIP setup on the Skyetel side. System Status is always available here.
Configuring VoIP.ms for Incredible PBX 2027
To sign up for VoIP.ms service, may we suggest you use our signup link so that Nerd Vittles gets a referral credit for your signup. Once your account is set up, you’ll need to set up a SIP SubAccount and, for Authentication Type, choose Static IP Authentication and enter your Incredible PBX 2027 server’s public IP address. For Transport, choose UDP. For Device Type, choose Asterisk, IP PBX, Gateway or VoIP Switch. Order a DID in their web panel, and then point the DID to the SubAccount you just created. Be sure to specify atlanta1.voip.ms as the POP from which to receive incoming calls. In the Incredible PBX GUI, be sure to enable the VoIP.ms trunk.
Configuring V1VoIP for Incredible PBX 2027
To sign up for V1VoIP service, sign up on their web site. Then login to your account and order a DID under the DIDs tab. Once the DID has been assigned, choose View DIDs and click on the Forwarding button beside your DID. For Option #1, choose Forward to IP Address/PBX. For the Forwarding Address, enter the public IP address of your server. For the T/O (timeout) value, set it to 2o seconds. Then click the Update button. Under the Termination tab, create a new Endpoint with the public IP address of your server so that you can place outbound calls through V1VoIP. In the Incredible PBX GUI, be sure to enable all of the V1VoIP trunks.
Configuring Anveo Direct for Incredible PBX 2027
To sign up for Anveo Direct service, sign up on their web site and then login. After adding funds to your account, purchase a DID under Inbound Service -> Order DID. Next, choose Configure Destination SIP Trunk. Give the Trunk a name. For the Primary SIP URI, enter $[E164]$@server-IP-address. For Call Options, select your new DID from the list. You also must whitelist your public IP address under Outbound Service -> Configure. Create a new Call Termination Trunk and name it to match your server. For Dialing Prefix, choose six alphanumeric characters beginning with a zero. In Authorized IP Addresses, enter the public IP address of your server. Set an appropriate rate cap. We like $0.01 per minute to be safe. Set a concurrent calls limit. We like 2. For the Call Routing Method, choose Least Cost unless you’re feeling extravagant. For Routes/Carriers, choose Standard Routes. Write down your Dialing Prefix and then click the Save button.
Before you can make outbound calls through Anveo Direct from your PBX, you first must configure the Dialing Prefix that you wrote down in the previous step. Log into the GUI as admin using a web browser and edit the Anveo-Out trunk in Connectivity -> Trunks. Enable the Trunk. Then click on the custom-Settings tab and replace anveo-pin with your actual Dialing Prefix. Click Submit and Apply Config to complete the setup. In the Incredible PBX GUI, be sure to enable all of the remaining Anveo trunks.
By default, incoming Anveo Direct calls will be processed by the Default inbound route on your PBX. If you wish to redirect incoming Anveo Direct calls using DID-specific inbound routes, then you’ve got a bit more work to do. In addition to creating the inbound route using the 11-digit Anveo Direct DID, enter the following commands after logging into your server as root using SSH/Putty:
cd /etc/asterisk
echo "[from-anveo]" >> extensions_custom.conf
echo "exten => _.,1,Ringing" >> extensions_custom.conf
echo "exten => _.,n,Goto(from-trunk,\\${SIP_HEADER(X-anveo-e164)},1)" >> extensions_custom.conf
asterisk -rx "dialplan reload"
Configuring Extensions with Incredible PBX GUI
Extensions are created using the Incredible PBX GUI: Applications:Extensions. Many SIP phones expect extensions to communicate on UDP port 5060. If this is the case with your SIP phone or softphone, then always create Chan_SIP extensions which communicate on UDP 5060. If your SIP phone or softphone provide port flexibility, then you have a choice in the type of SIP extension to create: Chan_SIP or the more versatile PJSIP (UDP 5061). Just remember to always configure SIP extensions with NAT Mode=YES in the Advanced tab. If your VoIP phones or softphones support IAX connectivity, you may wish to consider IAX extensions which avoid NAT problems.
When you create a new Extension, a new entry is automatically created in the PBX Internal Directory. If you wish to allow individual users to manage their extensions or use the WebRTC softphone, then you will also have to create a (very) secure password for User Control Panel (UCP) access. Choose Admin:User Management and click on the key icon of the desired extension to assign a password for UCP and WebRTC access.
Configuring a Desktop Softphone for Incredible PBX
We’re in the home stretch now. You can connect virtually any kind of telephone to your new PBX. Plain Old Phones require an analog telephone adapter (ATA) which can be a separate board in your computer from a company such as Digium. Or it can be a standalone SIP device such as ObiHai’s OBi100 or OBi110 (if you have a phone line from Ma Bell to hook up as well). SIP phones can be connected directly so long as they have an IP address. These could be hardware devices or software devices such as the YateClient softphone. We’ll start with a free one today so you can begin making calls. You can find dozens of recommendations for hardware-based SIP phones both on Nerd Vittles and the PIAF Forum when you’re ready to get serious about VoIP telephony.
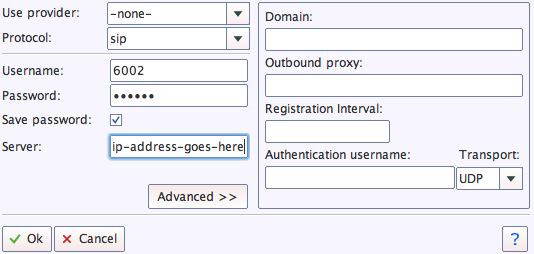
We recommend YateClient for Windows which is free. Download it from here. Run YateClient once you’ve installed it and enter the credentials for the 701 extension on Incredible PBX. You can find them by running /root/show-passwords. You’ll need the IP address of your server plus your extension 701 password. In the YateClient, fill in the blanks using the IP address of your Server, 701 for your Username, and whatever Password was assigned to the extension when you installed Incredible PBX. Click OK to save your entries.
Once you are registered to extension 701, close the Account window. Then click on YATE’s Telephony Tab and place some test calls to the numerous apps that are preconfigured on Incredible PBX. Dial a few of these to get started:
DEMO - Apps Demo
123 - Reminders
947 - Weather by ZIP Code
951 - Yahoo News
TODAY - Today in History
LENNY - The Telemarketer's Worst Nightmare
If you are a Mac user, another great no-frills softphone is Telephone. Just download and install it from the Mac App Store. For Android users, check out the terrific new VitalPBX Communicator. Works flawlessly with Incredible PBX.
Configuring a Softphone Extension on a Smartphone
Adding an Incredible PBX extension to your smartphone gets a little trickier. Whether you’re an iPhone or Android lover, all smartphones use batteries, and you don’t want to drain your battery by running a softphone as a foreground app all the time. Fortunately, you now have some choices in softphones engineered to work without draining your battery. While they all cost money, it’s not much money. We’ve written about all the choices, and you’ll find the links in our Softphone Provider Recommendations on the new Incredible PBX Wiki.
With PJsip extensions, you’re not limited to a single phone connection at a time, and we’ve preconfigured extension 701 to support ten simultaneous connections. The setup on the softphone side is simple. For the server, enter the actual IP address of your PBX in the following format: 22.33.44.55:5061. Then enter 701 for the username and enter the password assigned to the 701 extension on your PBX. When an incoming call arrives, all the phones registered to extension 701 will ring simultaneously. Simply answer the call on the phone that is most convenient. For extension 702, you can change the number of simultaneous connections by clicking the Advanced tab and setting the number in Max Contacts.
Configuring Outbound Routes in Incredible PBX GUI
Outbound Routes serve a couple of purposes. First, they assure that calls placed by users of your PBX are routed out through an appropriate trunk to reach their destination in the least costly manner. Second, they serve as a security mechanism by either blocking or restricting certain calls by requiring a PIN to complete the calls. Never authorize recurring charges on credit cards registered with your VoIP providers and, if possible, place pricing limits on calls with your providers. If a bad guy were to break into your PBX, you don’t want to give the intruder a blank check to make unauthorized calls. And you certainly don’t want to join the $100,000 Phone Bill Club.
To create outbound routes in the Incredible PBX GUI, navigate to Connectivity:Outbound Routes and click Add Outbound Route. In the Route Settings tab, give the Outbound Route a name and choose one or more trunks to use for the outbound calls. In the Dial Patterns tab, specify the dial strings that must be matched to use this Outbound Route. NXXNXXXXXX would require only 10-digit numbers with the first and fourth digits being a number between 2 and 9. Note that Outbound Routes are searched from the top entry to the bottom until there is a match. Make certain that you order your routes correctly and then place test calls watching the Asterisk CLI to make sure the calls are routed as you intended.
Configuring Inbound Routes in Incredible PBX GUI
Inbound Routes, as the name implies, are used to direct incoming calls to a specific destination. That destination could be an extension, a ring group, an IVR or AutoAttendant, or even a conference or DISA extension to place outbound calls (hopefully with a very secure password). Inbound Routes can be identified by DID, CallerID number, or both. To create Inbound Routes, choose Connectivity:Inbound Routes and then click Add Inbound Route. Provide at least a Description for the route, a DID to be matched, and the Destination for the incoming calls that match. If you only want certain callers to be able to reach certain extensions, add a CallerID number to your matching criteria. You can add Call Recording and CallerID CNAM Lookups under the Other tab.
Audio Issues with Incredible PBX 2027
While it is always a good idea anyway, if you experience one-way or no audio on some calls, be sure to add your external IP address and LAN subnet in the GUI by navigating to Settings -> Asterisk SIP Settings. In the NAT Settings section, click Detect Network Settings. Click Submit and Apply Settings to save your changes.
Adding Incredible PBX 2027 to an OpenVPN Network
We previously have documented the procedure for creating an OpenVPN server as well as OpenVPN client templates (.ovpn). If you need a refresher, the tutorial is here. To add your Incredible PBX 2027 server to an existing OpenVPN network, begin by creating an incrediblepbx2027.ovpn template on your OpenVPN server. Be sure to comment out or delete the setenv line in the template. Then copy this template to /etc on your Incredible PBX 2027 server. The following commands are already in place:
echo "[Unit]
Description=openvpn2027
ConditionPathExists=/etc/openvpn-start
After=rclocal.service
[Service]
Type=forking
ExecStart=/etc/openvpn-start /etc/incrediblepbx2027.ovpn
TimeoutSec=0
StandardOutput=tty
RemainAfterExit=yes
PermissionsStartOnly=true
SysVStartPriority=99
[Install]
WantedBy=multi-user.target" > /etc/systemd/system/openvpn2027.service
We’ve also enabled this openvpn2027.service which will start when you reboot your server. The OpenVPN IP address should now appear on the LAN line in pbxstatus:
systemctl enable openvpn2027.service
reboot
Incredible PBX 2027 Administration
We’ve eased the pain of administering your new PBX with a collection of scripts which you will find in the /root folder after logging in with SSH or Putty. Here’s a quick summary of what each of the scripts does.
add-fqdn is used to whitelist a fully-qualified domain name in the firewall. Because Incredible PBX 2027 blocks all traffic from IP addresses that are not whitelisted, this is what you use to authorize an external user for your PBX. The advantage of an FQDN is that you can use a dynamic DNS service to automatically update the IP address associated with an FQDN so that you never lose connectivity.
add-ip is used to whitelist a public IP address in the firewall. See the add-fqdn explanation as to why this matters.
del-acct is used to remove an IP address or FQDN from the firewall’s whitelist.
admin-pw-change is used to set the admin password for access to the FreePBX/Incredible PBX web GUI using a browser pointed to the local IP address of your server.
apache-pw-change is used to set the admin password for access to Apache/Incredible PBX apps including AsteriDex and Reminders. This provides a password layer of protection for access to these applications.
incrediblebackup2021 makes a backup of critical components on your PBX to a tarball saved in /backup. This should be copied to safe location off-site for a rainy day.
incrediblerestore2021 restores a backup file which has been copied to the /backup folder.
ipchecker is a script which deciphers the public IP addresses associated with whitelisted FQDNs created with add-fqdn on your server. If any of the addresses have changed, the firewall is restarted after updating the IP addresses. By default, it is executed every 10 minutes by /etc/crontab.
licenses.sh displays the license associated with each of the FreePBX modules on your server.
logos-b-gone removes proprietary artwork from your PBX and is no longer necessary with the included IncrediblePBX FreePBX module.
mime-construct is a command-line utility to send emails with attachments.
neorouter-login is a script to add your PBX to a NeoRouter VPN. Tutorial here.
odbc-gen.sh is a script that was run to generate the ODBC settings for Asterisk. Do NOT use it.
openvpn-start is a script to add your PBX to an existing OpenVPN network using an .ovpn config file. Tutorial here.
pbxstatus displays status of all major components of Incredible PBX 2027.
pptp-install is a script to create a PPTP network connection for your PBX. Tutorial here.
purge-cdr-cel-records removes all CDR and CEL records from the MySQL database.
reset-conference-pins is a script that automatically and randomly resets the user and admin pins for access to the preconfigured conferencing application. Dial C-O-N-F from any registered SIP phone to connect to the conference.
reset-extension-passwords is a script that automatically and randomly resets ALL of the SIP passwords for extensions 701-705. Be careful using this one, or you may disable existing registered phones and cause Fail2Ban to blacklist the IP addresses of those users. HINT: You can place a call to the Ring Group associated with all five extensions by dialing 777.
reset-reminders-pin is a script that automatically and randomly resets the pin required to access the Telephone Reminders application by dialing 123. It’s important to protect this application because a nefarious user could set up a reminder to call a number anywhere in the world assuming your SIP provider’s account was configured to allow such calls.
show-feature-codes is a cheat sheet for all of the feature codes which can be dialed from any registered SIP phone. It documents how powerful a platform Incredible PBX 2027 actually is. A similar listing is available in the GUI at Admin -> Feature Codes.
show-passwords is a script that displays most of the passwords associated with Incredible PBX 2027. This includes SIP extension passwords, voicemail pins, conference pins, telephone reminders pin, and your Anveo Direct outbound calling pin (if configured). Note that voicemail pins are configured by the user of a SIP extension the first time the user accesses the voicemail system by dialing *97.
sig-fix disables Module Signature Checking in the FreePBX GUI. This should not be necessary unless you have added or edited FreePBX Modules with missing module signatures.
sms-skyetel is a script to send SMS messages using a Skyetel trunk.
sms-voip.ms is a script to send SMS messages using a VoIP.ms trunk.
sms-blast, sms-blaster, and sms-dictator are scripts for message blasting. Tutorial here.
timezone-setup is a script to set the timezone for your PBX.
update-IncrediblePBX is a script that runs the Automatic Update Utility whenever you login to your server as root. These updates typically resolve bugs and security issues with your PBX. Do NOT remove it.
wolfram is a script to deploy Wolfram Alpha on your PBX. Tutorial here.
Forwarding Calls to Your Cellphone. Keep in mind that inbound calls to your DIDs automatically ring all five SIP extensions, 701-705. The easiest way to also ring your cellphone is to set one of these five extensions to forward incoming calls to your cellphone. After logging into your PBX as root, issue the following command to forward calls from extension 705 to your cellphone: asterisk -rx "database put CF 705 6781234567"
To remove call forwarding: asterisk -rx "database del CF 705"
Implementing Call By Name with 411
Once you have an Outbound Trunk and Route configured, deploying Call by Name by dialing 411 is simple. The way it works is to pick up any phone connected to your PBX and dial 411. When prompted for the name of the person or company to call, say the name as you entered it in the AsteriDex directory, e.g. Delta Air Lines. The name will then be looked up to decipher the number of the person or company to call. Then the call will be placed using your default outbound route. To deploy Call By Name, simply follow the setup instructions in this Nerd Vittles tutorial.
Keeping FreePBX 16 Modules Current
We strongly recommend that you periodically update all of your FreePBX modules to eliminate bugs and to reduce security vulnerabilities. From the Linux CLI, log into your server as root and issue the following commands:
rm -f /tmp/*
fwconsole ma upgradeall
fwconsole reload
/root/sig-fix
systemctl restart apache2
/root/sig-fix
Originally published: Monday, January 9, 2023
Need help with Asterisk? Visit the VoIP-info Forum.
Special Thanks to Our Generous Sponsors
FULL DISCLOSURE: ClearlyIP, Skyetel, Vitelity, DigitalOcean, Vultr, VoIP.ms, 3CX, Sangoma, TelecomsXchange and VitalPBX have provided financial support to Nerd Vittles and our open source projects through advertising, referral revenue, and/or merchandise. As an Amazon Associate and Best Buy Affiliate, we also earn from qualifying purchases. We’ve chosen these providers not the other way around. Our decisions are based upon their corporate reputation and the quality of their offerings and pricing. Our recommendations regarding technology are reached without regard to financial compensation except in situations in which comparable products at comparable pricing are available from multiple sources. In this limited case, we support our sponsors because our sponsors support us.
BOGO Bonaza: Enjoy state-of-the-art VoIP service with a $10 credit and half-price SIP service on up to $500 of Skyetel trunking with free number porting when you fund your Skyetel account. No limits on number of simultaneous calls. Quadruple data center redundancy. $25 monthly minimum spend required. Tutorial and sign up details are here.
![]() The lynchpin of Incredible PBX 2020 and beyond is ClearlyIP components which bring management of FreePBX modules and SIP phone integration to a level never before available with any other Asterisk distribution. And now you can configure and reconfigure your new Incredible PBX phones from the convenience of the Incredible PBX GUI.
The lynchpin of Incredible PBX 2020 and beyond is ClearlyIP components which bring management of FreePBX modules and SIP phone integration to a level never before available with any other Asterisk distribution. And now you can configure and reconfigure your new Incredible PBX phones from the convenience of the Incredible PBX GUI.
VitalPBX is perhaps the fastest-growing PBX offering based upon Asterisk with an installed presence in more than 100 countries worldwide. VitalPBX has generously provided a customized White Label version of Incredible PBX tailored for use with all Incredible PBX and VitalPBX custom applications. Follow this link for a free test drive!
Special Thanks to Vitelity. Vitelity is now Voyant Communications and has halted new registrations for the time being. Our special thanks to Vitelity for their unwavering financial support over many years and to the many Nerd Vittles readers who continue to enjoy the benefits of their service offerings. We will keep everyone posted on further developments.
Electric Vehicles 101: 2024 EV Buyers’ and Owners’ Guide
We’ve put this Electric Vehicle Guide together for those just getting their feet wet in the EV world. But we think you’ll find a few golden nuggets even if you’re a die hard EV owner like us. Our EV adventure began in 2016 with the purchase of a Tesla Model S with Full Self-Driving (FSD) after Elon Musk’s video was released showing his Tesla driving him to work hands-free and dropping him off at the front door of the office building before parking itself after waiting for pedestrians to cross the street. All fabrications as we would later learn. When our car unexpectedly died in the middle of nowhere leaving us stranded 200 miles from the nearest Tesla dealer, we sold it.
Lesson #1: Never buy any car that you can’t get fixed in a timely manner by a repair shop near where you live and/or frequently travel.
Following our Tesla debacle, we purchased a Jaguar I-Pace followed by a Tesla Model X, then a Kia EV6 and last week a Mustang Mach-E GT, Performance Edition. So we’ve been around the block (several times).
In our 7+ years of EV ownership, here are our take-aways.
Lesson #2: If you’re dead set on owning a Tesla, DO NOT PURCHASE FULL SELF-DRIVING. It was promised in 2016 and every year since. It’s not even close to working safely and reliably. In fact, I’m amazed it is still allowed on public streets. If you really want full self-driving, buy a GM product with Super Cruise or a Ford product with Blue Cruise. Both work flawlessly.
Lesson #3: Unless you have a way to charge your vehicle regularly at your home, don’t buy an EV. If you really still want to be part of the EV revolution, buy a hybrid (PHEV) that can keep itself charged. Using public charging facilities to keep your vehicle charged is not only time-consuming, but it’s also expensive. Pricing at most public EV chargers is almost as costly as gasoline, and a fill-up typically takes 40 to 60 minutes as opposed to 5 minutes at a gas pump.
Lesson #4: Avoid long road trips in an EV. It’s nerve-wracking, expensive, and time-consuming. A neighbor of ours in Florida drives his EV from Washington, D.C. to the beach and has to make five or six charging stops along the way. I’d sooner shoot myself. If you’re fortunate enough to be able to afford a second car, an EV makes an excellent, cost-saving, around-town car especially if you can charge it in your garage. For example, in Florida, charging in your garage costs roughly 5 cents per mile of charge. That’s less than one-third the cost of driving a typical gas-powered vehicle.
Lesson #5: We would never own another vehicle without Lane Keeping Assist (LKA), Elon calls it Auto-Pilot on the Tesla. It’s available on virtually every modern vehicle for an extra charge. While it won’t drive you to your destination and still requires that you keep your hands on the wheel, the stress of driving is greatly reduced. Be advised that all LKA systems are not created equal. On a Tesla, the feature is an all or nothing deal. You cannot make minor steering corrections without first disengaging auto-pilot by yanking on the steering wheel. With the other vehicles we’ve owned including Audi, Nissan, Infiniti, Jaguar, Range Rover, and Mustang, you can make steering adjustments without disengaging LKA, a much safer approach.
Charging Your Electric Vehicle
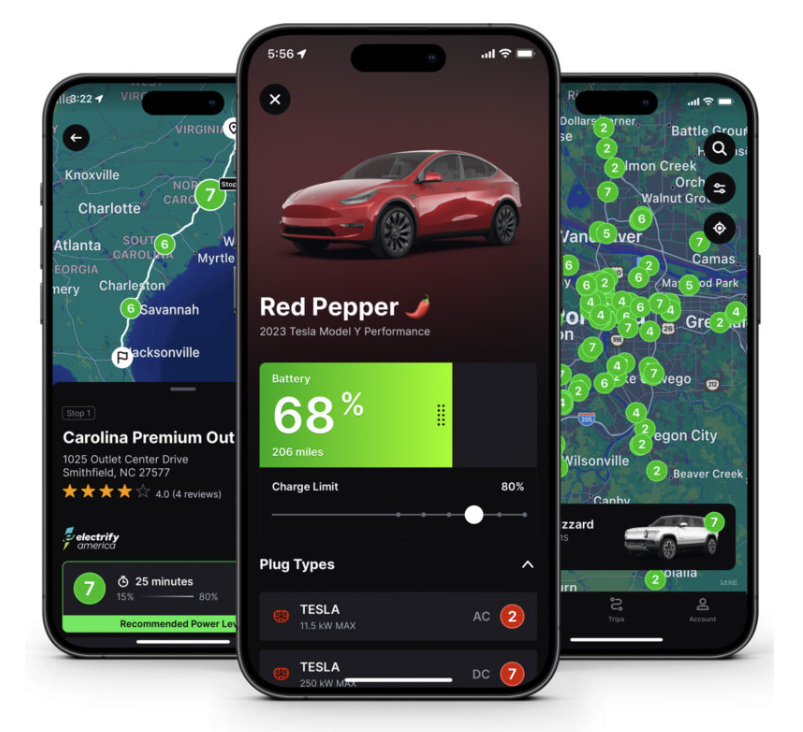
There are three types of charging systems for EVs: Level 1, 2, and 3. Level 1 chargers can be used with any 120 volt, 20 amp A/C outlet and provide about 3-5 miles of charge for every hour of connection. Level 2 chargers are typically installed in garages or office building. They require a 240 volt, 50 or 60 amp connection and provide 20 to 25 miles of charge per hour. Level 3 chargers are expensive and are typically found at commercial charging stations such as Tesla Superchargers, Electrify America, EVgo, and many others. They can provide 50 to several hundred miles of charge per hour. Prices vary depending upon local costs of electricity as well as supply and demand. The two questions you should be asking are (1) where’s the nearest Level 3 charger to my current location when I have 20% of range left and (2) which chargers have the best pricing per kWh. Our favorite cellphone app to obtain this information is Chargeway. It can be configured to show Tesla Superchargers or CCS chargers or both with pricing and charge availability. Chargeway includes over 80,000 charging stations from over 40 networks throughout the US and Canada. Add your EV and it automatically shows stations that match your EV’s plug type and power levels as well as pricing and charge time estimates. Once you’ve identified your vehicle in the app, you can further refine the settings in the Filters option. We typically set Green (J1772/CCS) to 6 and 7, Blue (CHadeMO) to 7, and Red (Tesla/NACS) to 7 since Mustangs can use both CCS and Tesla V3+ Superchargers (with adapter).
Finding Information About Electric Vehicles
Our favorite source of news about EVs is Electrek.While the editor was originally a Tesla FanBoy, he has sobered up a bit since his Tesla tried to kill him a couple times. Another great source of information are the forums for Tesla, Rivian, and the Mach-E.
Current Deals on Electric Vehicles
Before you start shopping for an EV, you first may wish consider which electric vehicles current;y qualify for tax rebates. Also worth a careful review are which vehicles include free charging. Finally, it’s a good idea to check recent news articles documenting price reductions on particular EVs. For example, just last week Ford dramatically cut the prices on all 2023 Mach-E vehicles and brought back 0% financing. If you’re dead set on a Tesla, the best time to purchase is the last week of every quarter when Tesla is attempting to meet sales goals.
Something We’ve Missed?
If you’ve got a tip that we’ve overlooked, feel free to share it by leaving a comment below.
Introducing OSS Endpoint Manager for FreePBX 16 & Incredible PBX 2027

If you’ve been searching for a free, open source provisioning system for your SIP telephones and you’re using Incredible PBX 2027 or other FreePBX® 16 platforms, your prayers have been answered thanks to the hard work of Bill Simon. What this buys you (for free) is a quick way to configure SIP devices from most of the major players shown above including Aastra, AudioCodes, Cisco, Linksys, CloudTC, Digium, Grandstream, Intelbras, Mitel, Norphonic, Patton, Polycom, Snom, Thomson, Unidata, Xorcom, and Yealink.
To get started, log into FreePBX on your PBX platform and click on the Settings tab. If you see OSS Endpoint Manager as you will on most Incredible PBX 2027 installations, you can skip installing OSS Endpoint Manager and move on to the next step. Otherwise, here are the steps to install OSS EPM 16. Using SSH, log into your PBX as root and issue the following commands:
cd /var/www/html/admin/modules
wget https://filedn.com/lBgbGypMOdDm8PWOoOiBR7j/OSS-EPM/ossepm16.tgz
tar zxvf ossepm16.tgz
fwconsole ma install endpointman
rm -f /tmp/*
fwconsole reload
Once you have OSS Endpoint Manager installed, return to the FreePBX GUI and open the application under the Settings tab. Read the reminder that you’re not using Sangoma’s commercial endpoint management product. Then click on the pull-down box in the right margin. Now let’s get the templates for the various SIP devices loaded onto your server.
- On the right pull-down, choose EndPoint Manager Settings.
- Adjust the entries as desired to set up your server as the host.
- For Package Server, enter: https://ossepm.incrediblepbx.com/
- Click in any other field to save your entries.
- On the right pull-down, choose Template Manager.
- Click the displayed link to download the latest templates from GitHub.
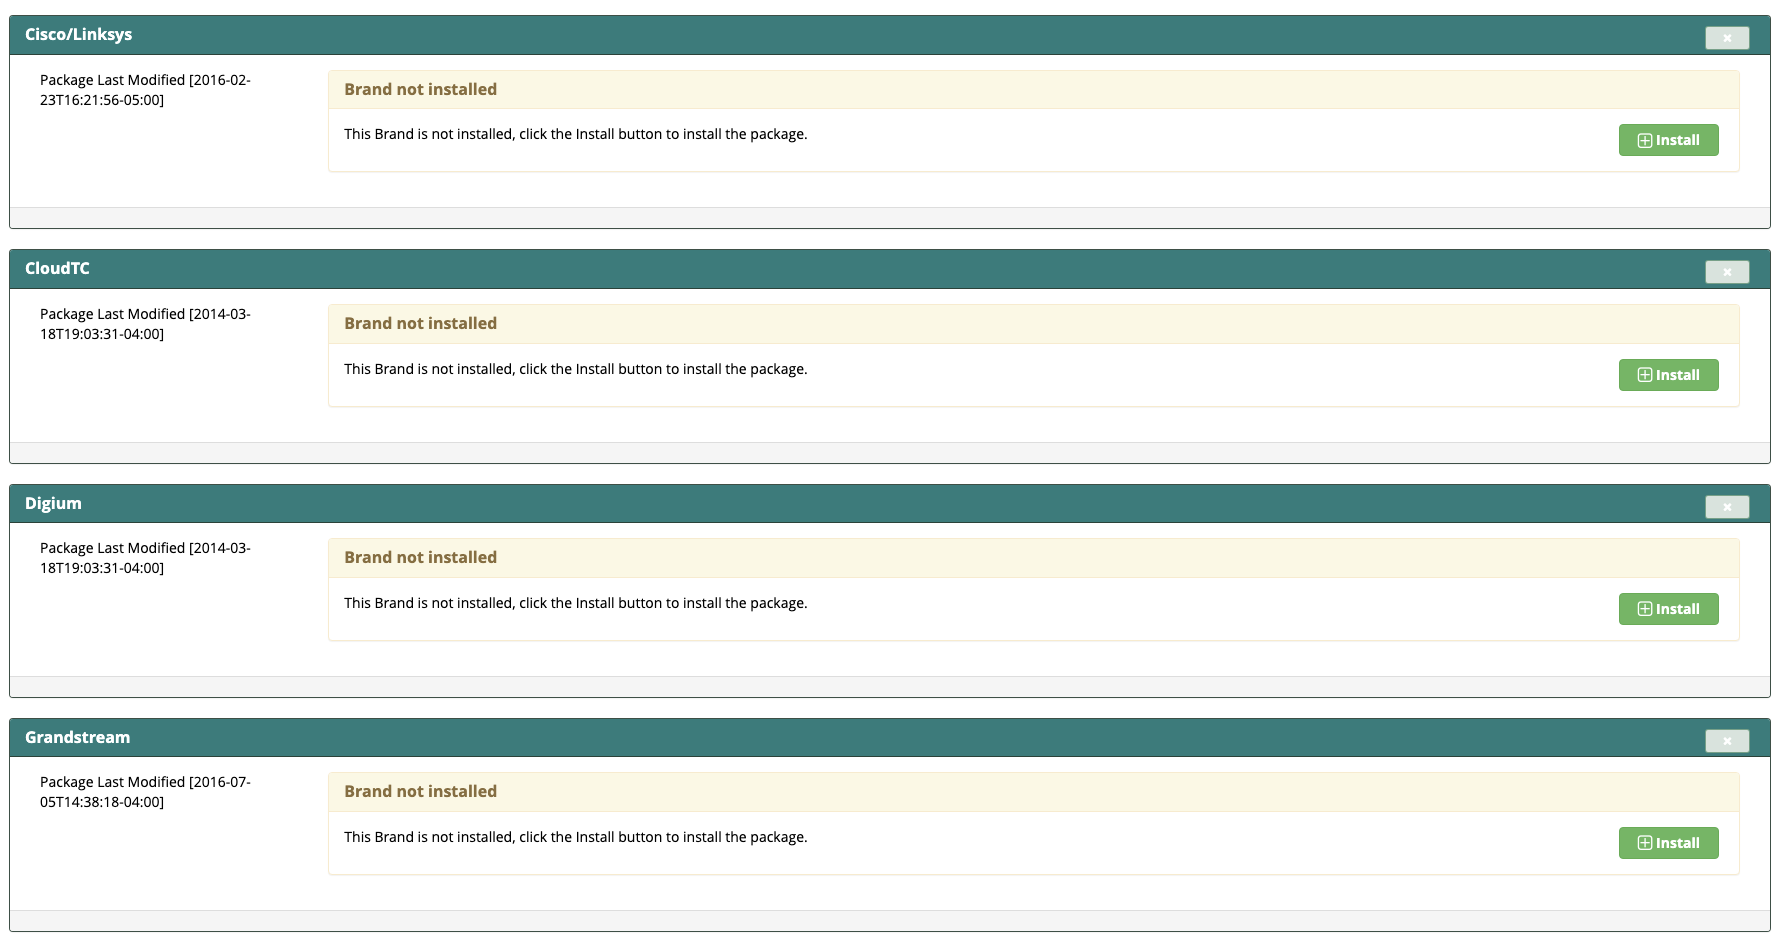
- On the right pull-down, choose Package Manager.
- Click Check for Updates.
- Click Install button beside each desired Brand.
The rest is a walk in the park. Plug in your SIP devices and perform the manufacturer’s steps to place the device in configuration mode. Insert the credentials to access OSS EPM on your PBX. Then sit back and enjoy the show.
Originally published: Thursday, February 1, 2024
Need help with Asterisk? Visit the VoIP-info Forum.
Special Thanks to Our Generous Sponsors
FULL DISCLOSURE: ClearlyIP, Skyetel, Vitelity, DigitalOcean, Vultr, VoIP.ms, 3CX, Sangoma, TelecomsXchange and VitalPBX have provided financial support to Nerd Vittles and our open source projects through advertising, referral revenue, and/or merchandise. As an Amazon Associate and Best Buy Affiliate, we also earn from qualifying purchases. We’ve chosen these providers not the other way around. Our decisions are based upon their corporate reputation and the quality of their offerings and pricing. Our recommendations regarding technology are reached without regard to financial compensation except in situations in which comparable products at comparable pricing are available from multiple sources. In this limited case, we support our sponsors because our sponsors support us.
BOGO Bonaza: Enjoy state-of-the-art VoIP service with a $10 credit and half-price SIP service on up to $500 of Skyetel trunking with free number porting when you fund your Skyetel account. No limits on number of simultaneous calls. Quadruple data center redundancy. $25 monthly minimum spend required. Tutorial and sign up details are here.
![]() The lynchpin of Incredible PBX 2020 and beyond is ClearlyIP components which bring management of FreePBX modules and SIP phone integration to a level never before available with any other Asterisk distribution. And now you can configure and reconfigure your new Incredible PBX phones from the convenience of the Incredible PBX GUI.
The lynchpin of Incredible PBX 2020 and beyond is ClearlyIP components which bring management of FreePBX modules and SIP phone integration to a level never before available with any other Asterisk distribution. And now you can configure and reconfigure your new Incredible PBX phones from the convenience of the Incredible PBX GUI.
VitalPBX is perhaps the fastest-growing PBX offering based upon Asterisk with an installed presence in more than 100 countries worldwide. VitalPBX has generously provided a customized White Label version of Incredible PBX tailored for use with all Incredible PBX and VitalPBX custom applications. Follow this link for a free test drive!
Special Thanks to Vitelity. Vitelity is now Voyant Communications and has halted new registrations for the time being. Our special thanks to Vitelity for their unwavering financial support over many years and to the many Nerd Vittles readers who continue to enjoy the benefits of their service offerings. We will keep everyone posted on further developments.
5 Minute PBX With Any Virtual Machine

For those with an existing virtual machine platform either at home or at the office, today is your lucky day. We have an Incredible PBX image for VirtualBox, VMware, Proxmox, Windows WSL, Mac UTM, and Linux Containers LXC that will have an Asterisk® PBX with FreePBX® up and running in less than 5 minutes. If you’ve ever wanted to kick the tires on a fully-loaded, secure PBX that offers virtually every telephony feature on the planet, now’s your chance. And it’s FREE!
If you’d prefer to let someone else worry about hardware maintenance, networking, and power outages, we’ve even got an Incredible PBX offering in the Cloud that will only set you back $25 a year in your choice of locations: Los Angeles, Atlanta, Miami, Germany, or The Netherlands. And that includes a free backup for a rainy day. Start here.
For those that are new to the open source community, finding free software is pretty easy. Finding good documentation to accompany it is more of a challenge. With Incredible PBX, you get both. My previous employer spent well over $150,000 for a PBX with less than half the features you’ll find in Incredible PBX out of the box. And you’ll never have to worry about upcharges every time you add a feature or an additional user or extension. Pick your free virtual machine platform below and enjoy the ride.
Incredible PBX 2027 for VirtualBox
For VirtualBox platforms, start by downloading the latest Incredible PBX 2027 .ova image from the Incredible PBX repository. You have a choice of operating systems: Ubuntu 22.04 or Debian 11. Then read our VirtualBox tutorial for setup and usage tips.
Incredible PBX 2027 for VMware
For VMware, start by downloading the latest VMware image for Incredible PBX 2027 and Ubuntu 22.04. Then read our VMware tutorial for setup and usage tips.
Incredible PBX 2027 for Proxmox 7
Our Incredible PBX 2027-U for Proxmox 7 tutorial will walk you through setting up a Proxmox server and building Incredible PBX 2027 virtual machines with Ubuntu® 22.04, Asterisk® 20, and FreePBX® 16 in minutes using a powerful little MiniPC.
Incredible PBX 2027 for Windows 11 WSL
If you’re strapped for cash and simply want to use an existing Windows 11 computer as the virtual machine host for Incredible PBX, you have a couple of options. First, you can install VirtualBox on your machine and follow the VirtualBox tutorial above. Another options is to deploy Microsoft’s own virtual machine platform for Windows 11. It’s called Windows 11 Subsystem for Linux (WSL). You’ll find step-by-step install instructions in this Nerd Vittles tutorial.
Incredible PBX 2027 for Mac UTM
With Apple’s new, proprietary processors, the days of using VirtualBox on a Mac are over. But, fear not. Apple has introduced their own virtualization platform: Mac UTM. You’ll find step-by-step instructions to deploy both UTM and Incredible PBX in this Nerd Vittles tutorial. For older Intel-based Macs, you still can deploy Incredible PBX with VirtualBox.
Incredible PBX 2027 for Linux Containers LXC
For those of you that have kissed Windows and Mac desktops goodbye, there’s now a virtualization platform for Linux desktop computers as well. You’ll find our tutorial for Linux LXC Containers here. You won’t be disappointed.
Adding a $1 a Month Phone Number with Free Incoming Calls
Last, but not least, let us point you to two of the best deals on the planet when it comes to acquiring a telephone number for your PBX with free incoming calls. CallCentric offers $1 a month residential DID with free incoming SIP calls. And a similar deal is available from LocalPhone with up to 100 free incoming calls of unlimited duration every day. We use both services and have never experienced an outage in over 10 years.
Originally published: Wednesday, January 24, 2024
Need help with Asterisk? Visit the VoIP-info Forum.
Special Thanks to Our Generous Sponsors
FULL DISCLOSURE: ClearlyIP, Skyetel, Vitelity, DigitalOcean, Vultr, VoIP.ms, 3CX, Sangoma, TelecomsXchange and VitalPBX have provided financial support to Nerd Vittles and our open source projects through advertising, referral revenue, and/or merchandise. As an Amazon Associate and Best Buy Affiliate, we also earn from qualifying purchases. We’ve chosen these providers not the other way around. Our decisions are based upon their corporate reputation and the quality of their offerings and pricing. Our recommendations regarding technology are reached without regard to financial compensation except in situations in which comparable products at comparable pricing are available from multiple sources. In this limited case, we support our sponsors because our sponsors support us.
BOGO Bonaza: Enjoy state-of-the-art VoIP service with a $10 credit and half-price SIP service on up to $500 of Skyetel trunking with free number porting when you fund your Skyetel account. No limits on number of simultaneous calls. Quadruple data center redundancy. $25 monthly minimum spend required. Tutorial and sign up details are here.
![]() The lynchpin of Incredible PBX 2020 and beyond is ClearlyIP components which bring management of FreePBX modules and SIP phone integration to a level never before available with any other Asterisk distribution. And now you can configure and reconfigure your new Incredible PBX phones from the convenience of the Incredible PBX GUI.
The lynchpin of Incredible PBX 2020 and beyond is ClearlyIP components which bring management of FreePBX modules and SIP phone integration to a level never before available with any other Asterisk distribution. And now you can configure and reconfigure your new Incredible PBX phones from the convenience of the Incredible PBX GUI.
VitalPBX is perhaps the fastest-growing PBX offering based upon Asterisk with an installed presence in more than 100 countries worldwide. VitalPBX has generously provided a customized White Label version of Incredible PBX tailored for use with all Incredible PBX and VitalPBX custom applications. Follow this link for a free test drive!
Special Thanks to Vitelity. Vitelity is now Voyant Communications and has halted new registrations for the time being. Our special thanks to Vitelity for their unwavering financial support over many years and to the many Nerd Vittles readers who continue to enjoy the benefits of their service offerings. We will keep everyone posted on further developments.
A Cloud-Based Asterisk PBX: 0 to $5/Mo.
In our last post, we catalogued the various ways to deploy an Asterisk® PBX using existing Windows, Mac, or Linux desktop hardware. But that solution isn’t ideal for everyone especially if you’re looking for a cloud-based platform that provides redundancy and backups. So today we’ll introduce some cloud platform Asterisk solutions, at least one of which can be deployed in under five minutes.
Let’s begin with our personal favorite, CrownCloud. For $25 a year, you get a 5-minute install from an Incredible PBX snapshot in your choice of locations: Los Angeles, Atlanta, Miami, Germany, or The Netherlands. You also get a free backup image. And, of course, you get the full complement of Incredible PBX utilities which set this deployment apart from all the other FreePBX® offerings.
It’s not every day that you get an opportunity to deploy an Incredible PBX® server on a cloud platform as robust as the one offered by Oracle®. And the fact that it won’t cost you a dime EVER makes this all the more appealing. This isn’t some bargain basement, crippled cloud platform with barely enough horsepower to get your server booted. Quite the contrary, this is an ARM-based Ubuntu 20.04 platform with 6GB of RAM, 45+ GB of storage, and a 1GB network pipe. The CPU capacity is equivalent to multiple physical cores of an Intel Xeon processor with hyper threading enabled. Read our step-by-step installation tutorial for deployment instructions. This install is best suited for those with some networking experience.
If you want a low cost Cloud solution that’s easy to deploy, you can’t beat RackNerd’s KVM Cloud platform for $12.98 a year which works out to just over $1 a month. The Incredible PBX 2027 tutorial for Ubuntu 22.04 will have you up and running in under an hour with the latest releases of Asterisk 20 and FreePBX 16.
Let’s finish with the elephants in the room: Amazon, Google, IBM, Microsoft, and Oracle. They all have cloud offerings, and our recommendation is don’t go there. Their services are EXPENSIVE. And they offer less functionality at significantly higher cost than some of the smaller, well-established companies such as Vultr and Digital Ocean. If $5 to $6 (with backups) a month for a cloud platform is not too rich for your blood, you can’t go wrong with either of these. And just like with RackNerd, the Incredible PBX 2027 tutorial for Ubuntu 22.04 will have you up and running in under an hour.
Originally published: Wednesday, January 17, 2024
Need help with Asterisk? Visit the VoIP-info Forum.
Special Thanks to Our Generous Sponsors
FULL DISCLOSURE: ClearlyIP, Skyetel, Vitelity, DigitalOcean, Vultr, VoIP.ms, 3CX, Sangoma, TelecomsXchange and VitalPBX have provided financial support to Nerd Vittles and our open source projects through advertising, referral revenue, and/or merchandise. As an Amazon Associate and Best Buy Affiliate, we also earn from qualifying purchases. We’ve chosen these providers not the other way around. Our decisions are based upon their corporate reputation and the quality of their offerings and pricing. Our recommendations regarding technology are reached without regard to financial compensation except in situations in which comparable products at comparable pricing are available from multiple sources. In this limited case, we support our sponsors because our sponsors support us.
BOGO Bonaza: Enjoy state-of-the-art VoIP service with a $10 credit and half-price SIP service on up to $500 of Skyetel trunking with free number porting when you fund your Skyetel account. No limits on number of simultaneous calls. Quadruple data center redundancy. $25 monthly minimum spend required. Tutorial and sign up details are here.
![]() The lynchpin of Incredible PBX 2020 and beyond is ClearlyIP components which bring management of FreePBX modules and SIP phone integration to a level never before available with any other Asterisk distribution. And now you can configure and reconfigure your new Incredible PBX phones from the convenience of the Incredible PBX GUI.
The lynchpin of Incredible PBX 2020 and beyond is ClearlyIP components which bring management of FreePBX modules and SIP phone integration to a level never before available with any other Asterisk distribution. And now you can configure and reconfigure your new Incredible PBX phones from the convenience of the Incredible PBX GUI.
VitalPBX is perhaps the fastest-growing PBX offering based upon Asterisk with an installed presence in more than 100 countries worldwide. VitalPBX has generously provided a customized White Label version of Incredible PBX tailored for use with all Incredible PBX and VitalPBX custom applications. Follow this link for a free test drive!
Special Thanks to Vitelity. Vitelity is now Voyant Communications and has halted new registrations for the time being. Our special thanks to Vitelity for their unwavering financial support over many years and to the many Nerd Vittles readers who continue to enjoy the benefits of their service offerings. We will keep everyone posted on further developments.
Deploying a Free Turnkey Phone System

To say the New Year is ushering in a scaled back constituency for self-managed telephony systems would be an understatement. Much of this migration from Asterisk® can be traced directly to the proliferation of cell phones coupled with the expansion of Zoom and Microsoft Teams deployments thanks to the COVID nightmare.
Despite Sangoma’s best efforts to commercialize Asterisk and FreePBX®, we think there’s still a place for free systems especially turnkey Asterisk PBX deployments that can coexist on Windows, Mac, and Linux desktops. For today, we’ll point you to tutorials that will let you download and then install a turnkey platform of your choice in just a couple minutes.
For Windows 11 and Zorin desktops, you can deploy Incredible PBX 2027 for Debian 11 and run it under VirtualBox. If you prefer an Ubuntu platform for Incredible PBX 2027, a tutorial is available here as well. If you’re using a Zorin desktop, keep in mind that VirtualBox must be reinstalled before use:
apt remove virtualbox-dkms
apt install virtualbox-dkms
Another turnkey Asterisk PBX option for Windows 11 desktops is WSL. Complete instructions for deployment and use are available here.
For Mac users, the available turnkey option of Incredible PBX depends upon whether you’re using an older Intel-based machine or a newer machine with Apple silicon.For Intel platforms, VirtualBox is an ideal platform for Incredible PBX 2027. For newer Macs with M1, M2, or M3 processors, simply deploy Incredible PBX with the UTM application.
Finally, for Linux desktops (and we prefer Zorin), you have two options. As noted above, you can deploy Incredible PBX with VirtualBox. For real-time performance, we prefer deployments using LXC Containers.
We’ll close with a few tips for the new year as you begin your new journey into the world of free Asterisk PBX telephony. Unlike some of the commercial offerings, the Incredible PBX platform offers a variety of support options. You can get first-hand support and hand-holding on the VoIP-Info.org Forum. Second, the Incredible PBX Wiki offers literally hundreds of tutorials and recommendations on every subject imaginable. Finally, the Incredible PBX Repository has download links for every platform and every script that has ever been produced.
Enjoy and Happy New Year!
Originally published: Sunday, December 31, 2023
Need help with Asterisk? Visit the VoIP-info Forum.
Special Thanks to Our Generous Sponsors
FULL DISCLOSURE: ClearlyIP, Skyetel, Vitelity, DigitalOcean, Vultr, VoIP.ms, 3CX, Sangoma, TelecomsXchange and VitalPBX have provided financial support to Nerd Vittles and our open source projects through advertising, referral revenue, and/or merchandise. As an Amazon Associate and Best Buy Affiliate, we also earn from qualifying purchases. We’ve chosen these providers not the other way around. Our decisions are based upon their corporate reputation and the quality of their offerings and pricing. Our recommendations regarding technology are reached without regard to financial compensation except in situations in which comparable products at comparable pricing are available from multiple sources. In this limited case, we support our sponsors because our sponsors support us.
BOGO Bonaza: Enjoy state-of-the-art VoIP service with a $10 credit and half-price SIP service on up to $500 of Skyetel trunking with free number porting when you fund your Skyetel account. No limits on number of simultaneous calls. Quadruple data center redundancy. $25 monthly minimum spend required. Tutorial and sign up details are here.
![]() The lynchpin of Incredible PBX 2020 and beyond is ClearlyIP components which bring management of FreePBX modules and SIP phone integration to a level never before available with any other Asterisk distribution. And now you can configure and reconfigure your new Incredible PBX phones from the convenience of the Incredible PBX GUI.
The lynchpin of Incredible PBX 2020 and beyond is ClearlyIP components which bring management of FreePBX modules and SIP phone integration to a level never before available with any other Asterisk distribution. And now you can configure and reconfigure your new Incredible PBX phones from the convenience of the Incredible PBX GUI.
VitalPBX is perhaps the fastest-growing PBX offering based upon Asterisk with an installed presence in more than 100 countries worldwide. VitalPBX has generously provided a customized White Label version of Incredible PBX tailored for use with all Incredible PBX and VitalPBX custom applications. Follow this link for a free test drive!
Special Thanks to Vitelity. Vitelity is now Voyant Communications and has halted new registrations for the time being. Our special thanks to Vitelity for their unwavering financial support over many years and to the many Nerd Vittles readers who continue to enjoy the benefits of their service offerings. We will keep everyone posted on further developments.
VoIP Messaging and The Golden Rule with Incredible PBX

If you want to continue to use SMS and MMS messaging on your VoIP platform, then today’s navigation guide is worth a careful read. Suffice it to say, this is what happens when the feds shirk their responsibilities and leave it to the foxes to guard the chicken coop.
The Golden Rule with all oligopolies is that he who has the gold makes the rules. And, make no mistake, there are stringent new rules for VoIP messaging. Not surprisingly, the FCC has jumped on the cellphone provider bandwagon. You can read all about the new FCC rules here. And the cellphone oligopoly has implemented additional requirements of its own that are enforced through a new organization called The Campaign Registry (TCR).
Any business that sends text messages to U.S. or Canadian mobile phone numbers is now required to register with TCR and obtain a 10-digit long code (10DLC) number. This number is used to identify the sender of each text message and to help the mobile carriers filter out spam (according to the carriers). To register with TCR, businesses must provide information about their company, including their legal name, EIN, and contact information. They must also submit a sample text message and identify the purpose for which they will be using SMS messaging.
What are TCR’s messaging guidelines?
- Obtaining permission from recipients before sending them text messages
- Clearly identifying the sender in each text message
- Providing a way for recipients to opt out of receiving future text messages
- Avoiding sending spam or unsolicited text messages
Carriers have imposed additional restrictions for certain types of messages so-called SHAFT content: sex, hate, alcohol, firearms, and tobacco (CBD is included). And, unlike email messages, SMS traffic cannot be encrypted so the providers can and do scan the contents of every message that hits their networks. If a business fails to comply with TCR’s requirements, the sender may face penalties including fines and suspension from sending text messages through the cellphone carriers.
You might wonder how these new rules came about. The short answer is that politicians flooded the cell providers’ networks with text messages during the last election cycle. And, of course, the politicians conveniently exempted themselves from all the spam rules including SMS messaging. So the new rules, while appearing admirable to the public, have little if anything to do with the root cause of the problem, the politicians.
CAUTION: What follows is NOT legal advice. It is simply our reading of available literature pertaining to TCR and VoIP.ms rules and regulations. Do NOT rely upon this interpretation of the rules in making decisions regarding SMS deployments. Do your own research. Better yet, consult an attorney.
Keep in mind that the current exception to TCR verification will probably disappear within the next several months. A word to the wise: Go ahead and get registered and verified unless you plan to use your cellphone exclusively for messaging or your usage is clearly non-business. The upfront costs are minimal. Here is an excellent summary of the various 10DLC registration categories.
Assuming your VoIP messages don’t include SHAFT content and otherwise comply with the guidelines above, there remains an exception for messaging without TCR verification… at least for now. The current limits on 10DLC SMS traffic without verification are as follows:
- Daily limit: 500 message segments
- Monthly limit: 5,000 message segments
- Per-recipient limit: 10 messages per day
A message segment is equal to 158 characters. So, a single text message can be composed of one or more segments, depending on its length.
There’s one additional gotcha. For traditional 10-digit numbers, only one SMS segment per second can be sent, and it cannot be increased. So be brief. For toll-free numbers, three SMS segments per second can be sent, and the restriction can be relaxed under certain circumstances. For short code messaging (initial cost is usually $1,500 or more per month to obtain a short code), 100 SMS message segments per second are permitted, and this limit can also be increased.
Now let’s return to our Navigation Guide for those that simply want to use VoIP messaging in the traditional ways that used to work, i.e. for a coach to schedule a little league practice or for you to tell your kid you’re going to be late picking them up from school.
Rule #1: If you have enabled SMS messaging on all of your VoIP phone numbers, do not use numbers on which you depend for critical input for outbound SMS traffic. The risk you run is that breaking one of the rules or limits above may get your number blacklisted from ALL future SMS message traffic.
Rule #2: Don’t break the daily, monthly, and per-recipient messaging limits EVER.
Rule #3: Don’t send SHAFT content over SMS even if you’re joking. Big Brother does not have a sense of humor.
Rule #4: Keep messages under 158 characters in length unless you’re using a toll-free number (158×3 message size limit).
Rule #5: Don’t send more than one message per second. For example, if you’re using a script to send a team notice of a little league practice, be sure to insert a one or two-second pause between each outbound message.
Rule #6: Only use a throw-away number to send outbound SMS messages. If the number gets blacklisted, discard the number.
The Safest VoIP Messaging Platform
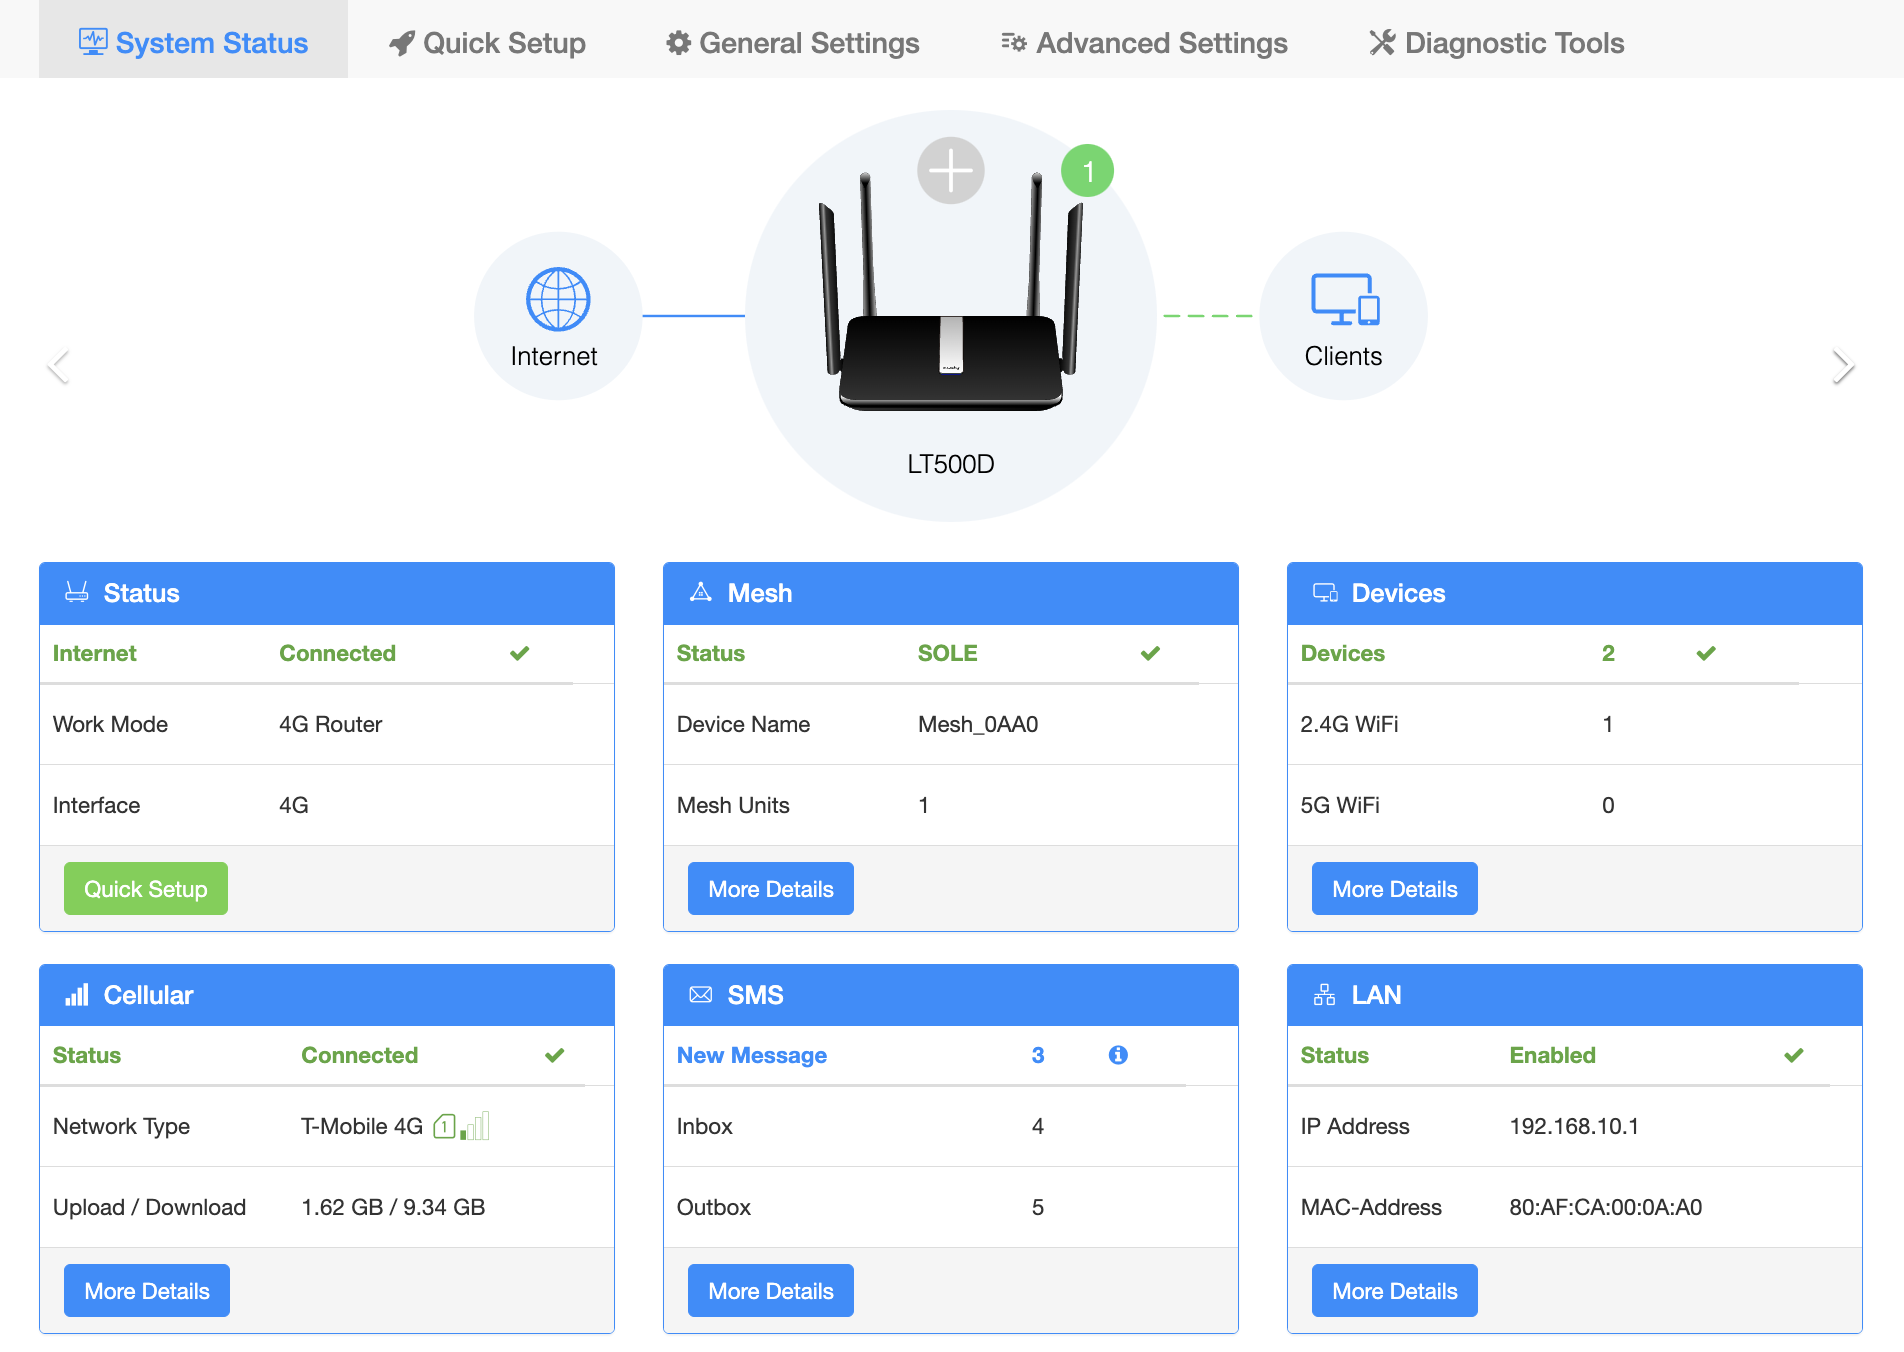
As you might expect, the safest way to send and receive SMS messages is through a cellphone or something that looks like a cellphone to the carrier networks. Our review of the Cudy Router spotlights a device that fits the bill perfectly if you have an extra SIM card lying around. Using the web interface on this device, you can send and receive SMS messages using the SMS link on the System Status page because the SMS messages appear to originate from a device on the cell provider’s own network where there are limited restrictions.
Using VoIP.ms for SMS Messaging
Assuming you can comply with all of the restrictions above, here’s our recommendation for a VoIP provider that lets you continue sending messages at minimal cost. That provider is one of our old favorites, VoIP.ms. Using our signup link helps keep the Nerd Vittles lights on so thank you in advance.
So long as you have an SMS-enabled DID with VoIP.ms, SMS messaging costs $0.0075 per message with no additional fees. Below we’ll walk you through getting everything set up with Incredible PBX to take advantage of VoIP.ms SMS services.
Configuring VoIP.ms for SMS Messaging
As noted, you’ll need to order a DID from VoIP.ms that supports SMS. Then enable SMS messaging in the DID setup and specify either an email address or cellphone number for delivery of incoming SMS messages addressed to that DID. If you happen to have a Yealink T46G (not T48G) or a Grandstream GXV phone that is also registered to that extension, the messages will also pop up on your desktop phone with an alert tone if you also enable "Link the SMS received to this DID to a SIP Account" and register the phone to a PJsip extension with the additions which follow. On Grandstream GXV Android phones, we recommend dragging the SMS app to the main screen so that the incoming message count appears beside the SMS icon when new messages are received. If you’re a clever programmer, you also can retrieve incoming messages from the Asterisk log by searching for "Inbound SMS dialplan invoked." The message will be in the following From and Body lines. Or tail /var/log/asterisk/full will look something like this:

To support sending SMS messages, enable the SOAP and REST/JSON API in the VoIP.ms Main Menu, set a very secure API password, and whitelist the IP addresses of each server from which you wish to send SMS messages.
Configuring Incredible PBX to Send SMS Messages
1. Login to your Incredible PBX 2027 server as root and issue the following commands:
cd /root/sms-voip.ms
rm -f /root/sms-voip.ms/*
pip install python-dotenv
wget http://incrediblepbx.com/sendsms-voipms.tar.gz
tar zxvf sendsms-voipms.tar.gz
rm sendsms-voipms.tar.gz
nano -w sendsms
2. When the editor opens, scroll down and replace 8431234567 with your SMS-enabled DID
3. Replace yourname@gmail.com with your VoIP.ms login email address
4. Replace your-API-key with your VoIP.ms API password
5. Save the file: Ctrl-X, Y, then ENTER
6. Send an SMS test message to your cell phone using the following syntax:
/root/sms-voip.ms/sendsms 10-digit-SMS-recipient "Your SMS message"
Configuring Incredible PBX to Receive SMS Messages
To receive SMS messages through FreePBX® using a compatible SIP phone or through the Asterisk CLI, you first must use a PJsip trunk to connect to VoIP.ms. Sample General Settings for the trunk are shown below. In the Advanced tab, set Message Context to sms-in.
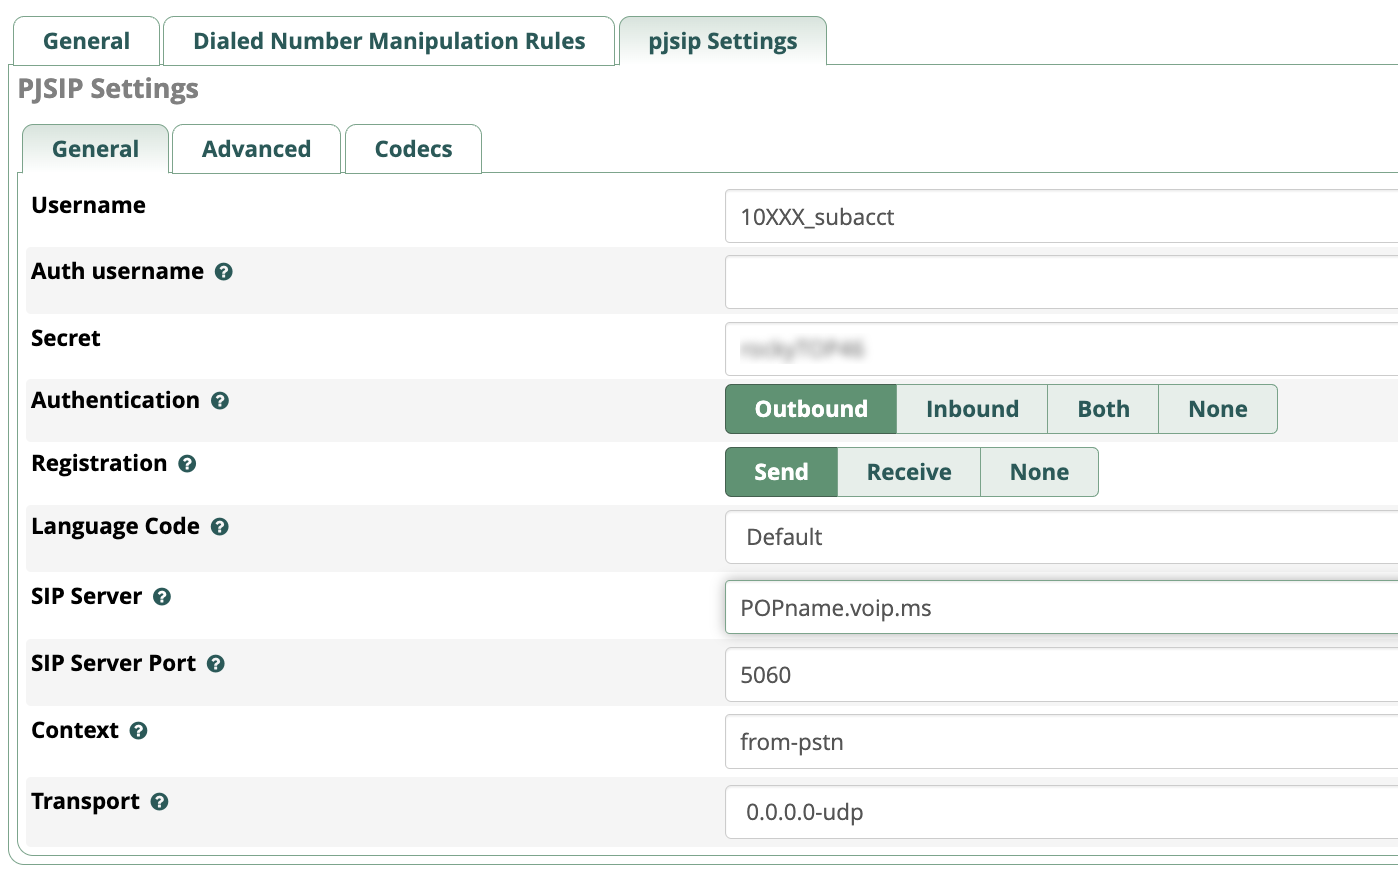
You also must create a PJsip extension or use the preconfigured 701 PJsip extension. In the Advanced tab, set Message Context to sms-out.
Finally, edit extensions_custom.conf in /etc/asterisk and add the following code to the bottom of the file:
[sms-out]
exten => _.,1,NoOp(Outbound Message dialplan invoked)
exten => _.,n,NoOp(  TO: ${MESSAGE(to)})
exten => _.,n,NoOp(FROM: ${MESSAGE(from)})
exten => _.,n,NoOp(BODY: ${MESSAGE(body)})
;
; add your VoIPms info in the next 3 lines
exten => _.,n,Set(VOIPMS_ACCOUNT="123456_subacct")
exten => _.,n,Set(VOIPMS_POP="atlanta.voip.ms")
exten => _.,n,Set(VOIPMS_TRUNK="VoIPms-PJsip") ; actual VoIP.ms trunk in FreePBX
;
exten => _.,n,Set(NUMBER_TO=${CUT(CUT(MESSAGE(to),@,1),:,2)})
exten => _.,n,Set(EXTENSION_FROM=${CUT(CUT(MESSAGE(from),@,1),:,2)})
;
; Now map your sending extensions EXTENSION_FROM to corresponding DIDs NUMBER_FROM
exten => _.,n,Set(CASE_701=6005550101) ; ext 701 msgs originate from 6005550101
exten => _.,n,Set(CASE_702=6005550102) ; ext 702 msgs originate from 6005550102
exten => _.,n,Set(CASE_703=6005550101) ; ext 703 msgs originate from 6005550101
;
exten => _.,n,Set(NUMBER_FROM=${CASE_${EXTENSION_FROM}})
exten => _.,n,Set(ACTUAL_FROM="${NUMBER_FROM}" )
exten => _.,n,Set(ACTUAL_TO=pjsip:${VOIPMS_TRUNK}/sip:${NUMBER_TO}@${VOIPMS_POP})
exten => _.,n,MessageSend(${ACTUAL_TO},${ACTUAL_FROM})
exten => _.,n,NoOp(Send status is ${MESSAGE_SEND_STATUS})
exten => _.,n,Hangup()
;-------------------------------------------------------------------------

[sms-in]
exten => _.,1,NoOp(Inbound SMS dialplan invoked)
exten => _.,n,NoOp(  TO: ${MESSAGE(to)})
exten => _.,n,NoOp(FROM: ${MESSAGE(from)})
exten => _.,n,NoOp(BODY: ${MESSAGE(body)})
;
; enter your default incoming SMS extension below
; if you want SMS messages delivered to multiple extensions,
; clone additional MessageSend lines below with extension numbers
exten => _.,n,Set(EXTENSION=701)
;
exten => _.,n,Set(ACTUAL_FROM=${MESSAGE(from)})
exten => _.,n,Set(HOST_TO=${CUT(MESSAGE(to),@,2)})
exten => _.,n,Set(NUMBER_TO=${MESSAGE_DATA(X-SMS-To)})
exten => _.,n,MessageSend(pjsip:${EXTENSION}@${HOST_TO},${ACTUAL_FROM})
exten => _.,n,NoOp(Send status is ${MESSAGE_SEND_STATUS})
exten => _.,n,Hangup()
;-------------------------------------------------------------------------
In the pasted [sms-out] context, insert your actual VOIPMS_ACCOUNT, VOIPMS_POP, and VOIPMS_TRUNK name in the lines provided. Then map each extension from which you wish to send SMS messages to a VoIP.ms DID on your PBX in the lines provided. In the pasted [sms-in] context, enter the EXTENSION number which should receive incoming messages from the PJsip trunk in which you designated [sms-in] as the Message Context. There is no magic to the [sms-in] context name. If you have more than one PJsip trunk, simply create additional incoming contexts (such as [sms-in-2]) for each additional trunk and clone the [sms-in] code designating the desired extension to receive incoming messages from each DID. For the [sms-out] context, it can be used as the Message Context for multiple extensions that should be enabled to send outbound SMS messages.
Save the file, and reload the Asterisk dialplan: asterisk -rx "dialplan reload"
Introducing the FreePBX SMS Connector Module
Bill Simon recently released another messaging alternative with his SMS Connector Module for FreePBX. The beauty of his new approach is it lets you use Sangoma’s User Control Panel (UCP) to send and receive messages with Incredible PBX 2027. It also supports messaging on both Sangoma’s and ClearlyIP’s SIP phones including the Incredible PBX SIP phones. Here’s the setup process with Incredible PBX 2027 for non-business messaging using VoIP.ms.
At VoIP.ms…
1. Create a Subaccount and DID/Trunk
2. Enable SMS on the trunk and Link SMS Messages received on this Trunk to your SubAccount
3. Enable VoIP.ms API, create an API Password, and Whitelist the public IP address of your server
4. Copy your VoIP.ms email address and API Password for use on your server’s SMS setup
On Your Incredible PBX server…
1. Login to the FreePBX GUI as admin
2. Create a PJsip Trunk for VoIP.ms
3. In Advanced Settings, set Message Context to voipms-sms-in
4. In Admin -> User Management, create a password for extension 701
5. Add the following context to the end of /etc/asterisk/extensions_custom.conf:
[voipms-sms-in]
exten => _.,1,NoOp(Inbound Voip.ms SMS dialplan invoked)
same => n,Set(TO=${MESSAGE_DATA(X-SMS-To)})
same => n,Set(FROM=${CUT(MESSAGE(from),\",2)})
same => n,Set(ENV(QUERY_STRING)=provider=voipms\;to=${TO}\;from=${FROM}\;message=${URIENCODE(${MESSAGE(body)})})
same => n,Set(ENV(REQUEST_METHOD)=GET)
same => n,System(php /var/www/html/smsconn/provider.php)
same => n,Set(ENV(QUERY_STRING)=)
same => n,Hangup()
;-------------------------------------------------------------------------
6. Reload your dialplan: rm /tmp/* ; fwconsole reload
Install and Configure SMS Connector Module…
1. Login to your server as root and issue the following commands:
fwconsole ma downloadinstall https://filedn.com/lBgbGypMOdDm8PWOoOiBR7j/SMSconnector/smsconnector-16.0.11.tar.gz
fwconsole reload
2. In the FreePBX GUI, navigate to Connectivity -> SMS Connector
3. Click Provider Settings and enter your email address for Username and API Secret for VoIP.ms. Click Submit.
4. In SMS Connector menu, click Add Number and enter your DID and PJsip extension 701 to associate with it.
5. Enter VoIP.ms as Provider and click Save Changes.
Using User Control Panel (UCP)…
1. If you have not already done so, apply these UCP patches for Incredible PBX:
mysql -u root -ppassw0rd asterisk -e "update freepbx_settings set value = 'Latest-16' where keyword = 'MIRROR_BRAND_VERSION'; "
mysql -u root -ppassw0rd asterisk -e "update admin set value = 'true' where variable = 'need_reload'; "
rm -f /tmp/*
fwconsole reload
fwconsole ma downloadinstall ucp
rm -f /tmp/*
fwconsole reload
2. Open UCP from FreePBX GUI
3. Login as 701 with your new password
4. Click + in Upper Left of display and add SMS Module for 701.
5. When SMS Module appears on UCP console, click Start Conversation
6. Send a test message to your cellphone
7. Reply to the SMS message from your cellphone
8. Reply should appear in UCP within 20-30 seconds
Let’s close today with a final cautionary note. The Bell Sisters define non-business usage as conversational messaging much like what most already do using their cellphones. If you push the envelope, you risk $100 fines for every message sent. Unless you are a lawyer or have deep pockets to hire one and fight The Oligopoly, you are well advised to obtain a 10DLC number and avoid any potential issues going forward.
Originally published: Monday, November 6, 2023
Need help with Asterisk? Visit the VoIP-info Forum.
Special Thanks to Our Generous Sponsors
FULL DISCLOSURE: ClearlyIP, Skyetel, Vitelity, DigitalOcean, Vultr, VoIP.ms, 3CX, Sangoma, TelecomsXchange and VitalPBX have provided financial support to Nerd Vittles and our open source projects through advertising, referral revenue, and/or merchandise. As an Amazon Associate and Best Buy Affiliate, we also earn from qualifying purchases. We’ve chosen these providers not the other way around. Our decisions are based upon their corporate reputation and the quality of their offerings and pricing. Our recommendations regarding technology are reached without regard to financial compensation except in situations in which comparable products at comparable pricing are available from multiple sources. In this limited case, we support our sponsors because our sponsors support us.
BOGO Bonaza: Enjoy state-of-the-art VoIP service with a $10 credit and half-price SIP service on up to $500 of Skyetel trunking with free number porting when you fund your Skyetel account. No limits on number of simultaneous calls. Quadruple data center redundancy. $25 monthly minimum spend required. Tutorial and sign up details are here.
![]() The lynchpin of Incredible PBX 2020 and beyond is ClearlyIP components which bring management of FreePBX modules and SIP phone integration to a level never before available with any other Asterisk distribution. And now you can configure and reconfigure your new Incredible PBX phones from the convenience of the Incredible PBX GUI.
The lynchpin of Incredible PBX 2020 and beyond is ClearlyIP components which bring management of FreePBX modules and SIP phone integration to a level never before available with any other Asterisk distribution. And now you can configure and reconfigure your new Incredible PBX phones from the convenience of the Incredible PBX GUI.
VitalPBX is perhaps the fastest-growing PBX offering based upon Asterisk with an installed presence in more than 100 countries worldwide. VitalPBX has generously provided a customized White Label version of Incredible PBX tailored for use with all Incredible PBX and VitalPBX custom applications. Follow this link for a free test drive!
Special Thanks to Vitelity. Vitelity is now Voyant Communications and has halted new registrations for the time being. Our special thanks to Vitelity for their unwavering financial support over many years and to the many Nerd Vittles readers who continue to enjoy the benefits of their service offerings. We will keep everyone posted on further developments.
Incredible ChatGPT: Artificial Intelligence For Your Phone

Unless you’ve been sleeping under a rock, you already know that Artificial Intelligence (AI) has the potential to transform every aspect of our lives. The reasons are fairly obvious. AI can process and analyze massive amounts of data in seconds that humans could spend months and years collecting. AI is being used to develop new drugs and treatments, diagnose diseases, and provide personalized care to patients. It’s being used to develop self-driving cars and trucks, optimize traffic flows, and improve public transportation. It can be used in manufacturing to automate tasks, improve quality control, and reduce costs. And AI can be used in the financial world to detect fraud, assess risk, and make investment decisions. Because of AI’s encyclopedic prowess, it can also write a mean term paper with human-like prose. That’s the good news. The bad news is that not everything AI regurgitates is accurate so be extremely careful relying upon AI exclusively to make decisions. See if you can spot the problem in this ChatGPT response:

ChatGPT is a large language model chatbot developed by OpenAI, a company backed by Microsoft®. Within two months after launch, ChatGPT had over 100 million subscribers. It is trained on a massive dataset of text and code and is able to generate human-like text, translate languages, write different kinds of creative content, and answer your questions in an informative way. The knowledge cutoff date for the gpt-3.5-turbo version of ChatGPT is September 2021. For users of Incredible PBX, today we’re pleased to bring that ChatGPT model to a telephone near you.
To get started, you’ll need three components. First, you’ll need an Incredible PBX 2027 platform with Debian 11 or Ubuntu 22.04 running on Windows, a Mac, or Linux. Turnkey versions are available for dozens of virtual machine and cloud-based platforms. If you’re using Incredible PBX 2027 on the Rocky 8 platform, you will also need to install the gTTS text-to-speech engine from here. Second, you’ll need to obtain a free OpenAI_KEY here using your Google, Apple, or Microsoft email account. And, third, you’ll need to obtain a free Speech-to-Text API_KEY and API_URL from IBM. Once you have the three pieces in hand, you’re ready to proceed with the installation for your Incredible PBX platform. After installation, you can make ChatGPT queries using any telephone connected to your PBX. Simply dial 2428 (C-H-A-T) and speak your query.
Installing the ChatGPT Telephone Interface
Not every ChatGPT response is suitable for use with a telephone. You wouldn’t want ChatGPT reading you a term paper or spouting out some Asterisk® dialplan code. Nor can most telephones display photos. So our deployment for Incredible PBX today provides two ChatGPT solutions: (1) a command-line interface that is accessible from a terminal or via SSH: chatgpt -p "your query". (2) The telephone interface is accessible by dialing 2428. For the telephone interface, be careful what you ask. You don’t want a 10,000-word response. For example, a good query might be "What are the five best Atlantic coast beaches in the United States." A not-so-good query would be "What are the best restaurants in the world."
To get started after installing Incredible PBX using one of the numerous tutorials available here, log into your server as root and issue the following commands:
cd /
wget https://filedn.com/lBgbGypMOdDm8PWOoOiBR7j/ChatGPT/incredible-chat.tar.gz
tar zxvf incredible-chat.tar.gz
cd /root
Once the components have been downloaded and installed, navigate to the /root folder.
Enter your ChatGPT and IBM STT credentials in the following files:
- Edit chat and insert your OPENAI_KEY in line 6
- Edit chatgpt and insert your OPENAI_KEY in line 15
- Edit chatgpt.sh and insert your OPENAI_KEY in line 12
- Also insert your IBM STT API_KEY in line 16 of chatgpt.sh
- Also insert your IBM STT API_URL in line 17 of chatgpt.sh
Complete the install by issuing the following commands:
cd /root
sed -i '/\[from-internal-custom\]/r chat.code' /etc/asterisk/extensions_custom.conf
chmod +x chat*
sed -i 's|:wav|.wav|' /etc/asterisk/extensions_custom.conf
mv chat /usr/local/sbin
mv chatgpt /usr/local/bin
mv chatgpt.sh /var/lib/asterisk/agi-bin
asterisk -rx "dialplan reload"
NOTE: The chatgpt command-line tool does not work on the Rocky 8 platform because of a bug in their fold implementation. However, both our chat command-line tool and the 2428 telephony interface work fine once the gTTS text-to-speech engine is installed for Rocky 8.
Making a Test Call with ChatGPT
Now that all the pieces are in place, let’s make a test call. From a phone connected to your Incredible PBX server, dial 2428. At the prompt, enter the following query: What Are the Five Best Gulf Coast Beach Resorts in the United States? Within a minute or so, ChatGPT will provide the answer using the gTTS text-to-speech engine included in Incredible PBX. Enjoy!
A Cautionary Note About ChatGPT
We’ll close today with this cautionary note about ChatGPT… from ChatGPT:
Originally published: Friday, October 20, 2023
Need help with Asterisk? Visit the VoIP-info Forum.
Special Thanks to Our Generous Sponsors
FULL DISCLOSURE: ClearlyIP, Skyetel, Vitelity, DigitalOcean, Vultr, VoIP.ms, 3CX, Sangoma, TelecomsXchange and VitalPBX have provided financial support to Nerd Vittles and our open source projects through advertising, referral revenue, and/or merchandise. As an Amazon Associate and Best Buy Affiliate, we also earn from qualifying purchases. We’ve chosen these providers not the other way around. Our decisions are based upon their corporate reputation and the quality of their offerings and pricing. Our recommendations regarding technology are reached without regard to financial compensation except in situations in which comparable products at comparable pricing are available from multiple sources. In this limited case, we support our sponsors because our sponsors support us.
BOGO Bonaza: Enjoy state-of-the-art VoIP service with a $10 credit and half-price SIP service on up to $500 of Skyetel trunking with free number porting when you fund your Skyetel account. No limits on number of simultaneous calls. Quadruple data center redundancy. $25 monthly minimum spend required. Tutorial and sign up details are here.
![]() The lynchpin of Incredible PBX 2020 and beyond is ClearlyIP components which bring management of FreePBX modules and SIP phone integration to a level never before available with any other Asterisk distribution. And now you can configure and reconfigure your new Incredible PBX phones from the convenience of the Incredible PBX GUI.
The lynchpin of Incredible PBX 2020 and beyond is ClearlyIP components which bring management of FreePBX modules and SIP phone integration to a level never before available with any other Asterisk distribution. And now you can configure and reconfigure your new Incredible PBX phones from the convenience of the Incredible PBX GUI.
VitalPBX is perhaps the fastest-growing PBX offering based upon Asterisk with an installed presence in more than 100 countries worldwide. VitalPBX has generously provided a customized White Label version of Incredible PBX tailored for use with all Incredible PBX and VitalPBX custom applications. Follow this link for a free test drive!
Special Thanks to Vitelity. Vitelity is now Voyant Communications and has halted new registrations for the time being. Our special thanks to Vitelity for their unwavering financial support over many years and to the many Nerd Vittles readers who continue to enjoy the benefits of their service offerings. We will keep everyone posted on further developments.
Virtualization Trifecta: $500 Buys a Perfect Hosting Platform
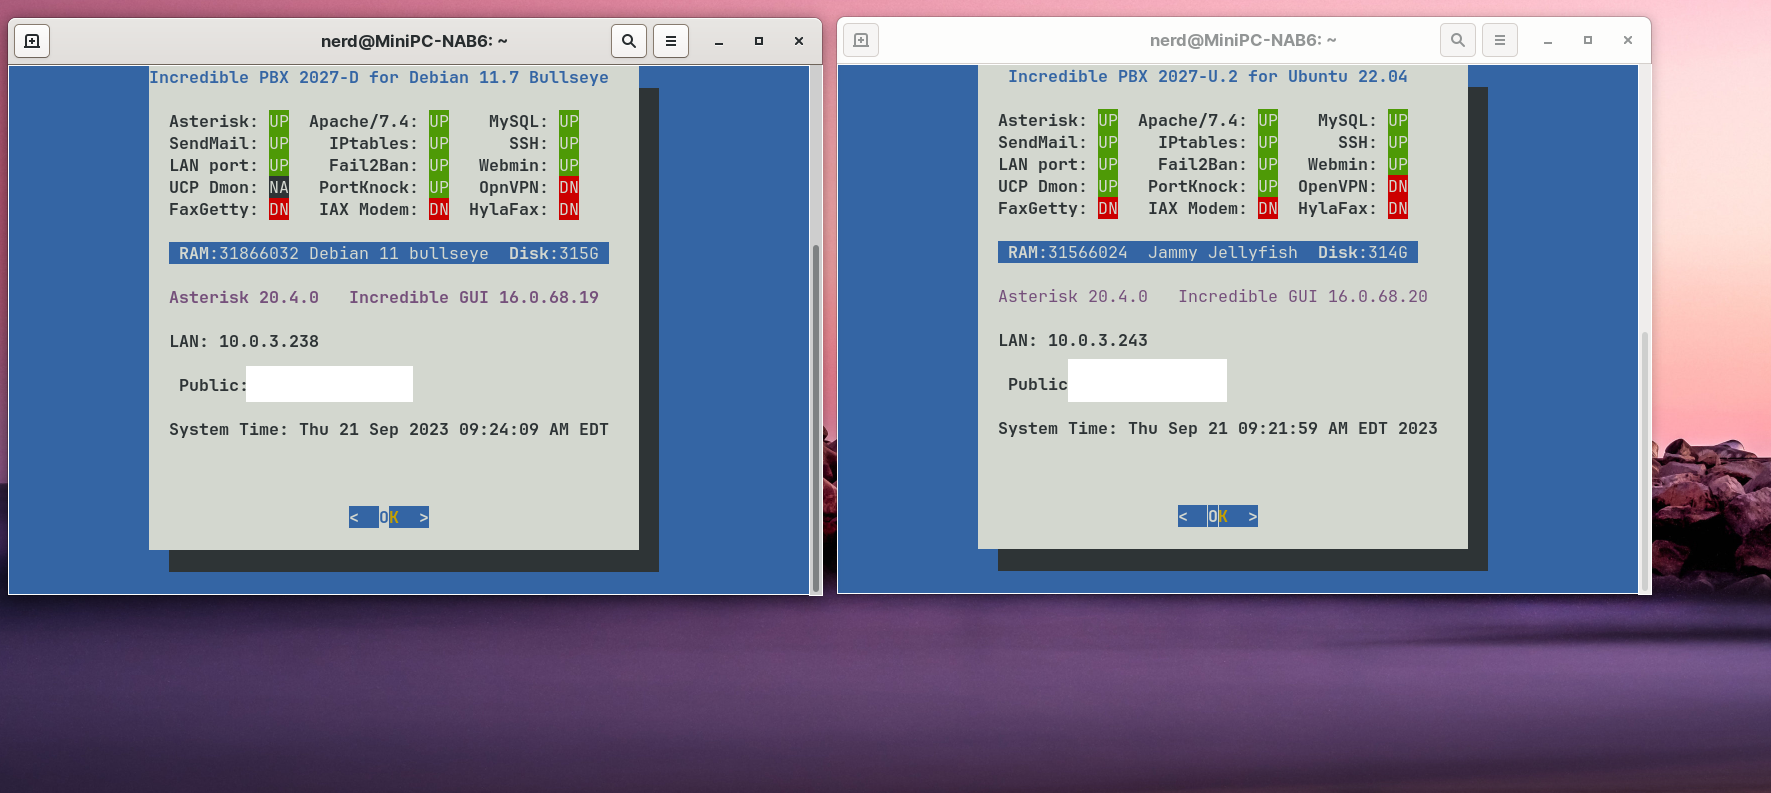
We’ve been raving about Zorin OS 16 last month as the best desktop operating system available. And today we combine it with a $500 MiniPC to provide not one, but three, virtualization platforms with a single machine. You get LXC Linux Containers, VirtualBox, and the Windows 11 WSL platform all rolled into one dual-boot desktop PC. On the Linux side with Zorin OS 16, you can run multiple LXC containers (shown above) and VirtualBox virtual machines simultaneously. And on the Windows 11 platform, you get the Windows Subsystem for Linux in addition to VirtualBox. For those clamoring for a multi-tenant Asterisk®, our question is why when you can securely run standalone platforms for each tenant on one PC.
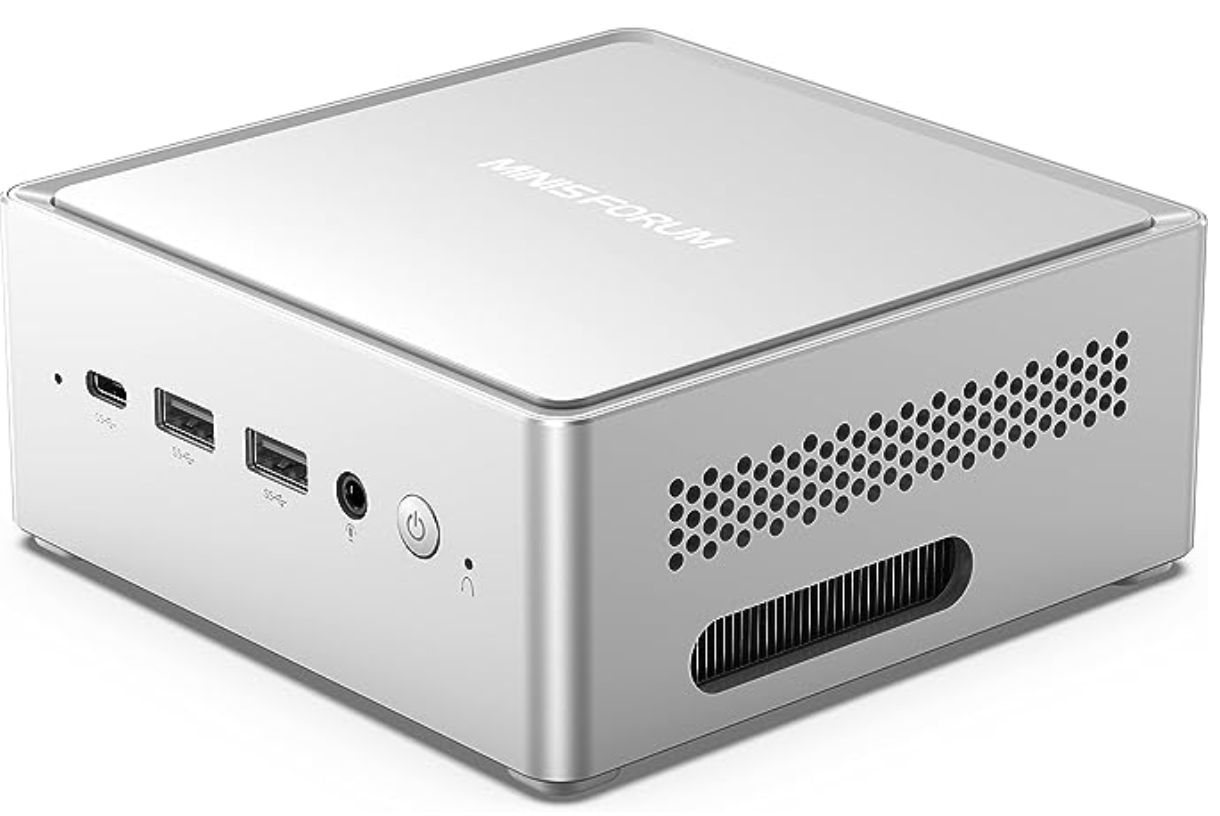
Because UEFI protections have complicated deployment of Linux on Windows 11 platforms, the secret sauce to make this magic happen is finding a hardware supplier who has elected not to cripple Linux deployment. There may be others and feel free to post a comment sharing your successes, but our favorite supplier is MINISFORUM with their Venus Series of MiniPCs. We obviously haven’t tested all of their offerings, but we are actively using the NAB6 Mini PC featuring a 12th Gen Core i7-12650H processor, 32GB of DDR4 RAM, and a 1TB PCIe4.0 SSD. It’s available on Amazon today for $440. If you’re in the market for a gaming platform as well, the UM690 has gotten rave reviews and looks like a good fit for under $600.
As frequent visitors to our site know, referral revenue from Amazon helps keep the lights on at Nerd Vittles, but we also eat our own dog food. We recommend products we actually use.
Installing Incredible PBX 2027 with Windows 11 WSL
Let’s start with an easy virtualization platform, the Windows 11 Subsystem for Linux. To save you having to jump around behind tutorials, here’s a quick refresher on the process.
To get started, you’ll need Windows 11 (build 22000.*) or Windows 11 Insider Preview (builds 21362+) using any hardware platform that supports Windows 11. To begin, from the Windows 11 Start Menu, Search for powershell. Right click on the app and choose Run As Administrator.
Here are some wsl commands you’ll want to keep handy:
List Available Linux Offerings  : wsl --list --online
Show Installed Linux Platforms  : wsl -l -v
Install a Linux Virtual Machine : wsl --install -d {distro}
Startup a Linux Virtual Machine : wsl -d {distro}
Shutdown Running Virtual Machine: wsl --terminate {distro}
Remove any Linux Virtual Machine: wsl --unregister {distro}
Backup any Linux Virtual Machine: wsl --export {distro} {filename.tar}
Restore a Linux Virtual Machine : wsl --import {distro} {filename.tar}
Let’s begin by installing an Ubuntu Virtual Machine: wsl --install -d Ubuntu-22.04. You’ll be prompted to create a user account and password, e.g. nerd and password. If you’re not prompted to create a user account, reboot your Windows machine and reopen the Ubuntu-22.04 app from the Start menu. That will straighten things out. Once the Ubuntu CLI window appears, enter the following commands to set up the root user account and begin your Incredible PBX install. Then go have a very long cup of coffee.
sudo passwd root
su root
# enter password you created for root
cd ~
apt install wget -y
wget http://incrediblepbx.com/IncrediblePBX2027-U-Win11.sh
chmod +x IncrediblePBX2027-U-Win11.sh
./IncrediblePBX2027-U-Win11.sh
While you’re waiting, notice that the Windows Start Menu now includes a new Ubuntu app which you will use to launch the Incredible PBX 2027-U virtual machine down the road.
When the install finishes, reboot.
Keep in mind that Incredible PBX will be running as an Ubuntu-22.04 virtual machine under Windows 11. So it’s important to know how to start things up and shut things down. As with any operating system, you don’t want to simply pull the plug and risk damaging both the file system and your MySQL databases.
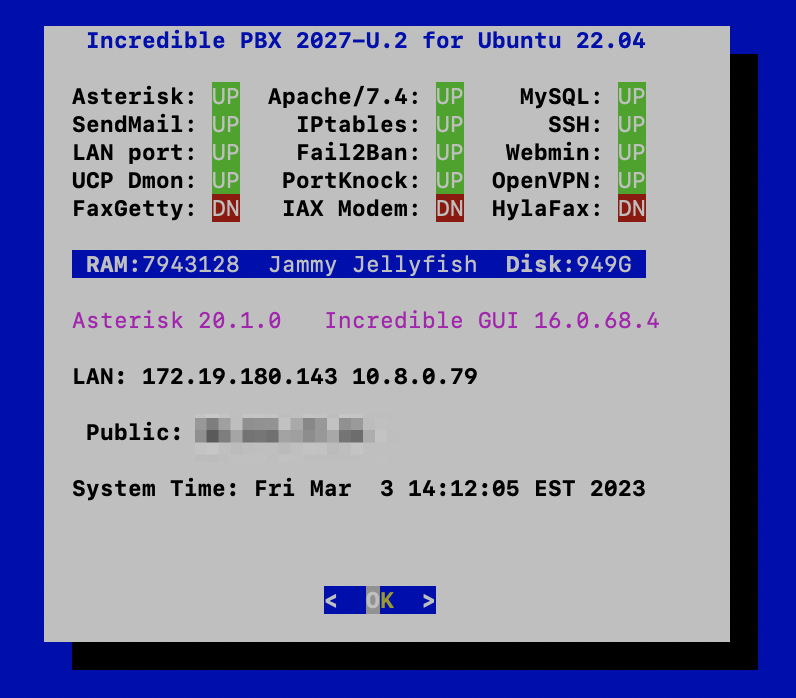
To start the Ubuntu-22.04 virtual machine, you can do it in either of two ways. From the Windows Start Menu, double-click on the Ubuntu-22.04 app. Or from the PowerShell running as Administrator, type: wsl -d Ubuntu-22.04. Verify it’s running like this: wsl -l -v
Once the Ubuntu CLI appears, issue the following commands to activate all of the Linux components upon which Incredible PBX depends:
su root
# enter root password
cd ~
./update-IncrediblePBX
pbxstatus
# if pbxstatus shows non-fax apps down
# then run startup below
./startup
pbxstatus
The LAN IP address is only accessible from your Windows machine. To run the Automatic Update Utility, you’ll need to SSH into this LAN address from the PowerShell running as Administrator where 172.19.180.143 is the LAN address shown in pbxstatus:
ssh root@172.19.180.143
To shutdown the Ubuntu-22.04 virtual machine, first open the Ubuntu-22.04 app and switch to the root user. Issue the halt command. This gracefully shuts down Asterisk, MySQL, and Apache. When the script completes, return to the PowerShell and issue this command to halt the virtual machine: wsl --terminate Ubuntu-22.04
Deploying OpenVPN with Incredible PBX. We strongly recommend deploying an OpenVPN client as part of your WSLg install and also on the Windows 11 desktop. It will simplify access to the server both from within Windows and also from any external source without having to wrestle with your firewall settings. This Incredible PBX Wiki article will walk you through creation of an OpenVPN Server platform, and this Incredible PBX Wiki article will walk you through the OpenVPN Client setup process. Simply name your Ubuntu .ovpn config file incrediblepbx.ovpn and save it in the /etc directory for automatic startup.
CAUTION: Be sure to create and use a separate .ovpn configuration file for your Windows desktop including these additional settings documented in the Wiki:
pull-filter ignore redirect-gateway
route-nopull
route 10.8.0.0 255.255.255.0
Installing Incredible PBX with VirtualBox & Windows 11
Oracle’s virtual machine platform inherited from Sun is amazing. It’s not only free, but it’s pure GPL2 code. VirtualBox gives you a virtual machine platform that runs on top of many desktop operating systems including Linux, Windows, and Intel-based Macs. In terms of limitations, we haven’t found any. We even tested this on an Atom-based Windows 7 machine with 2GB of RAM, and it worked without a hiccup. So step #1 today is to download one or more of the VirtualBox 6.1 installers. Our recommendation is to put all of these 100MB installers on a USB thumb drive.1 Then you’ll have everything in one place whenever and wherever you happen to need it. Once you’ve downloaded the software, install it onto your Windows 11 desktop. Accept all of the default settings, and you’ll be good to go. For more details, here’s a link to the Oracle VM VirtualBox User Manual.
NOTE: A VirtualBox 6.1 platform is required with Windows 11. Adjust screen size in View -> Virtual Screen.
To install Incredible PBX, download the Incredible PBX 2027-D image with Debian 11 (3.7 GB) or the Incredible PBX 2027-U image with Ubuntu 22.04 onto your desktop.
Next, double-click on the Incredible PBX .ova image on your desktop. Be sure to check the box to initialize the MAC address of the image if you’re using an older version of VirtualBox. Then click Import. Once the import is finished, you’ll see a new Incredible PBX 2027 virtual machine in the VM List of the VirtualBox Manager Window. Let’s make a couple of one-time adjustments to the Incredible PBX configuration to account for possible differences in sound and network cards on different host machines.
(1) Click once on the Incredible PBX 2027 virtual machine in the VM List. Then (2) click the Settings button. In System tab, check Hardware Clock in UTC Time. In the Audio tab, check the Enable Audio option and choose your sound card. In the Network tab for Adapter 1, check the Enable Network Adapter option. From the Attached to pull-down menu, choose Bridged Adapter. Then select your network card from the Name list. Then click OK. That’s all the configuration that is necessary for Incredible PBX.
Once you’ve imported and configured the Incredible PBX Virtual Machine, you’re ready to go. Highlight the Incredible PBX 2027 virtual machine in the VM List on the VirtualBox Manager Window and click the Start button. The standard Linux boot procedure will begin and, within a few seconds, you’ll get the familiar Linux login prompt. During the bootstrap procedure, you may see a couple of dialogue boxes pop up that explain the keystrokes to move back and forth between your host operating system desktop and your virtual machine. Remember, you still have full access to your desktop computer. Incredible PBX 2027 is merely running as a task in a VM window. Always gracefully halt Incredible PBX just as you would on any computer.
Here’s what you need to know. To work in the Incredible PBX virtual machine, just left-click your mouse while it is positioned inside the VM window. To return to your host operating system desktop, press the right Option key on Windows machines or the left Command key on any Mac. On Linux desktops, press the right Ctrl key. For other operating systems, read the dialogue boxes for instructions on moving around. To access the Linux CLI, login as root with the default password: password.
Deploying Incredible PBX with VirtualBox on Zorin
Now let’s reboot your machine and choose Zorin as the platform to load. The Incredible PBX setup is similar to the process used with Windows 11, but UEFI machines are temperamental about which non-Windows apps can run. To enable VirtualBox on the Zorin platform, here are the steps. First, run the Terminal app and reinstall VirtualBox:
apt remove virtualbox-dkms
apt install virtualbox-dkms
You’ll be prompted to set up a password for your new VirtualBox UEFI key (8 characters). Then reboot and register the new key when prompted. Enter the password when prompted. Now run VirtualBox from the Applications menu, and you should be good to go.
Once you have VirtualBox running successfully, you can install Incredible PBX 2027. Using the Firefox browser, download the IncrediblePBX2027-U with Ubuntu 22.04 image or the IncrediblePBX2027-D with Debian 11 image to your Downloads folder. From the File Manager, double-click on the .ova image to install it into VirtualBox. Click RUN to start up Incredible PBX 2027. The rest of the setup process is the same as what we described for Windows 11.
Deploying Linux Containers Using Static Routes
The beauty of Linux Containers is they run natively sharing the Linux kernel. So performance is outstanding. But, unlike VirtualBox, there is no simple way to create a Linux Container that obtains a DHCP address from the LAN’s DHCP server, so called bridge mode. This is especially true if your Zorin host is connected wirelessly. Read both of those sentences again to make sure you understand the network limitation of Linux Containers. Simply stated, networking with Linux Containers functions much like the NAT (as opposed to Bridge) option in VirtualBox. Here’s what that means.
Linux Containers are created on their own private subnet. If you wish to access them from a different device on the same LAN shared with your Zorin desktop hosting your Linux Containers, the simplest method is to create a static route to the private LXC subnet either on your LAN’s router or ON EVERY LAN DEVICE that needs to connect to your Linux Containers.
Here are the Mac and Linux commands to create, delete, and list static routes on the other LAN devices where 10.0.3.0 is the LXC subnet hosting the Linux Containers and 192.168.0.167 is the LAN address of the Zorin host PC:
sudo route add -net 10.0.3.0/24 192.168.0.167
sudo route -n delete 10.0.3.0
netstat -rn
Here are the Windows commands to create, delete, and list the same:
route add 10.0.3.0 MASK 255.255.255.0 192.168.0.167
route delete 10.0.3.0
route print
Deploying Linux Containers on the Primary LAN
If you are dead set in wanting to configure your Linux Containers to use IP addresses on the same subnet as your primary LAN, keep in mind that DHCP will not work for Linux Containers on a secured wireless network. For a tutorial on setting this up using static IP addresses, go here. It’s the only alternative that works.
Deploying Linux Containers with OpenVPN
A less painful way to accomplish the same thing is to install OpenVPN clients in your Linux Containers. To do this, you first must enable tun for Linux Containers. On your Zorin host machine, create a new 00-openvpn.conf file in /usr/share/lxc/config/common.conf.d:
lxc.cgroup.devices.allow = c 10:200 rwm
lxc.mount.entry = /dev/net dev/net none bind,create=dir 0 0
lxc.mount.entry = /dev/net/tun dev/net/tun none bind,create=file
Next, create an OpenVPN client config file for your Linux Container on your OpenVPN server. Now start up the Linux Container, switch to the root user, and copy the new config file (.ovpn) into the /etc folder naming it openvpn2027.ovpn. Then restart the Linux Container and wait for about 10 seconds for the OpenVPN client to load. Running pbxstatus now will show the OpenVPN IP address in your LAN listing, and the Linux Container is accessible from any device on your OpenVPN virtual private network.

Originally published: Monday, October 2, 2023
Need help with Asterisk? Visit the VoIP-info Forum.
Special Thanks to Our Generous Sponsors
FULL DISCLOSURE: ClearlyIP, Skyetel, Vitelity, DigitalOcean, Vultr, VoIP.ms, 3CX, Sangoma, TelecomsXchange and VitalPBX have provided financial support to Nerd Vittles and our open source projects through advertising, referral revenue, and/or merchandise. As an Amazon Associate and Best Buy Affiliate, we also earn from qualifying purchases. We’ve chosen these providers not the other way around. Our decisions are based upon their corporate reputation and the quality of their offerings and pricing. Our recommendations regarding technology are reached without regard to financial compensation except in situations in which comparable products at comparable pricing are available from multiple sources. In this limited case, we support our sponsors because our sponsors support us.
BOGO Bonaza: Enjoy state-of-the-art VoIP service with a $10 credit and half-price SIP service on up to $500 of Skyetel trunking with free number porting when you fund your Skyetel account. No limits on number of simultaneous calls. Quadruple data center redundancy. $25 monthly minimum spend required. Tutorial and sign up details are here.
![]() The lynchpin of Incredible PBX 2020 and beyond is ClearlyIP components which bring management of FreePBX modules and SIP phone integration to a level never before available with any other Asterisk distribution. And now you can configure and reconfigure your new Incredible PBX phones from the convenience of the Incredible PBX GUI.
The lynchpin of Incredible PBX 2020 and beyond is ClearlyIP components which bring management of FreePBX modules and SIP phone integration to a level never before available with any other Asterisk distribution. And now you can configure and reconfigure your new Incredible PBX phones from the convenience of the Incredible PBX GUI.
VitalPBX is perhaps the fastest-growing PBX offering based upon Asterisk with an installed presence in more than 100 countries worldwide. VitalPBX has generously provided a customized White Label version of Incredible PBX tailored for use with all Incredible PBX and VitalPBX custom applications. Follow this link for a free test drive!
Special Thanks to Vitelity. Vitelity is now Voyant Communications and has halted new registrations for the time being. Our special thanks to Vitelity for their unwavering financial support over many years and to the many Nerd Vittles readers who continue to enjoy the benefits of their service offerings. We will keep everyone posted on further developments.
- Many of our purchase links refer users to Amazon when we find their prices are competitive for the recommended products. Nerd Vittles receives a small referral fee from Amazon to help cover the costs of our blog. We never recommend particular products solely to generate Amazon commissions. However, when pricing is comparable or availability is favorable, we support Amazon because Amazon supports us. [↩]
Free Asterisk Solutions
