
Pro tip: Deploy thin images on a Mac with AutoDMG
This article, Pro tip: Deploy thin images on a Mac with AutoDMG, originally appeared on TechRepublic.com.

Image: Jesus Vigo/TechRepublic
Imaging is a blessing to an overburdened IT department. One of the most tedious and yet utterly important tasks a SysAdmin will perform is the setup and configuration of nodes.
Regardless of the OS, the repetitive nature of putting together a production-ready computer with all the necessary applications, drivers, and settings is prone to human error, not to speak of the technical issues that may arise from hardware failure or a software configuration conflict.
I have championed imaging as a saving grace for IT in that it allows us to "do more with less," which seems to contradict the statement that AutoDMG is the standard in thin imaging by making it so that "less is more."
Taking the digital torch from its predecessor, InstaDMG, AutoDMG was completely rewritten to modernize the creation of clean, never-before-booted Apple Software Restore (ASR) images that could later be cast out to one or many Apple computers, efficiently simplifying the deployment/recovery process for new or refreshed equipment.
AutoDMG is a modular deployment tool, emphasizing thin imaging as a means to create a boot-ready image that contains only the most essential software needed to get the computer operational. Additional apps, settings, and configurations may be technically included in the final image; however, in the interest of speed and size for optimization, that is better left to be installed through other, atomistic solutions, such as DeployStudio workflows or Apple Remote Desktop (ARD).
Before creating a thin image, there are hard requirements to adhere to as well as a few soft ones, which are not so much rules as guidelines to keep the images as lightweight as possible.
Apple computer running 10.8+
Administrative credentials
OS X Installer.app (Mac App Store)
Applications to be installed in (.pkg) format (optional)
Based on my brief time using AutoDMG, these are considerations to be mindful of when creating your first build.
The version of OS X on the Apple computer must match the version of the OS X image you intend on creating. For instance, if you are creating a Yosemite-based build, it will not work on Mavericks or any prior version of OS X.
Be wary of OS X forks when deploying to newer hardware. If possible, use the most recent release build to minimize installation issues.
Application packages may not always work when being deployed through AutoDMG for a variety of reasons. When testing out your build, if an app has not installed properly, it may be better to deploy the software afterward through a management client, workflow, or alternate install method than to compromise the integrity of the thin image.
On the subject of thin imaging, the key is to be light -- including only the most necessary packages and updates is integral to creating an image that is quick to deploy and easier to manage.
Once all the necessary installer and application packages have been readied, create the first build by following these steps:
Launch AutoDMG.app. Upon loading, click the AutoDMG menu | Update Profiles to perform a quick update of the OS X Installer profiles. This helps to ensure that the profiles are current when working with the newest OS X Installers from the Mac App Store (Figure A).
Figure Aautodmgfiga052215.jpg Image: Screenshot by Jesus Vigo for TechRepublic
Drag and drop the OS X Installer.app onto AutoDMG to mount the installer and determine if any updates are available (Figure B).
Figure Bautodmgfigb052215.jpg Image: Screenshot by Jesus Vigo for TechRepublic
If updates are available and you wish to include them in the build, check the box next to all the updates to be included and click the Download button. Updates will then be downloaded to the working directory to be processed later (Figure C).
Figure Cautodmgfigc052215.jpg Image: Screenshot by Jesus Vigo for TechRepublic
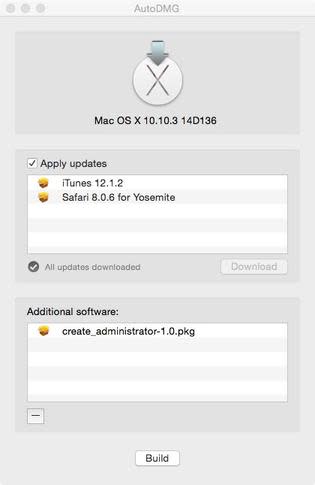
The Additional Software section will include any packages that you wish to include in the build. By default, .PKG files are natively used to perform app installations in AutoDMG; however, packages may also be created to include settings or modify configurations, if so desired. Drag and drop the packages to be included in the list, and then click the Build button when done (Figure D).
Figure Dautodmgfigd052215.jpg Image: Screenshot by Jesus Vigo for TechRepublic
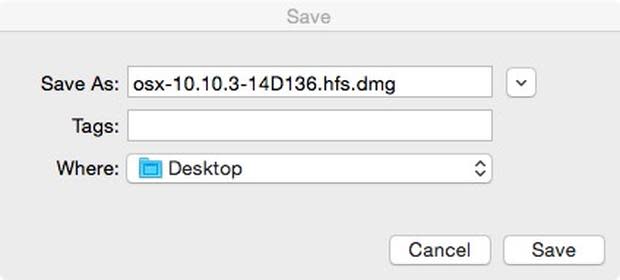
Prior to beginning the build, you will be prompted to select a location to save the completed image. Click Save to select the desired location (Figure E).
Figure Eautodmgfige052215.jpg Image: Screenshot by Jesus Vigo for TechRepublic
In order to process the commands necessary to build the image, authentication from an admin is required. Enter the credentials and click OK to execute the commands (Figure F).
Figure Fautodmgfigf052215.jpg Image: Screenshot by Jesus Vigo for TechRepublic
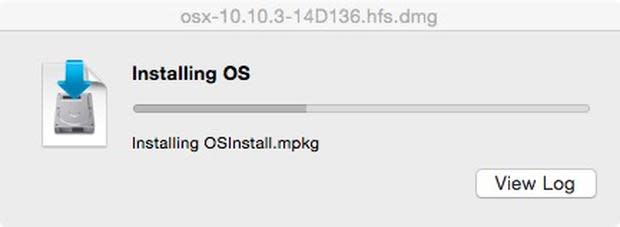
The build process will begin, and it will go through several phases to create a DMG file, with the OS X installer files and packages extracted to that file and processed (Figure G) (Figure H).
Figure Gautodmgfigg052215.jpg Image: Screenshot by Jesus Vigo for TechRepublic
Figure Hautodmgfigh052215.jpg Image: Screenshot by Jesus Vigo for TechRepublic
During the final phases, AutoDMG will convert the disk image and scan the image for errors, as this minimizes issues later during the deployment process (Figure I)(Figure J).
Figure Iautodmgfigi052215.jpg Image: Screenshot by Jesus Vigo for TechRepublic
Figure Jautodmgfigj052215.jpg Image: Screenshot by Jesus Vigo for TechRepublic
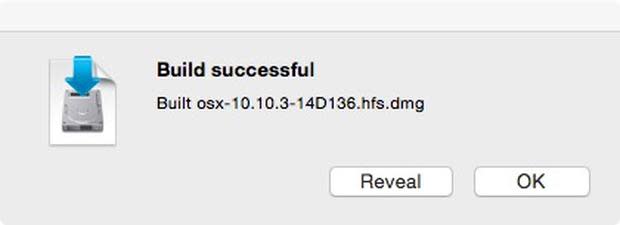
Depending on the resources available to the computer and how many updates or packages are being integrated, the image creation process will vary. Once it is successfully created, a final prompt will confirm the image file's creation, and the process will be complete (Figure K).
Figure Kautodmgfigk052215.jpg Image: Screenshot by Jesus Vigo for TechRepublic


The next step is to test your thin image. Though testing is optional, it is crucial to the overall success of the deployment process and should not be overlooked.
Since the created image is in DMG format, a plethora of deployment strategies exist, from Terminal to Deploy Studio to Disk Restoration using Disk Utility, just to name a few.
Ultimately, due to its modular format, changes such as incremental downloads, updates to packaged software, or even complete upgrades from one version to another can be swapped as needs arise, resulting in a new, unfettered image being created without the time-consuming install, update, capture, and test tasks involved in creating gold image masters.
