


The Complete Guide to Mac OS X Screenshots
OS X features powerful built-in tools for taking screenshots, but the default format and location of the captured images may not be suitable for every user. Thankfully, nearly every aspect of OS X screenshots can be customized using the Terminal app. Here’s how.
The Basics
Before we get in to the customizable settings for screenshots, let’s go over a few basics on exactly how to take screenshots (experienced users can skip this section).
There are three primary screenshot types in OS X: capture the entire screen, capture the selected window, or capture a defined area. Each of these can be triggered with a keyboard shortcut:
Command + Shift + 3: Take a screenshot of the entire screen. If you have multiple displays, a separate full-screen screenshot will be created for each display.
Command + Shift + 4: Take a screenshot of a defined area. Pressing this shortcut will turn your mouse cursor into a crosshair with pixel information. Simply position the crosshair in one corner of the area you’d like to capture, click and hold the mouse or trackpad, and drag to paint the area you will capture. Note that before you click, the pixel count displayed beneath the crosshair represents the pixel coordinates of your display (with 0, 0 representing the top-left of your screen), while after you click and begin to drag, the pixel count represents the size of the selected area.

Command + Shift + 4 + Spacebar: Take a screenshot of the selected window. To use this shortcut, press Command + Shift + 4 first, then tap the Spacebar. The crosshairs will turn into a camera icon. Hover this icon over a window and you’ll see the window become shaded in blue. Click the mouse or trackpad once and a screenshot of just that one window will be created.
Using any of the shortcuts above will create a screenshot file on your Desktop (by default; we’ll show you how to change this location later on). If you add the Control key to any of the combinations above, your screenshots will be saved to your clipboard instead of being created as an image file.
In addition to the screenshot shortcuts, users can also open the Grab app, located in /Applications/Utilities. This app gives users access to the same functions discussed above, as well as a timer option that automatically takes a screenshot ten seconds after it is activated.
Using Terminal
Now that you know the basics, let’s get to the customization options. First, you’ll need to use Terminal to take the steps described in this tutorial. You can find Terminal in the Utilities subfolder of your Applications folder. You can also quickly launch Terminal by searching for it with Spotlight.
Second, after inputting every command that is described below, you’ll need to type the following command to force the changes to take effect:
killall SystemUIServer
If you don’t type this, your changes won’t be noticeable until you restart the Mac. Also, every change made below can be easily reversed to the default setting by reentering the command with default values, so feel free to experiment with the different options.
Now, on to the options for customizing OS X Screenshots:
Change the screenshot image type
By default, OS X saves screenshots as PNG (or Portable Network Graphics) files. This format can be useful because it supports transparency, but PNG files are not suitable for all uses. To change the default capture file format, open Terminal and type in the following command:
defaults write com.apple.screencapture type [format]
In the command above, replace [format] with one of the following (click on each link for a description if you are unfamiliar with a particular format):
bmp
pdf
jpg
jp2
tif
pict
tga
png
For example, typing “defaults write com.apple.screencapture type jpg” will make JPEG the the default file format. You can change this as often as you need to by simply entering the Terminal command again with a new format.
Change the default screenshot file name
OS X saves each screenshot with the name “Screen shot [date] at [time].” As an example, a screenshot taken on Friday, March 1, at 9:29 PM will be saved as “Screen shot 2013–03–01 at 9:29 PM.”
You cannot remove the date and time from the name but you can easily change “Screen shot” to something else. To do this, type the following command into Terminal and press Return:
defaults write com.apple.screencapture name [file name]
Replace [file name] with the custom name you’d like to use with each screenshot. If it’s a single word, you can simply type it in place of [file name], but if it’s a phrase with one or more spaces, you need to put the phrase in quotations. For example, if you’re taking screenshots for a book and would like to keep them organized by chapter, enter:
defaults write com.apple.screencapture name “Chapter 1”
This will create a series of screenshots named “Chapter 1 2013–03–01 at 9:29 PM.” In the case of our book example, you’ll update the Terminal command as you start each new chapter.
Change the default location to which screenshots are saved
Screenshots are saved by default to the user’s desktop. This is handy for the occasional screenshot but those looking to take dozens or hundreds of screenshots will want to set up a custom destination to avoid cluttering up the desktop.
First, create or identify a folder to which you want to save your screenshots. Next, go to Terminal and enter the following command:
defaults write com.apple.screencapture location
Press the spacebar once to create a single space after “location” and then drag and drop the folder you created above onto the Terminal window. Doing so will enter the exact path to that folder. After you’ve dropped the folder and see the path displayed, press Return to activate the command.
Alternatively, you can also manually type the destination, although dragging and dropping the folder is faster and error-proof (if you mistype a destination path while entering the command manually, it won’t work). For example, if you wish to save screenshots to a “Screenshots” folder in your user’s Pictures folder, you’d type the following:
defaults write com.apple.screencapture location Users/[username]/Pictures/Screenshots/
Dragging the folder from a Finder window into the Terminal window results in the same outcome.
Disable window drop shadow
A really nice feature of OS X is the automatic creation of drop shadows when taking a screenshot of an individual window with the Command-Shift–4-Space command. This may not be desired by all users, however, and it can be disabled by entering the following Terminal command:
defaults write com.apple.screencapture disable-shadow -bool true
If you wish to revert to the default drop shadow, just head back to Terminal and type:
defaults write com.apple.screencapture disable-shadow -bool false
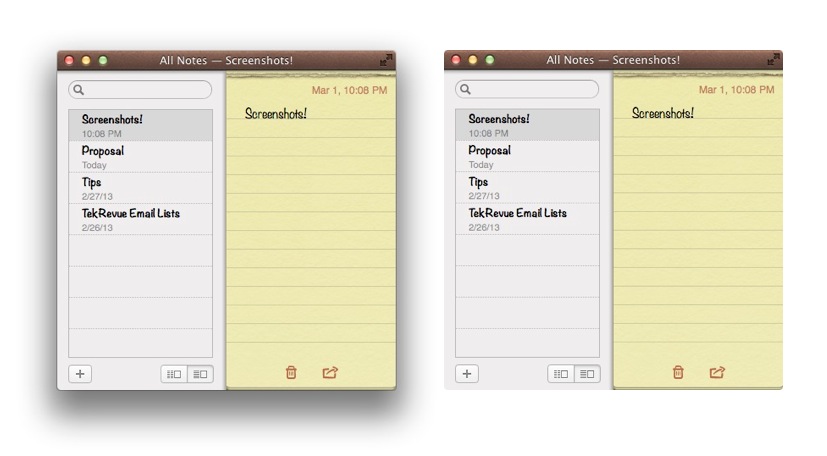
The image above shows a screenshot captured in OS X with the drop shadow enabled (left) and disabled (right).
Remember, you can easily revert any of these changes to their default values so feel free to experiment. By customizing the built-in OS X screenshot capture tools, most users will have all the power they need to fit screenshots into their workflows. If you require additional functionality, third-party options such as Skitch (now owned by Evernote), or LittleSnapper are always available.


21 thoughts on “The Complete Guide to Mac OS X Screenshots”
How can i set screenshot sounds?
The screenshots will be saved at the resolution of your Mac. So, if you’re using a 27-inch iMac with a native resolution of 2560×1440 and you take a full-screen screenshot (Command-Shift-3), you’ll get an image file at 2560×1440. If you’re on a 15-inch Retina MacBook Pro, you’ll get 2880×1800.
If you take a screenshot of a particular window or area, your screenshot will be generated at the same resolution that the window occupies when you make the capture.
One exception to this is if you’re on a Retina Mac and you want standard-size screenshots (because Retina screenshots will appear 4 times bigger to those viewing it on a non-Retina display). For these, try the app Retina Capture.
For practically all Macs, taking a screenshot at native resolution is just fine for Web use. In fact, you may often want to decrease the resolution to better fit your website, especially if you’re taking full-screen shots on a Retina MacBook or 27-inch iMac. In that case, just open the screenshot image with Preview and go to Tools > Adjust Size. Change the measurement units to pixels and change the value to the desired size.
Command + Control + Shift + 3: Captures entire screen
Command + Control + Shift + 4: Captures defined area
Command + Control + Shift + 4 + Spacebar: Captures selected window (5 key sequence ! :) )
Then Command + V to paste into the application (e.g. Pages) you need the shots in.
shot was taken?
———————————————–
when you press comand+shift +3 it takes a screenshot. IT also automatically names it “Screen Capture 1” then the next one is “Screen
Capture 2”
My moms mac names the screenshot according to the date & time the
shot was taken.
Im wondering how can my mac os 10.4 do the same thing.
I recall reading about a process to do that. I’m out of the office at the moment, but I’ll check on it when I’m back and reply here.
I searched a bit, but I don’t think it’s possible. I found this: http://hints.macworld.com/article.php?story=20091228142521881
But it looks like that trick stopped working after Snow Leopard. :(