Much as you may have heard about the “paperless office,” the truth is that paper is still a popular item to have around the home and the office. And it is because many of us have at least one printer attached to our computers—either physically tethered via a cable or virtually connected over a network. Whether you hope to use that printer to produce photographs, drafts of your next novel, or flyers for your kid’s upcoming jai alai tournament, it will do you little good sitting in its box. Now’s the time to break it out and configure it for your Mac. The means for doing that is Mountain Lion’s Print & Scan system preference.
Your preference for printing
Choose System Preferences from the Apple menu and, in the Hardware area, click Print & Scan. If you’ve switched on your printer, attached a cable between it and your Mac, and if the Mac OS natively supports that printer, you’ll see the printer’s name in the Printers list. At this point, you’re well on your way. When you next wish to print something, just choose the File > Print command from within the application you’re using and your printer should shortly produce the printed document you’re after.
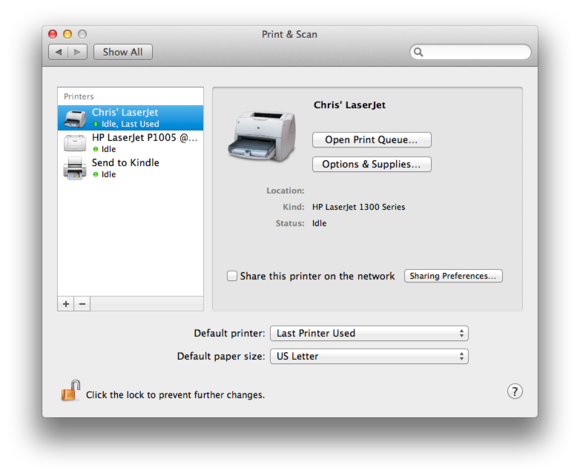
To the right of the Printers list is an area that contains a few options. They include:
Open Print Queue: When you print a document, the PrinterProxy application opens. (When it opens, it’s named after your printer.) Any documents in line to be printed will appear in its window. Within this application you can perform a couple of printing chores, which I’ll go into later in the column.
Options & Supplies: When you click this button, you’ll see two or more tabs. Click the General tab and you’ll find fields for your printer’s name and location. (The location isn’t entered by default. To add one—Spooky Attic, for example—just type it in. That location will appear after the Location entry in the preference’s main window.) You should also spy a listing for the printer’s driver version.
If you see a Driver tab, click it and you’ll view options offered by your printer. For instance, you may be able to choose a different tray to output pages to. Or you may see a Fit to Page option. And particular printers will show the total memory installed in the printer.
And then there’s the Supply Levels tab. Some printers (inkjet models, for the most part) will tell you how much ink remains in their cartridges. This can help you learn when it’s time to purchase new cartridges. Note, however, that these supply levels are approximate. Some printers report levels inaccurately, which can result in you replacing cartridges before they’ve run out of ink. A better bet is to check this tab every so often and, when it shows low levels, pick up some new cartridges. Continue to print until you can see evidence that a cartridge really has run out. Then replace those cartridges that need it.
Sharing Preferences: At one time, if you wanted to share a printer across a network, that printer had to have networking hardware built into it. That’s no longer the case. Instead, you can enable the Share This Printer on the Network option and your printer will appear as a printing destination for any other Mac on your network. (When you do this, Printer Sharing should be switched on for your Mac. If it isn’t, click the Sharing Preferences button and, in the resulting Sharing window, click the Printer Sharing option in the Services list.)
Default Printer: If you have just a single printer, this pop-up menu will mean nothing to you. However, if your have Printer A in your home office, Printer B in your mate’s bathroom, and Printer C in the rumpus room, you’ll want to carefully configure this menu so that you’re printing to the most appropriate device. (You can also make a printer the default by Control-clicking it and choosing Set Default Printer from the menu that appears.)
Default Paper Size: Here in the United States, most of us can choose US Letter from this pop-up menu and never touch it again. But if you use a different size of paper—legal or A4, for example—choose it here.
When setup’s not so simple
Well, that was pretty easy. Unless, of course, your printer doesn’t appear in the Print & Scan window. Although configuring a printer is far easier than it once was, there may be times when you need to do more than this. For example, if you’ve connected a printer to your Mac and it doesn’t appear in the list of printers, or it does appear but is listed as a generic printer rather than by its name, you’ll have to install the printer software (specifically, the driver) for that printer.
Some printers ship with a CD that contains that software but, increasingly, new Macs don’t have CD/DVD drives. And honestly, that’s fine. Much of the time that printer software is out of date. You’re better served by going to the printer manufacturer’s website, locating its Support/Downloads area, and downloading the latest version of the printer driver and accompanying software.
Once you’ve downloaded and installed the printer software, your printer should appear in the Printers list. Unless it doesn’t. And why wouldn’t it? Suppose that printer isn’t physically connected to your Mac. Instead, it uses a network connection. What then?
Adding a printer
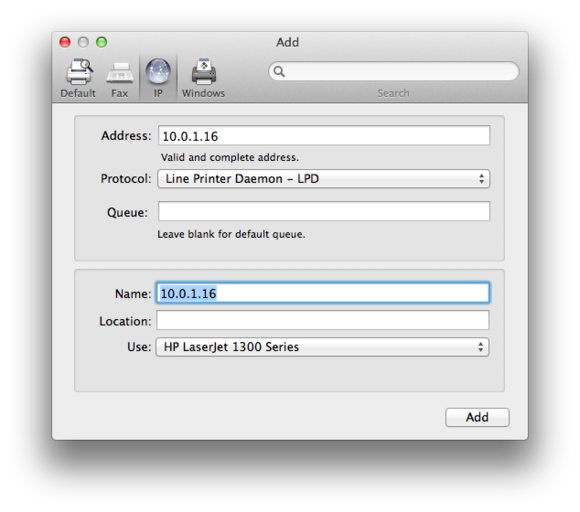
In such cases, you should add the printer. And you start by clicking the Plus (+) button that appears below the Printers list. Do this and an Add window will appear containing a few options. Let’s run through them.
Default: When you click Default, you’ll see a list of some of the printers available on your local network. (I say some because these are printers that have been configured to make themselves known to your Mac using a scheme called Bonjour. This requires no more work from you than to choose to share your printer over the network using printer sharing as I’ve described.)
To add one of these printers, just select it and then click the Add button. Its name, location, and driver should appear below. You’ll then be prompted to add it. Go right ahead.
Fax: Ha ha ha ha ha, who uses a fax these days…. Oh, you do? Sorry. If you have a multifunction printer that includes a fax feature, it will appear here if you’ve installed the software that accompanies that printer. Select it and click Add if the printer’s fax feature doesn’t appear in the Print & Scan window.
IP: Devices on your local network are assigned an IP (Internet Protocol) address. For example, if your devices are connected to an AirPort base station of some kind, your Mac might have an IP address of 10.0.1.2 and your iPad a 10.0.1.3 address. Network printers are assigned addresses of their own. You can learn what that address is by printing a configuration page. (See your printer’s documentation to learn how to do this.)
Once you have that address, click the IP tab and enter the printer’s IP address in the Address field. If the address is good and your Mac “sees” the printer on the network, you’ll see ‘Valid and Complete Address’ below the Address field. The Name field will hold the IP address. You’ll want to change that to something more recognizable—Bobo’s Printer, for example. Then click Add and the printer will be available to you.
Windows: We try to not have an attitude about Windows in Mac 101. If Windows computers, and printers attached to them makes sense for your work and play, good on ya. This is particularly important because many new Mac users come from the Windows world and would like to continue using as much of their old or existing gear as possible. Fortunately, Mountain Lion is quite understanding of Windows when it comes to printing.
If you’ve shared a printer via Windows (using something called the SMB—or Server Message Block—protocol) your Mac can be made aware of that printer and use it. Just click the Windows tab, select Workgroup, and locate the printer attached to that workgroup. Then select it, and click Add.
You can also add a scanner to the Print & Scan window (thus the word scan in its name). But as scanning is a horse of another color, I’m going to address it specifically in an upcoming column.
Regarding desktop printers
You can create something called a desktop printer. This is an icon that represents your printer that you place on your Mac’s desktop. When you want to print a file from the Finder, simply drag it on top of this icon. The document’s host application will open, and the file will print without you having to jump through any dialog boxes.
Creating a desktop printer is a cinch. From within the Print & Scan window, just drag your printer to the desktop. Its icon will appear with a small arrow pointing to it, indicating that it’s an alias to your “real” printer.
About the print queue
As promised, let’s turn to the print queue. When you send a file to be printed, a new icon that looks very much like your printer will appear in the Dock. This is the PrinterProxy application. The number of documents its queue holds will be reflected in a red badge icon that appears at the top right of the icon.
Click this icon and you’ll see the queue. There are a couple of things that you can do within it. First, you can pause all printing by clicking the green Pause button in the toolbar. Until you click Resume, all printing stops.

You can also pause the printing of individual documents. You do that by clicking the Pause icon that appears to the right of the document you wish to pause. Other documents that aren’t paused will continue to print. To resume printing of a paused document, click the Resume icon (which looks like a half-circle with an arrow at the end). You can remove documents from the print queue by clicking the X next to them.
And there you have the basics of configuring a printer to work with your Mac. Next week we’ll focus on the actual job of printing documents from within applications.
Next week: The printing primer