While the holiday season can bring both comfort and joy, it can also be one of the most hectic times of the year—one where you may be so distracted by one task that you neglect another. Take those holiday well-wishes that many of us email to friends, family, and business associates, for example. All too often we leave them to the last minute and, worse, remember them only when we’re on the road to grandma’s without laptop or Internet connection.
Not only can you compose your season’s greetings weeks before the holidays, but you can schedule when they’re sent, thus ensuring that they hit your loved ones’ inboxes at the perfect moment. The means for doing this is OS X’s Automator. Here are the steps for creating and automatically sending your holiday email messages with Mountain Lion.
Begin your festive workflow

Launch Automator (in your /Applications folder) and from the workflow template chooser select Calendar Alarm and click Choose. From the Library pane at the far left of the workflow window, select Mail and drag the New Mail Messageaction to the workflow area to the right.
in the Library pane, select Files & Folders and drag the Get Specified Finder Items action to that same workflow area. Select Mail in the Library pane and then drag Add Attachments to Front Message action to the workflow. Click on the Utilities item in the Library pane and drag Pause to the workflow. And finally, from that same Utilities library, add Run AppleScript to the workflow.
Put the actions in action
What have you done exactly? Let’s walk through the actions.
The first action will create a new message in Apple’s Mail application. Into this action you want to add those people to whom you’ll send your greeting. You can manually enter their email addresses into the action’s To field, or click on the Contact button (it looks like a Rolodex card) and add contacts stored in the Contacts application.
In the Subject field enter an appropriate title for your message—Happy Holidays! while trite, gets the idea across quite well. Enter something jolly in the Message field and from the Account pop-up menu choose the email account you’ll send the message from.

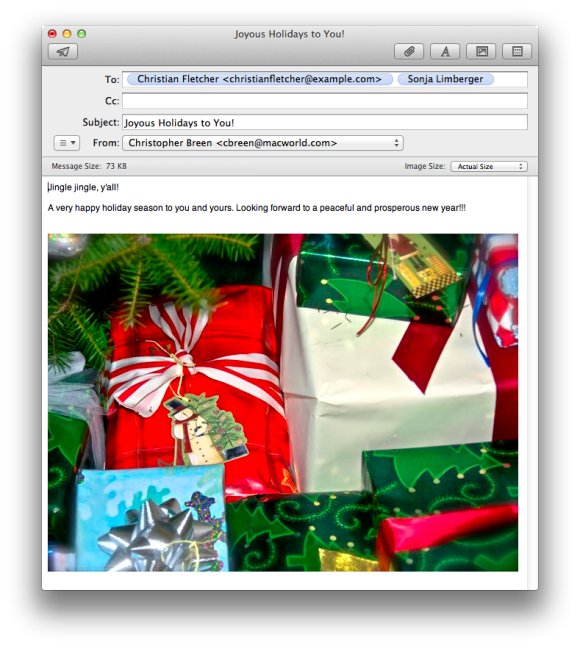
The second action—Get Specified Finder Items—tells the workflow the location of the appropriately cheery image you intend to add to your email message. Locate such an image on your Mac—a picture of the family, a snowy landscape, or flying ungulates, for example—and drag it into this action. Note that this image will not be resized when sent. You need to manually resize it so that it’s not so enormous that your email gateway rejects it. You can do this within Apple’s iPhoto by selecting an image, choosing File > Export, and in the File Export tab, choosing Mediumfrom the Size pop-up menu. Click Export and save the image to the desktop, for easy dragging to your workflow.
The third action, Add Attachments to Front Message embeds the image into your message.
The Pause action is something of a workaround. In our final step—the AppleScript action—we’re going to tell Mail to send the message. But without adding a brief pause between adding the attachment and initiating that AppleScript, the message is sent without the image. So, we’re giving Automator the time it needs to complete all of its actions. I’ve found that a 2-second pause is enough.

And finally the AppleScript. This tells Mail to whisk the message to your holiday pals. The AppleScript to use is:
tell application "Mail" to activatetell application "System Events"click menu item "Send" of menu "Message" of menu bar item "Message" of menu bar 1 of application process "Mail" of application "System Events"end tell
This AppleScript will work only if you’ve configured your Mac’s Accessibility system preference correctly. To do so, launch System Preferences, select Accessibility, and enable the Enable Access for Assistive Devices option. (You’ll need to enter your administrator’s password.) When you do this, AppleScript is able to issue Mail’s Send command.

Schedule your greetings
You’re nearly done. Now choose File > Save. When you do the Calendar application launches and, if one doesn’t exist, an Automator calendar is created. The workflow you just assembled appears as an event. Move that event to the day when you wish to send your message. Click on it, press Command-E, and then enter the time you’d like the message to be sent. Click Done and go about the rest of your holiday business. The message will be sent as configured.
Spread cheer from pre-Mountain Lion Macs
I’ve taken pains to say that this workflow is for Mountain Lion. You can do this in earlier versions of the the Mac OS as well and, at least in the case of Snow Leopard, it can be easier.
With Snow Leopard you can dispense with the Pause and AppleScript actions and instead insert the Send Outgoing Messages action. Under Mountain Lion this action doesn’t work within this workflow as it should. If you try to use it the message will stay front and center in Mail and won’t be sent. It behaves properly under Snow Leopard.