
Notifications have been a part of iOS from day one, and last year’s iOS 5 update improved them greatly with Notification Center and the new banner style (the one that rolls down from the top of the screen without disrupting your current activity). They are an integral part of our interactions with our iPhones and iPads — we get them from missed calls, text messages, emails, reminders, social network interactions, apps, games, and so on. But on the Mac, notifications have been more of a hack than a system-level feature: something that developers have implemented themselves, and mostly just when they felt it was absolutely necessary to do so. As a result, they haven’t been nearly as much a part of the OS X experience as they have on iOS.

The most widely-used system for notifications on OS X until now has been Growl: a third-party app that allowed developers to easily implement their own notifications. It was widely adopted by the OS X developer community, and over the years it became an essential install for many Mac users. But Growl isn’t the best solution for notifications because it is still a third party app that the user must go out of their way to install.[1] Whilst this isn’t a problem for an experienced computer user, it is for those that don’t want or need to worry about finding a download link for a third-party notification solution or keeping it up to date (though admittedly this has become less of a problem with Growl’s release on the Mac App Store). And of course Apple itself would never use Growl for notifications for their own apps, some of which could benefit most from notifications (e.g. Mail, Messages, and FaceTime).
Fortunately, in OS X Mountain Lion Apple has now implemented native notifications and Notification Center. If you’ve ever used iOS 5 you’ll instantly be familiar with how they work because Apple has effectively recreated them for the Mac, only making a few changes to suit the different platform. All of Apple’s built-in OS X applications support the new notifications (Messages, Mail, Reminders, Mac App Store, FaceTime, etc) and there is an API for developers to add support for them to their own as well.

Notifications Roll In
Just like in iOS, Mountain Lion gives users the option of choosing what kind of notification they would like for their various apps: None, Banner style, or Alert style. Banners roll in (literally) from the top of your screen and sit below the menu bar in the top-right corner of your display for a few seconds before sliding out of the screen to the right. Alerts are virtually identical to banners but will stay on screen until you dismiss them or action them (e.g. click Reply on an iMessage notification). We’ll explain how you can choose which notification style to use below in the ‘Customize Notification Center’ section.

Visually, the banner and alert styles look nearly identical, with both using the same rounded rectangle with a white to gray gradient and strong background shadow. Developers have no control over these notifications’ appearance, but they can set what icon to use along with a title, subtitle (if applicable) and the “informative” text. For example, when you receive an iMessage you will see the Messages icon, the name of the message sender as the title, then an excerpt of the message itself as the “informative” text. Mail.app notifications look a bit different, with the title being the sender’s name and a subtitle that contains the subject line, followed by an excerpt of the text in the email. The only difference with the Alert Style notification is that it has two buttons on the right: one to dismiss the notification, the other to action it.

Notification Center Revealed
So what happens when a notification pops up, but then rolls away before you can get a good look at what it said? In Mountain Lion all un-actioned notifications go to Notification Center, a sidebar that lives behind your desktop and lists all your notifications (as well as a few other things that we’ll get to a bit later).
The most convenient way to open Notification Center is by using a two-finger swipe from the right-hand side of your trackpad towards the left. This gesture drags your entire desktop (except the menu bar) over to the left, revealing Notification Center sitting underneath. Once revealed it will show you your notifications either by app or by most recent, depending on how you have it set to sort (see ‘Customize Notification Center’ for more). Each notification features a timestamp on the right and contains the same information it did in the banner or alert. To clear your notifications either action them (which usually just means opening the app) or click the little × mark located on the right-hand side of every app to clear all notifications from that app. Like Notification Center in iOS, there is no button to clear all the notifications from every app. Clicking a notification will open the app it belongs to and, if appropriate, jump to the relevant section (e.g. to the iMessage that a Messages notification alerted you to). To close Notification Center and get back to your desktop, use two fingers again to swipe to the right or just click anywhere outside it.
If you’re not using a trackpad, you can open Notification Center by clicking the Notification Center button in your menu bar or by setting up a keyboard shortcut (go to System Preferences → Keyboard → Keyboard Shortcuts → Mission Control to do the latter).
Notification Center doesn’t only work on the desktop. You can also access it just as easily while using a full-screen app or Dashboard (but not while in Mission Control).
Your Quick Glance Diary
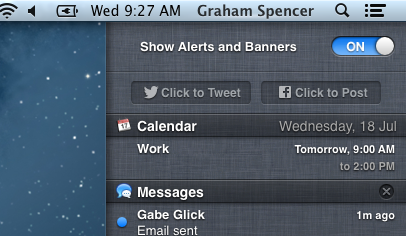
One of my favourite features of Notification Center on iOS is the way it lists my upcoming Calendar appointments. Luckily for me, it does the same in Mountain Lion. Under the Calendar section you’ll see your upcoming events and appointments along with their location (if they have one) and scheduled time. If you’ve got Birthdays in your calendar they’ll appear here as well, distinguished by a little present icon on the left. A final nice touch for those of you who constantly forget it (like me) is the date displayed on the Calendar bar — something that won’t be available in iOS until iOS 6 this fall.
Sharing

If you’re using Mountain Lion’s new Twitter integration, you can choose to add a button to Notification Center that lets you easily send a tweet. Simply open the Notifications System Preferences pane (you can click the Settings icon in the bottom right corner of Notification Center to jump directly to it), click the Share Buttons option, then select the checkbox that asks whether you want to show share buttons in Notification Center.

Now when you reveal Notification Center, there will be a button that says “Click to Tweet”. Clicking it will open a Tweet Sheet: literally a little pad of paper where you can write out your Tweet. It includes a button to add your location and a helpful little character counter. When you’re finished, click Send and your tweet sheet will fly up and get posted to Twitter.
Apple notes on its website that coming this fall (presumably around the release of iOS 6), Notification Center will also have support for Facebook. Just like Twitter, there will be direct support for notifications and the ability to post straight to your Facebook wall from a share sheet similar to the Twitter version described above.
Do Not Disturb

Working on a critical, time-sensitive task and don’t want to be disturbed by notifications from Mail, iMessage, or Twitter? Thankfully there’s a simple way to temporarily turn off notifications when you don’t want to be distracted. Simply scroll down in Notification Center and you’ll see a hidden “Show Alerts and Banners” toggle. Switch the toggle to OFF and you won’t be alerted of any more notifications until the next day — or until you switch the toggle back to ON. You’ll still be able to view all your notifications by revealing Notification Center, but they’ll no longer pop up on your desktop. Unfortunately, you will still hear notification sounds unless you explicitly turn them off (see the customization options below to see how to do so).
When you have Alerts and Banners set to OFF Apple makes sure to keep the toggle visible instead of hidden. This way, if you forget to turn them back on when you finish your important task you should notice it when you next open Notification Center — but even if you don’t it always defaults back to ON the next day, so there’s no worry about missing notifications forever.
Notifications Won’t Interrupt Your Presentations
A really nice touch that Apple added to notifications was to ensure that they wouldn’t appear in certain circumstances, such as when your Mac’s display is being mirrored or showing a Keynote presentation. That little touch means you don’t even have to worry about turning Do Not Disturb on when presenting — Mountain Lion takes the initiative of hiding all notifications automatically whilst your Mac is mirrored or giving a presentation.
Unfortunately, notification sounds continue to play just like they do in Do Not Disturb mode, so you’ll still need to be aware of that before giving an important presentation. Also note that if mirroring to an Apple TV with AirPlay you will still receive visual notice of your notifications (somewhat of a contradiction of the feature).
Customize Notification Center

Whilst you don’t have extensive control over Notification Center, there are a few options that Apple provides. All these options are contained inside the Notifications pane in System Preferences; you can jump straight there by pressing the Settings icon in Notification Center’s bottom-right corner.
Change the App Order
If you don’t like how apps are ordered in Notification Center you can swap them around by simply dragging their position up or down the left column (including the Share Buttons). Alternatively, you can just tell Mountain Lion to sort notifications by time using the Sort Notification Center option at the bottom of the window.
Banners vs Alerts
Earlier we covered the difference between banners and alerts: the former being temporary notifications that go away on their own, and the latter being persistent notifications that only disappear when actioned upon. Setting which style an app uses is easy: simply click the app you want to set in the left column, then click either None, Banner, or Alert.
Number of Notifications
Below notification type is the option to have the app appear in Notification Center. If you uncheck this, notifications for that app will still appear on your desktop (as long as Banner or Alert is selected) but they will not appear in Notification Center. If checked, you can then choose how many notifications for that app will appear in Notification Center: 1, 5, 10, or 20.
Badge App Icon
If you don’t like those red badges telling you that, say, you have 54 unread emails, just uncheck this box for the app you want to remove it from (Mail.app in this case) and you’ll never see another badge app icon for it again (unless you re-check it, of course).
Play Sound When Receiving Notifications
This one is pretty self-explanatory, but if you don’t want to hear sounds when a notification appears just uncheck this box to silence them for that app.
Conclusion
Bringing a native and unified notification system to OS X was a great move on Apple’s part, and will no doubt result in more apps sending notifications and more users benefiting from them. But there will be some who dislike the new notifications because of their distractive nature. To some degree they are right, because more than ever the Mac is used for work whilst iPhones and iPads are used to relax and have fun (though of course the reverse is still true for many).
Fortunately, Apple gives enough control over how notifications work that you can easily stop them from being a distraction whilst still benefiting from the fact that they can display far more information than the old badge icon ever could. It’s for that reason that Notification Center is one of my favourite features of Mountain Lion. Yes, on one level it can be distracting, but when I can tell whether or not to read an email or respond to an @reply with a single glance without breaking my concentration, I’d say it helps far more than it hinders.
- Unless they install an app that bundles it. ↩︎