Expert's Rating
Pros
- Customizable membership plans.
- Multiple ways to restore your data.
- Desktop and iOS app work seamlessly together.
Cons
- Initial backup can be slow.
- Size limit when restoring files from Web Restore.
Our Verdict
With the demise of MobileMe upon us, you’ll need to come up with a new backup solution if this Apple service is your current backup method of choice. If you’re a fan of online, cloud-based backups, then CrashPlan is one to consider.
Codefortytwo Software’s CrashPlan+ is an online backup program that backups all of your files over the Internet. Your data is stored on CrashPlan’s servers, and the program backs up multiple versions of your documents. You have a few different plans and price points to choose from, so it fits all sorts of needs. Want to backup your external backup drive? No problem—CrashPlan+ can do that, too.
The option to backup to multiple destinations means you will never be out of luck in case of a crash: if something happens to one backup location (like your MacBook), you’ll still have it on CrashPlan’s local server. You can easily restore it from another machine.
The version I tested here was CrashPlan+ Unlimited. (Read on for details of each CrashPlan+ package.) I synced backups between an iMac and CrashPlan Central, the software’s online backup location. I restored files to a MacBook Pro from CrashPlan Central, and also used the iOS app to access files.
Getting started
The first step is figuring out which plan is the one for you. CrashPlan+ offers three basic plans: CrashPlan+ (starts at $1.50 per month for 10GB of online storage and one computer), CrashPlan+ Unlimited (starts at $3 per month for unlimited online storage and one computer), and CrashPlan+ Family Unlimited (starts at $6 a month for unlimited online storage between two to ten computers). Pick the one that best matches your storage needs, and then customize your payment plan. You can opt for a month-to-month payment plan, or yearlong subscriptions after that (pick between one and four years: four years gives you the best value). CrashPlan offers a free month-long trial if you’d like to try a plan out first before committing.
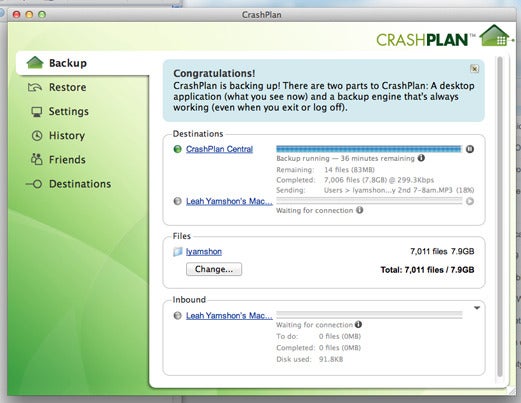
Once you’ve downloaded the software, you’re ready for your first backup. Backing up to CrashPlan is super simple: once you’ve purchased your plan and downloaded the software, CrashPlan will automatically run backups at your specified backup time. I like to have mine always running, so it backs up as I edit and save new things (it can save open files on OS X, which gives me the ultimate peace of mind).
Like all backup systems, your first backup takes a while, but all backups after that are significantly quicker. Because CrashPlan stores your backups on their own servers—and because the backup occurs online—your first backup will be painfully slow. My iMac took about four days for 490GB to save. Subsequent backups are much quicker, as CrashPlan compresses data before the backup is sent.
Accessing files and restoring your system
In case of a crash, or if you’re setting up a new computer, there are a few different ways to restore your data. To restore something on your Mac that’s registered with CrashPlan, open the software app and click the Restore tab along the right-hand side. You’ll see two dropdown menus: Select the computer to restore files on by way of the top dropdown menu; select the files from the correct backup destination from the bottom dropdown. To restore everything, select the catchall top box to select every file on your drive, then hit restore; or, select individual files or folders.
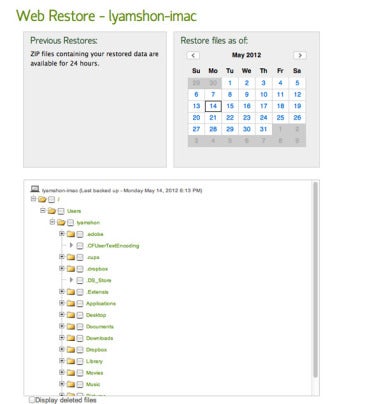
Another way to restore data is through a CrashPlan Central Web restore. Login to your account on CrashPlan’s website, then select the Computers tab along the left-hand side. You’ll see a list of the computers associated with your account; click the Restore button next to the computer you’d like to restore from. Just like restoring from your desktop software, you can restore your complete backup, or just choose specific files. Your selected backup will download as a zip folder. Plus, you can use Web restore from any computer—all you need is a Web browser.
Although there’s no limit on the size of the individual file that you restore, you’re limited to 250MB for a Web restore. Recovering your complete backup via Web restore is likely to take a few zip files.
One question I had was in regard to CrashPlan’s privacy and safety measures. CrashPlan+ promises an enterprise-grade 448-bit encryption to secure your files before they’re even backed up. This ensures that only you can access your files from the main CrashPlan server.
Mobile apps
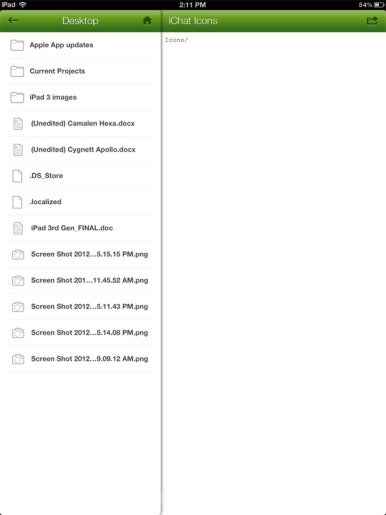
With a CrashPlan, well, service plan, you can access your files through CrashPlan’s suite of iOS apps. Opening files through the app is a breeze. On the home screen of the app, you’ll see the devices you’ve backed up using CrashPlan listed on the left. Select a device, and you’ll see the folders from your backups. Navigate the folders, find the item, tap it, and the file downloads to your device.
The app and the Mac software work completely in tandem—not only can you download files, you can check on the status of your backup, which comes in handy during your long first backup.
The CrashPlan app is available for both the iPad and the iPhone, though I greatly prefer the iPad version for its clean interface, and it clearly wins for editing documents. The app is compatible with any version of CrashPlan.
Macworld’s buying advice
CrashPlan+ is easy to use, has a clean interface, and can be customized to fit different backup needs. Different payment options also make it an affordable choice. Plus, CrashPlan+’s three restore options—app integration, Web-based recovery on any computer, and desktop recovery—work seamlessly well together.