Editor’s Note: The following article is an excerpt from Take Control of BBEdit, available for download from TidBITS Publishing ($5 through April 9th, $10 thereafter). Beyond the clippings discussed below, the 199-page ebook explains how to use BBEdit 10 to efficiently accomplish real-world tasks, with a focus on essential text-processing features, working with HTML, and managing multi-resource projects.
A clipping lets you easily insert pre-defined bits of text into a document. A clipping can be any length of text, and it can contain placeholders that are swapped out with the corresponding value when you insert the clipping.
Let me give you a real-world example. When I type Web links for a certain publication, I need to not only type the correct HTML for the link, but also include the attribute for opening the link in a new blank window, like this: <a href="link goes here" target="_blank">text for link</a>.
To add these Web links rapidly, I created a clipping with three placeholders. It looks like this: <a href="#CLIPBOARD#" target="_blank">#SELECT#</a>#INSERTION#.
Now, suppose that I want to type a Web link to the Bare Bones Software website at http://www.barebones.com/. I copy the URL so that it is stored in my clipboard, I type and select Bare Bones Software, and I trigger the clipping. BBEdit puts this into my document: <a href="http://www.barebones.com/" target="_blank">Bare Bones Software</a>. My cursor ends up immediately after , where I set the #INSERTION# placeholder.
Defining clippings
BBEdit stores clippings in your Library/Application Support/BBEdit/Clippings folder. BBEdit creates that folder the first time you save a clipping, but you may create it yourself if you need to use it before saving a clipping from within BBEdit.
You can modify the contents of the Clippings folder directly, if you need to, including dragging in clippings created by other people, or items found in prefabricated sets to which BBEdit provides links.
You can navigate to that folder in the Finder or choose Clippings > Open Clippings Folder. (The Clippings menu is the one that looks like a © symbol. If that menu isn’t on your menubar, go to BBEdit’s preferences, open the Menus & Shortcuts section, and select Clippings.)
The placeholders you are most likely to use:
| #CLIPBOARD# | Inserts the contents of the system clipboard. |
|---|---|
| #DATE# #TIME# | Inserts the current date or time, formatted according to choices made in the Formats view of the Language & Text System Preferences pane. |
| #INSERTION# | Places the cursor at this point after the substitution has happened. |
| #INLINE# | Strips all line-ending characters from the clipping after all other placeholders have been substituted with text. It may appear anywhere in the clipping. |
| #INDENT# | Indents a multiple-line clipping, whether a list of short lines or several paragraphs, to the same level as the first item to be inserted. |
| #SELECT# | Replaces itself with the text selection in place before you trigger the clipping. Without #SELECT#, any selected text is deleted and replaced by the clipping’s results. |
Warning: In BBEdit’s Text Files preference pane, be sure that Ensure File Ends with Line Break is not selected. Otherwise, when you save a clipping without a hard return at the end, BBEdit will add a return to the clipping file. Then, when you use the clipping—so long as you don’t also use the #INLINE# tag—BBEdit will put a hard return where you didn’t expect it, and you will start screaming uncontrollably. Let’s not have that.
To create a clipping: In a BBEdit text document, type your clipping text, along with any necessary placeholders. Now, if your document contains nothing but text for the clipping, choose Save as Clipping from the Clippings menu on the menu bar. If your document has text in it besides the text you want for the clipping, select the clipping text and choose Clippings > Save Selection as Clipping.
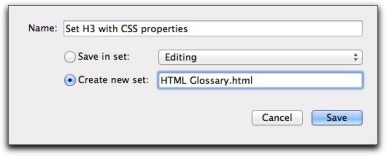
Next, enter a name for your clipping. Select the set that your clipping should be stored with. Items in the Universal Items set are always available in any text document. If you create a new set and name it with a BBEdit language extension, such as .rss, .markdown, or .html, the clippings in that set will be available only in documents that are either explicitly set to that language type in the text status bar’s Language pop-up menu or implicitly set by text file extension.
When you’re done, click the Save button. If you later want to edit your clipping, hold down the Option key while choosing it from the Clippings menu.
Inserting clippings
Once you have clippings defined, you want to use them, of course! BBEdit lets you insert clippings through a few different methods:
• Text completion: If you have text completion on (in the Editing pane of BBEdit’s preferences), the easiest way to insert a clipping is to start typing its name. Clipping completions are shown with a icon.
• Clippings palette: Position the insertion point where you want your clipping to appear, and then choose Window -> Palettes -> Clippings. A nifty floating palette appears showing a set at the top, with Universal Items below. To insert a clipping, double-click it or select it and click Insert.
• Keystroke: Clippings may have keystrokes assigned to them. To assign a keystroke, select an item in the Clippings palette and then click Set Key.
• Menu bar: Choose Clippings -> clipping name.
Consult the manual: The BBEdit Manual (Help -> User Manual) has an exhaustive chapter on clippings. To see the full list of placeholders or learn about more technical issues, read Chapter 12.
Note: Clippings work extremely well within BBEdit, but if you want similar functionality in other programs consider Smile’s $35 TextExpander (). I also recommend Stairways Software’s $36 Keyboard Maestro ().
Glenn Fleishman is a frequent contributor to Macworld on networking topics, technical editor of TidBITS, and author of numerous books, including the just-published Take Control of BBEdit ( TidBITS Publishing, 2012).]