Apple made headlines last week by rolling out a line of iTunes-exclusive ringtones featuring music by The Beatles—a move that excited some Beatles fans and enraged others. As with Apple's other ringtone offerings, the tones are sold separately from the full version of the song for $1.29 apiece and only include a small clip of the song chosen by Apple. If you already own the song or want the full version for your own music-listening pleasure, you'll have to pay twice.
Except in reality, you don't. This is a topic that comes up regularly between Ars staff and our friends and family. Apple doesn't hide the fact you can make your own ringtones for free, but it's certainly not widely advertised. Plenty of iPhone users are still unaware how easy it is to create your own ringtones out of music you already own (or even music you create). Whether you like The Beatles, Rush, Beyoncé, or Vivaldi, you can make ringtones to your heart's content without having to plunk down a dollar every time you want to switch things up.
The simplest way to do so is through GarageBand, so we'll go over the process for that first. But you don't have to use GarageBand if you don't own it and prefer something else. We'll detail another, GarageBand-free method for creating iPhone ringtones as well.
GarageBand
GarageBand comes as part of the iLife suite of applications for the Mac (which itself often comes preinstalled on new Macs), but it can also be purchased individually via the Mac App Store for $14.99. You don't necessarily need the most recent version—GarageBand '11—in order to create ringtones for your iPhone. Plenty of older versions will be able to perform the same functions (at least back to version 4, and possibly earlier). So if you haven't upgraded in a while, don't worry.
To start, create a new project in GarageBand and open up the media browser by clicking on the button with music notes in the far right-hand, bottom corner. Assuming you have the music you want to use in your iTunes library, this is where you'll be able to search for it. Locate the song you want to turn into a ringtone and drag it into the main area. This will create a new track listing on the left-hand side of the screen.
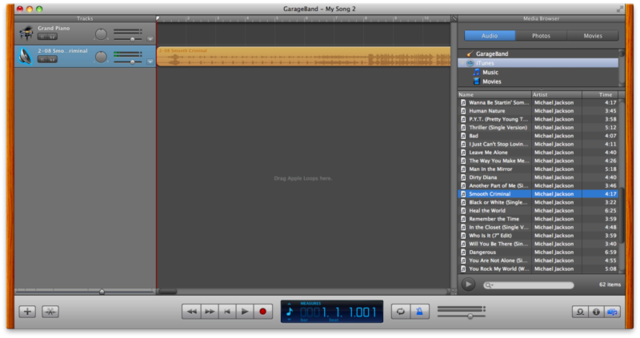
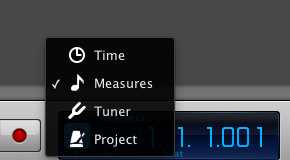
Click the musical note on the LCD panel at the bottom and switch it to "Time"—this will allow you to more easily adjust the length of your music clip.
Next, click the cycle button (looks like a repeat song icon from iTunes) in the control panel. This will add a yellow bar at the top of the screen that you can drag around to the portion of the song you want for your tone. When you listen to your music loop with the cycle control turned on, it will loop only within the highlighted area (which is useful for determining whether your loop sounds good in a vacuum). The length of your clip can be almost as long or short as you'd like within a 40-second time limit for ringtones, or 30 seconds for other types of tones (text tones, new mail alerts, and whatnot). You may not necessarily want the very beginning of the song, either, so experiment by dragging around the cycle indicator in order to capture the part of the song that makes the most sense to you.
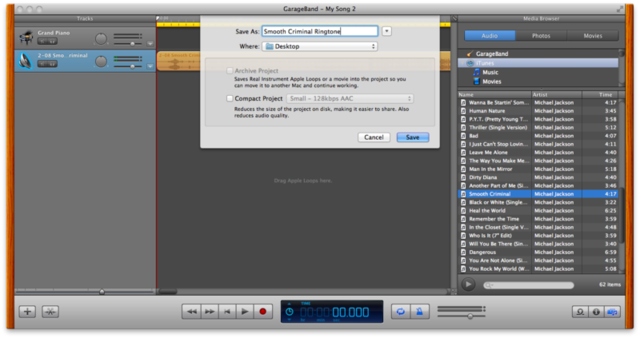
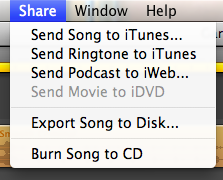
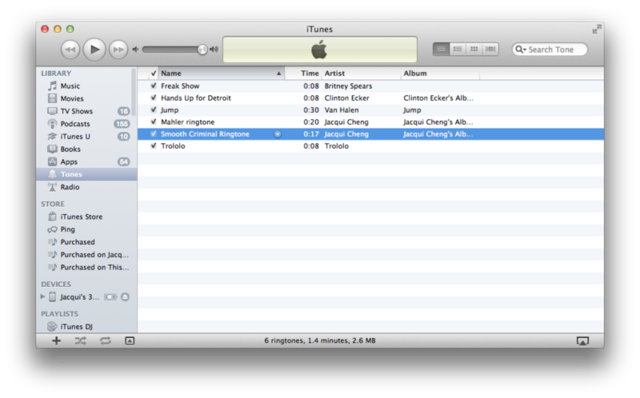
Once you've decided on your clip, save the project with the name you want to use for your ringtone. Then go to the Share menu within GarageBand and select "Send Ringtone to iTunes." iTunes will open and you'll be able to find your newly created ringtone under "Tones" on the left-hand side.
Now you're ready to put your newly created ringtone onto your iPhone! Make sure iTunes sees your iPhone by either plugging it into your computer or making sure they're linked somehow (the WiFi syncing in iOS 5 means it doesn't have to be plugged into the computer, but that's just what I like to do for speed). Click on "Tones" at the top of your iPhone sync screen, and check the box to sync your tones. You can either sync all ringtones in your Tones library or just selected ones.
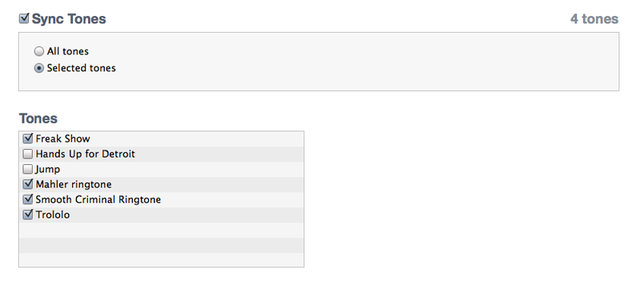
Once you've chosen the ones you want to sync, click the "Apply" button in iTunes and let the files sync to your device. From there, pick up your iPhone and find the contact(s) in your address book for the people you want to assign your new ringtone. Tap on the "Edit" button in the upper right to see the options and scroll down to "Ringtone."
Tap on the default option to see what else is available. The next screen should show you what is already assigned with a list of the ringtones you created immediately after that. Underneath your ringtones will be a list of the standard defaults on the iPhone.
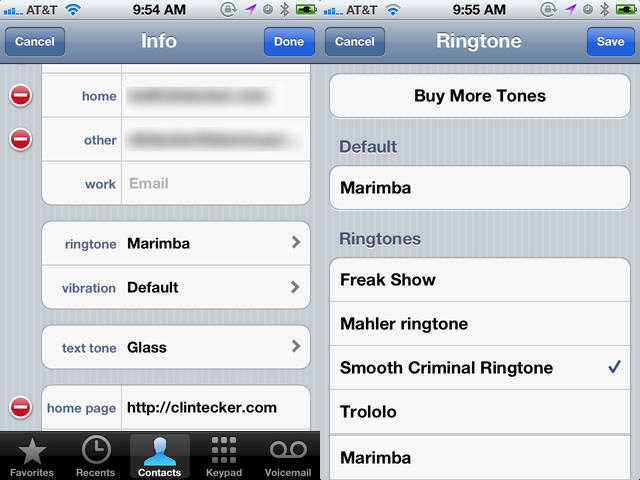
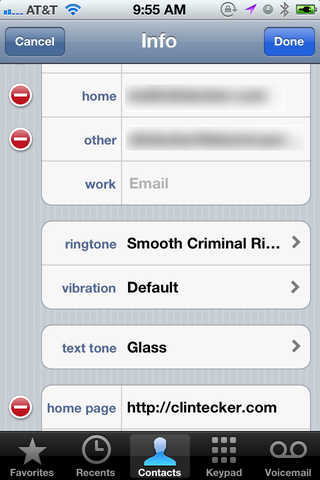
Select the one you want and hit "Save" in the top right. This should bring you back to your contact's entry in your address book, and then tap "Done" in the top right corner when you're finished.
At this point, you're ready to begin receiving calls from your friend and listening to your newly created ringtone. This process should work with any unprotected music file in your library, whether it's an MP3 you ripped from a CD or an iTunes Plus track you purchased. Protected music—DRMed iTunes tracks from the days of yore that were never converted to the DRM-free iTunes Plus format—won't work because of their restricted nature. If you want to use those songs as ringtones, you may want to consider upgrading the track to iTunes Plus first.
Going the non-GarageBand route
GarageBand makes it simple to make your own ringtone for your iPhone, but you don't necessarily have to use it if you don't own the software or prefer to use other audio editing options. Pretty much any audio editor will do, in fact, as long as you're able to trim an MP3 or unprotected AAC file to the appropriate length. For this part of the how-to, I'm going to use QuickTime because it comes free on every Mac, but others like to use programs like Audacity (which is free and open source) or Fission ($32 from Rogue Amoeba) to get the job done as well.
Using the latest version of QuickTime Player (version 10.1 as of this writing), open up the music file you plan to edit. Go to the Edit menu and then select Trim, or hit command + T. This will bring up sliders on your music that allow you to adjust the length of your clip:
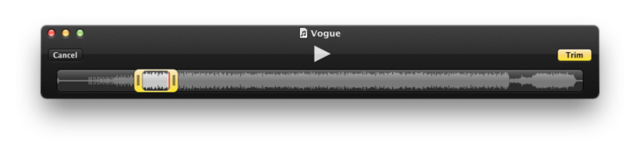
This is slightly harder than using GarageBand or Audacity because it's harder to see the exact length of the clip you're cutting, but as long as you make an effort to keep it short and focus on the best part of the song that you want to use, you shouldn't run into many problems.
Once you're finished selecting your clip, click the yellow "Trim" button and QuickTime will kick you back to a normal view of your song (now a shortened clip). Export the song by going to File > Export, which will save it as an audio AAC (.m4a) file. Once you save the file, change the extension from .m4a to .m4r (the 'r' is for ringtone) and then drag the file into your iTunes Library. This should place your newly created clip into the "Tones" category within iTunes, described in the above GarageBand section.
If you find your file in the Tones part of iTunes, you're pretty much set. Follow the same steps for transferring it to your iPhone and selecting the tone for one of your contacts. If your audio program of choice can't save the file as an .m4a, however, you'll have to convert it before you can change the extension. Some Ars staffers like to use ffmpeg to convert MP3 files to the proper format.
That's it! The process is pretty simple, even if you choose to use non-Apple software for the majority of the process. No longer will you have to fork over a dollar every time you want to change your tone. Though if your goal is to do as little work as humanly possible, that's always an option to fall back on.
reader comments
92