How to batch resize your image collection using Preview in macOS
 Malcolm Owen
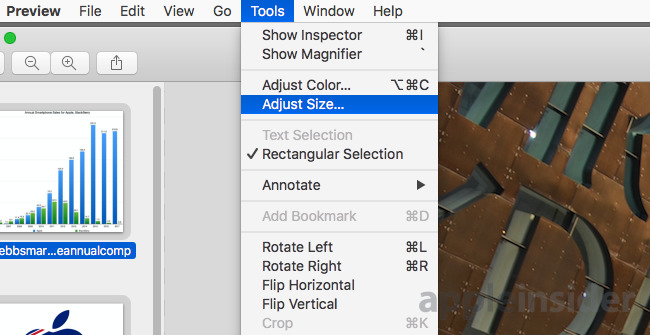
If you have a large collection of images that you need to resize, an easy way to change all of the files quickly is to use Preview, included within macOS, instead of using a dedicated utility or an image editing program's functions. AppleInsider walks through how to batch process the photographs and other graphics to fit a certain size.
Photographers and other people who spend time amassing large collections of images typically are not concerned about the dimensions of each file. For most purposes, having the file in as high a quality and resolution as possible is preferred, unless users have severe concerns about how much free storage they have available on their local drives.
There are, however, situations where it is a good idea to try to make changes to such collections. For example, if a number of photographs are being hosted on a website or emailed to someone, the file size could be an issue. Reducing the number of pixels and making all images a uniform size is also useful in some applications.
Some image editing suites offer batch processing functions, but it is also available from the macOS desktop, using the built-in Preview app's basic editing tools.
Opening All Images
To start the process, you need to open all of the images in a single Preview instance. The easiest way to do this, if all the image files are in the same folder, is to select all of them, right-click, select Open With then Preview.
This will open one Preview window with an extra column on the left-hand side, showing all of the images included in the folder. You can scroll up and down this column, clicking to view individual files in the main panel.
Confining the Image
Within Preview's menu bar, select Edit, then Select All, to highlight all of the image files in the app. You can also drag to highlight files using the mouse if you wish to change individual or smaller groups of files.
With all required images selected, click Tools then Adjust Size... in the menu bar. This will bring up a new window, which will ask to set various properties regarding size to the selecting images.
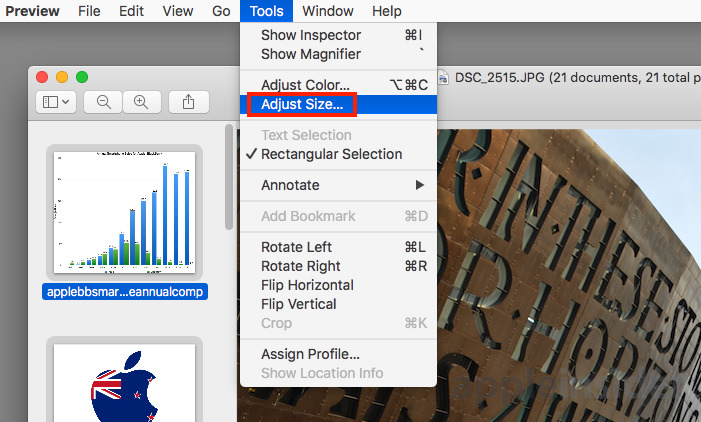
It is possible to select a dimension in the Fit Into dropdown box if you need to use a common size. On clicking OK, this will resize all of the images down or up so it can fit within the bounds of the selected resolution.
If you wish to change to a specific height or width, click in either box and type in the required measurement, while leaving the other box blank, then click OK. This will make all images have the same width or height, scaling the other dimension up or down to achieve the required measurement.
The Scale proportionally box should remain ticked, otherwise this could distort the images. It is also suggested to have Resample image ticked as well.
At the bottom of the window, the Resulting Size box will advise of what will happen to the images once OK is clicked, from a file size perspective. This could be handy to look at when selecting different resolutions, if the file size of the entire collection plays a factor in your choices.
Once changes have been made, save the files using the menu.
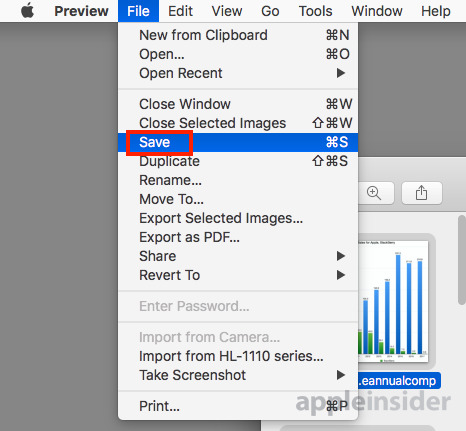
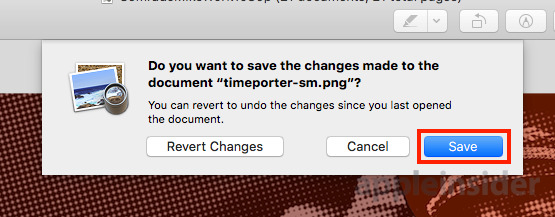
When quitting Preview, it will also bring up a confirmation box offering to revert an image back to its original state or to save it. Notably, this comes up for each and every image used in this way and cannot be skipped, so the quickest way through is to repeatedly tap enter on the keyboard to save each item.
Further Notes
The mass-editing works for a few other options in Preview, including rotating and flipping images. Not everything works in this way, such as annotations which are performed on a per-image basis.
As the final "revert changes" confirmation box appears for every image edited, this can be a nuisance for cases where extremely large image collections need editing. In such cases, it may be worth exploring using similar functions in image editing suites instead of using this technique.


 Wesley Hilliard
 Amber Neely

 William Gallagher