Lyn from Toronto asks about how to reduce the size of images selectively to avoid storing full-resolution photos when larger sizes are overkill. She notes, “My husband takes a ton of photographs, and coming off the camera and then downloaded into the Photos app, they are each about 4MB and take up a lot of friggin space.”
However, she doesn’t see any option to reduce resolution selectively within Photos or with other tools. She wonders, too, if there’s a way to carry out a batch operation to reduce the images’ sizes, or offload the full-resolution files outside of the Photos Library.
This is a really interesting request, and something that’s completely outside the scope of what Photos offers. While there are other photo-management tools out there like Adobe Lightroom (which also has full-featured photo-editing controls), none of them make that particularly easy, either.
I have a few ideas of how to proceed. The simplest one to me would be to use Photos to export lower-resolution images, delete the originals, and then re-import the downsamples ones. The process would look like this. Note Step 5, as I’ll come back to that in a moment.
- Import your photos as normal into Photos.
- Create an album that contains all the images you want to reduce in resolution.
- In the album, use Edit > Select All to choose all its images.
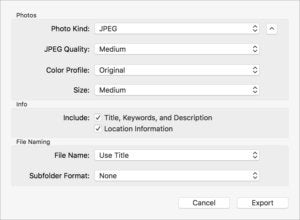
- Select File > Export > Export X Photos. If the full set of options isn’t showing, you’ll see a downward-pointing arrow at upper right. Click that.
- Choose Photo Kind (probably JPEG), JPEG Quality (probably High), and Size (probably Medium)—see below.
- Set Subfolder Format to None, because you’re just going to re-import these.
- Click Export and choose a folder into which to save these images.
- Now in the album, with all the images still selected, right-click any one of them and choose Delete X Photos.
- If you have iCloud Photo Library enabled, you’ll be prompted to confirm you want to delete the image off all devices. Confirm that.
- Now choose File > Import, and select the folder to which you exported the lower-resolution images and import them.
 IDG
IDG Export lets you downsample as well as reduce image quality.
As for options in Step 5, you will really want to test various options for several kinds of photos to see what your tolerable limits of lower resolution are. For some people, they’ll discover they don’t want a lower-fidelity (JPEG Quality) or lower-resolution (Size) as they thought. For others, medium quality and medium size could occupy 20 percent or less as much space as the original image and serve the same purpose.
A different option would be to import images using Image Capture, found in the Applications folder, into a folder on your Mac instead of into Photos. Then use any photo-editing software that supports batch image resizing, which includes the wonderfully featured and relatively affordable Graphics Converter 10 ($40) as well as Adobe Photoshop. Both programs can walk you through downsampling images in a folder. Then import the resulting smaller images into Photos.
Ask Mac 911
We’ve compiled a list of the questions we get asked most frequently along with answers and links to columns: read our super FAQ to see if your question is covered. If not, we’re always looking for new problems to solve! Email yours to mac911@macworld.com including screen captures as appropriate. Mac 911 can’t reply to—nor publish an answer to—every question, and we don’t provide direct troubleshooting advice.
Author: Glenn Fleishman, Senior Contributor

Glenn Fleishman’s most recent books include Take Control of iOS and iPadOS Privacy and Security, Take Control of Calendar and Reminders, and Take Control of Securing Your Mac. In his spare time, he writes about printing and type history. He’s a senior contributor to Macworld, where he writes Mac 911.